Game quest cemetery of redemption curse of the raven. Walkthrough of the game "Redemption Cemetery: Curse of the Raven." Download the game Redemption Cemetery. Curse of the Raven - full version
We go through the gates of the cemetery.
We take the iron rod on the grave on the left (it goes into inventory).
Let's scare away the crow from the gravestone on the right and take a closer look at it.
Use a metal rod from the inventory to move the stove away.
We take half of the tablet.
At the fork we turn right.
We drive away the raven and examine the photograph on the grave.
We brush away a piece of paper from the photo in which there is a little girl.
Let's look at the grave nearby.
There is no tombstone.
We insert half of the sign here.
We read the newspaper.
The girl was burned in a fire! Go ahead.
We see a guardhouse.
Let's go inside.
Let's find all the items from the list.
We received the second half of the sign.
We return to the graves.
The spirit of a man appears and begs you to save his daughter.
A portal appeared.
Let's jump into it.
Chapter 1.
We were transported in time and space to the very beginning of the fire, at the moment when the child was still alive.
The house is burning in front of us.
Click on the girl in the window on the second floor.
She screams like a beluga.
Take the newspaper from the mailbox (into inventory).
We shoo a magpie from a tree.
We take part of the lighter from the nest (into inventory).
In the grass next to the house we take the awl (into inventory).
We approach the door.
To the left of it we take a bottle of cleaner G (into inventory).
We put the newspaper under the door and push it forward.
Using an awl, we pick out the key stuck in the keyhole on the other side of the door.
The key falls on the newspaper. We take out the newspaper.
Use the key to open the door.
Hallway.
The room is very smoky.
We take the owl figurine H from the shelf next to the door and break the window with it.
The smoke gradually dissipates through the hole.
We take the brush K on the table near the portrait of the girl, and from the first aid kit (on the chair) we take the bandage M.
We zoom in on book L, in which we see a piece of paper with the numbers 6385.
Open the top shelf in the closet and grab the J flashlight.
On the hood, remove the ventilation grille H, shine a flashlight into the hole and take out the fuse from there.
We are trying to enter the door directly. Crap! The door handle is hot.
We examine the window and take away hammer I.
Use a hammer to knock out the support from under barrel O.
The barrel rolls up to the entrance to the basement.
We hammer on the barrel from above with a hammer.
The barrel breaks, water spills out and puts out the fire in the basement.
We go down to the basement.
Basement.
We approach the fuse panel on the right.
We insert the found fuse into the shield.
Mini-game. We arrange the fuses so that the sum in each row and column is 15.
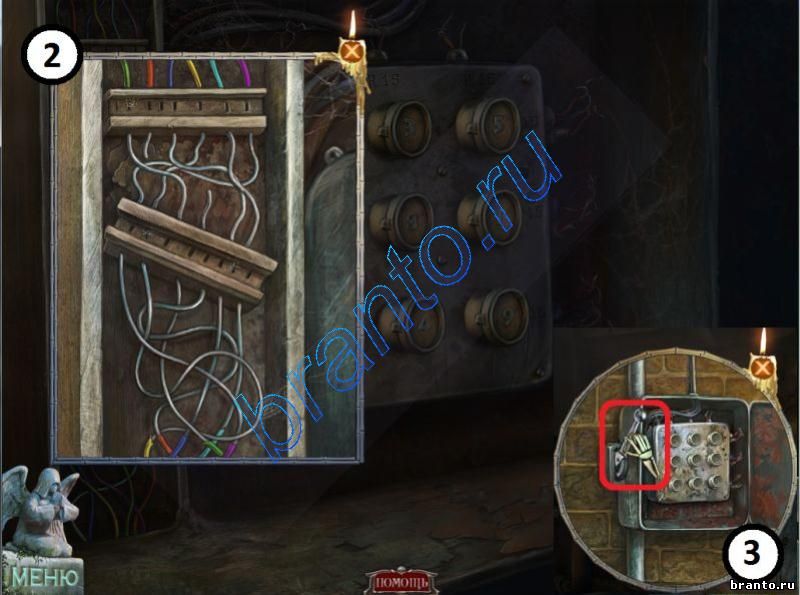
Click on the broken wires in the upper left corner of the panel.
Based on color, we connect the wires.
We press the lever.
The electricity is off. Let's go to the closet.
We collect items from the list. An ax goes into inventory.
On the left under the table we find a dirty metal box with a combination lock S.
Spray the glass with cleaner and scrub it with a brush. We put code 6385 on the box.
We take gloves T from the box.
Take scissors R on the table.
We go out into the hallway.
First floor corridor.
We put on gloves and open the first inner door W.
The girl's father is lying on the floor.
We take the key from his palm.
We are trying to go further along the corridor, but the collapsed ceiling and fire block our path.
We enter the room to the right of dad.
It's like a closet where all sorts of junk is stored.
Pantry.
In the closet we take the handle from the vice Y, and in the top drawer of the bedside table we take glue Z.
There is also something on the shelf on the left, but I can’t reach it.
Using an ax, we cut a hole in the wall on the left (in the place where there is no wallpaper).
Let's rush there.
Living room.
Take tongs A from the stand near the fireplace.
We move into the hallway.
Hallway.
We take up the broken stool.
Place a bandage, scissors and glue next to it.
Using scissors, cut off a piece of bandage and the cap of the glue.
We spread glue on all the wooden parts of the stool, assemble them together and wrap the leg with a bandage.
We take a stool with us.
1st floor corridor.
We turn left from the man.
Kitchen.
Click on the glowing area, zooming in on the kitchen furniture.
We are looking for items from the list. We get a knife.
Let's go to the pantry.
Pantry.
We substitute a stool and take out a ballerina figurine from the top shelf.
Let's go to the living room.
Living room.
In the living room, we cut off a piece of carpet C with a knife and take it to the basement.
Basement.
Throw the carpet into the puddle of water on the floor E.
The wet carpet is returned to inventory.
Insert the handle into vice D.
Turn the handle, releasing the screwdriver (into inventory).
1st floor corridor.
In the corridor of the 1st floor, we throw a wet blanket on top of the blazing fire and go up to the second floor.
Second floor corridor.
We select mop G from the floor.
We examine the table near the left wall.
There is a clock F on it.
Remember the time on the clock: 10.05
On the right wall, opposite the table, there is some kind of mechanism.
Most likely, it is needed to lower the stairs to the attic.
We enter the room on the right.
Bathroom.
Open the cabinet above the sink and take wire cutters I.
We approach the bathroom.
Take the weight from watch J.
Water is pouring, but there is no container to collect water.
Under the carpet we will find screw H.
We go out into the corridor and go into the second room on the left.
Bedroom.
In the bedside table we take the ruler L, on the bed under the blanket we take the winch handle K.
We return to the basement.
Basement.
Click on the sparkling cabinet to search for items from the list.
A wrench went into inventory.
There is a pry bar on top of the window.
We take out the mount using a mop.
We return to the kitchen.
Kitchen.
Use a pry bar to open the hood.
Inside, use a knife to cut the tape holding part of the lighter.
Click on the sparkling area to search for items from the list.
We find the oil can (in inventory).
We stomp into the living room.
Living room.
We assemble a lighter on the windowsill and fill it with gasoline (or gas) from a can.
Let's go to the bedroom.
Bedroom.
We use a lighter to warm up the ballerina who is frozen to the chest of drawers and take her with us.
2nd floor corridor.
In the corridor of the 2nd floor we unwind the winch trigger mechanism. But there are not enough gears.
Let's go back to the living room.
Living room.
We insert a couple of ballerinas into the music box.
The lid of the box opened.
Mini-game. Arrange the pebbles according to color.
Having completed the puzzle, insert the key into the box.
The ballerinas start dancing, the side panel tilts to the side.
We unscrew the three gears with a screwdriver and with such happiness we run into the second floor corridor.
2nd floor corridor.
We insert the gears and handle into the winch mechanism.
Lubricate the mechanism with oil from an oil can and turn the winch handle.
The stairs go down and we go to the attic.
Attic
Click on the sparkling area to search for items from the list.
We take the pulley.
We approach the grandfather clock Q, hang the weight and set the time to 10.05 (as on the clock in the corridor).
The door opened.
Let's take the plate.
We rip open the bag on column R with a knife and take another part of the plate.
We hang the pulley to the hoist.
We go down to the bedroom.
Bedroom.
We insert two plates into the lock of the chest by the window.
Mini-game. We put together a mosaic by swapping the plates. As a result, we get an image of the ship.
The lock unlocked.
Take the T key from the chest.
This key opens the first room on the left on the 2nd floor.
Library.
Click on the glowing area to search for items from the list.
Take electrical tape.
On the windowsill, we cut off the wire from the electric razor using V cutters.
In the closet on the left, unscrew the door U with a screwdriver.
Let's go to the basement.
Basement.
We connect the wire and wrap it with electrical tape W.
Let's go to the kitchen.
Kitchen.
We approach the sink and remove valve Y with a screwdriver.
We go to the bedroom at the end of the corridor.
Bedroom.
On the window, insert a screw into the latch and tighten it with a Z screwdriver.
We open the window and look outside.
We place the door from cabinet A and, using this improvised bridge, take key B.
Using a ruler, we move the bolt on the shutters of the window next to the bedroom and find ourselves in the room with the girl.
The room is on fire.
Use tongs to take hook C.
Let's go to the library.
Library.
We take the fuse.
Open the bookcase with the key.
We rearrange the books on another shelf to get to the instructions for assembling the winch motor.
We rush to the attic with the trophy.
Attic.
We assemble the engine using instructions and a screenshot.
We insert the wire into the socket and wrap the connected wire with electrical tape.
We put a hook on the winch.
Click on the glowing area in the corner to search for items from the list.
We take the drive belt from the engine into inventory.
We put the belt on the engine.
We insert the fuse into the engine control panel on the pole and press the bottom button.
The load lifted, and we received a gaff for inventory.
Remove the drive belt from the engine.
Let's go to the basement.
Basement.
We put a belt on the shaft of the elevator mechanism.
Let's go to the kitchen.
Kitchen.
Press the elevator button K.
The bucket went down.
Let's go back to the basement for the bucket.
Let's go to the bathroom.
We screw on the valve and draw water into bucket M.
Back to the basement.
Basement.
We pour from the bucket onto the ladder and pull it out with the hook N.
We go outside.
We place the ladder under the window with the girl. She is saved.
We return to the cemetery.
The ghost thanks him for saving his daughter.
The girl’s grave disappears, and in its place we select a clean gravestone.
Let's go to the guardhouse.
Let's go inside.
Click on the glowing area to search for items from the list.
We get a hammer and chisel.
We return to the place where the game began.
At the fork we turn left.
We place the slab on the unmarked grave, and with a hammer and chisel we knock out the name Catherine Steward on it.
The ghost of a woman begs us to help her find her killer.
A portal opens.
We jump into the portal.
Chapter 2.
We find ourselves in front of the mansion where Katerina once lived.
We go to the gardener's house past the mansion.
The gate to the backyard and the house door are locked.
Take hand rake B from the garden cart.
On the path we take ladder C.
We place it at the gardener's house, from the roof of which we take wire D.
We take the stairs into inventory and head towards the main entrance to the mansion.
Main entrance.
We attach the ladder to the street lamp and take valve F from there.
Remove the grate near the fountain.
We lean over the hatch.
It's full of foliage. We rake the leaves.
We insert it into the sewer pipe and then turn valve G.
All the water pours out of the fountain.
Click on the empty fountain to search for items from the list.
We get the key.
Let's go to the mansion.
Main entrance.
We open the door with the key.
Let's go inside.
Hall.
In the middle of the hall there is a coffin with Catherine's corpse.
We approach the coffin.
There's something wrong with the deceased's hands.
We go up the stairs.
In the niche at the feet of the statue we take the ring.
We go down and go left to the dining room.
Dining room.
On the table with wheels we take knife H.
We take banquette I near the large table.
Let's look at the table itself, where we liked a piece of sausage under a silver lid J.
We steal candle K from the candlestick.
Let's zoom in on the chest of drawers.
For some reason they nailed up the chest of drawers.
We move into the room to the right of the chest of drawers.
Kitchen.
We take a piece of cheese L from the table, put our sausage on the cutting board and cut off a piece M.
Click on the glowing area on the right and search for hidden objects.
We got a corkscrew.
Click on the wood and take the hacksaw N.
We go out into the hall.
Hall.
We go up the stairs and go straight along the corridor.
2nd floor corridor.
We place the bench against the closet and remove the curtain tassels O from above.
We enter the first room on the right. This is the bedroom of the deceased mistress.
Bedroom.
We tie the curtains with tassels.
On the dressing table on the right we see a box.
Let's open it using the ring.
In it we take tweezers R.
On the chest of drawers next to the photo of Katerina’s son we take the envelope Q.
Take feather P on the bedside table.
We leave the room.
2nd floor corridor.
On the door opposite there is a lock with a secret, but there is not enough ball to open it.
The far door on the right is locked.
Let's point our feet outside.
Main entrance.
There is a shovel on the parapet of the stairs.
We shorten the shovel with a saw.
We attach a candle to the cutting and connect them with wire.
Take the candle on a stick into your inventory.
Click on the sparkling fountain to search for hidden objects.
There are wire cutters.
We return to the dining room.
Dining room.
We approach the boarded up chest of drawers and use wire cutters to pull out the nails S.
In the drawer we take a pen and an oven mitt.
In the kitchen, use an oven mitt to open the door of the stove T and light a candle on a stick.
We go out into the hall.
We go up the stairs to the second floor, but now turn left.
Library.
There is a gas lighting switch on the wall to the left.
We insert the handle into it and turn it U.
The chandelier came on.
As always, there are a lot of incomprehensible objects: on the table there is a stack of papers, in the fireplace there are burnt letters.
We approach the portrait on the wall next to the bear.
We take away the diagram with the image of the ship W sticking out from behind the picture.
We approach a shelf with books, near which there is a mobile ladder, but now something is preventing the movement.
We take out pin X from under the wheels with tweezers.
Click on aquarium V.
There is a piranha swimming there.
We distract it with a piece of sausage and (while the fish is eating) we take out a figurine of a sailor from the aquarium.
We move the stairs.
There is a bottle with a Y boat on the shelf.
Use a corkscrew to remove the cork from the bottle.
Using tweezers we push the sailor onto the boat in accordance with the diagram.
We found a ball.
We pass along the corridor to the doors with a puzzle lock.
We insert the found ball into the lock.
Puzzle. Place the balls as shown in the picture on the right.
The lock opened.
We enter the room.
The room of the owner's son.
Click on the glowing area to search for items from the list.
We find a cage.
We take jar C from the bedside table.
In one of the small drawers of the bookcase, take thread G and label F.
On the floor there are instructions for catching mice D, let's read it a little.
We go to Katherine's bedroom.
Katherine's bedroom.
There are a couple of H medicine bottles on the bedside table.
Glue a label on one of them.
This is a sleeping pill.
Let's go to the kitchen.
Kitchen.
Click on the glowing area to search for hidden objects from the list.
The nutcracker goes into inventory.
On the right, behind the bedside table in front of the mouse hole, we build a mousetrap from a cage, thread, a piece of cheese and a pin.
The mouse crawled out to eat the cheese.
We catch the mouse N.
The cell with the loot goes into inventory.
Cut off the sausage with a knife and mix sleeping pills I into the sausage (into inventory).
The room of the owner's son.
There is a puzzle on the table in my son's room.
Let's throw a mouse into it.
The goal of the game is to guide the mouse to a piece of cheese by rearranging the glass tubes.
A panel comes out with key P on it.
Click on the glowing area to search for items from the list.
We received a figurine of a sailor.
Let's go to the library.
Library.
We insert the second sailor figurine into the glass bottle with the boat.
The numbers 41 72 appeared on the sail.
We go to the gardener's house.
Gardener's house.
We open the door with the key.
We go inside the house.
Click on the glowing area to search for items from the list.
A sponge goes into inventory.
We take the rake R near the bed, and the tags Q in the chest.
There are cages with poisonous snakes on the table.
We return to the mansion.
Hall.
We approach the coffin.
We rub the deceased woman's hand with a sponge.
Under the layer of makeup, a snake bite became visible.
Let's go to the gardener's house.
Gardener's house.
Click on the glowing area to search for items from the list.
The bolt cutter goes into inventory.
We head to the table in the right corner.
You need to place tags with the names of the snakes on the cages. It is not yet clear how to do this.
We go out onto the street and turn right.
We cut the wire with a bolt cutter and enter the gate leading to the backyard.
Backyard.
We see a shepherd in a doghouse.
We give the dog a piece of sausage with the sleeping pill T.
She goes into nirvana, remove the key U from the collar.
We use a rake to clear away the pile of leaves against the wall.
We get a book about snakes and the Dreamcatcher W amulet.
We go into the gardener's house.
Gardener's house.
We open the book.
We look at the pictures and stick tags with the names of the snakes on the cells.
We push the green snake into the jar and go to the mansion.
2nd floor corridor.
In the second floor corridor we approach the second door on the right.
We insert the key into the lock and open the door of the room.
Husband's bedroom.
We take hourglass G from the coffee table, and inkwell I from the large table by the window.
We approach the safe built into the wall J.
Dial code 4172 (remember the boat from the bottle).
The safe is open, but there is another lock inside - a puzzle.
The hole in the safe opens into Catherine's room.
Now it is clear how the snake bit the owner of the mansion.
The creators of the game clearly stole the idea and the old Conan Doyle.
We put a snake from a jar in the safe.
Kathleen's bedroom.
There is some kind of string K hanging under the picture above the bed.
We tie the Dream Catcher to it.
Let's pull on it.
A snake slides down the cord onto the bed and hides under the pillow.
We put our hand under the pillow (we are not afraid of anything) and find the M key.
We open the dressing table drawer with the key and find a sheet of paper N.
Let's go to the library.
Library.
We put the piece of paper in a stack of papers on the table.
Place the following items from your inventory nearby: an hourglass, a feather, an inkwell, an envelope and a nut cracker.
Let's restore Kathleen's will using the items on the table.
Break the hourglass with a nutcracker and pour sand onto the paper.
We place the pen on the paper on which the letters appear.
Click on the inkwell and again on the paper.
We put the letter in the envelope.
A sealed envelope with a will goes into inventory.
We go outside to the mailbox and mail the will.
Hubby gets arrested.
We return to the cemetery.
We find ourselves at Katherine's grave.
Her spirit thanks him for taking care of her son and offers help on how to get out of here.

Click on the scarecrow next to the grave.
Take key B from the scarecrow's eye.
Let's go to the barn.
Behind the house, use the key to open storage room C and take shovel D.
We return to Katherine's grave and turn left.
Here we see another grave with a crypt.

We dig a hole with a shovel to the right of the grave and find a slab.
We put it on the grave.
The spirit of Marie Madison appears and tells us about her problems.
They say that she was a doctor and during the epidemic (when she was traveling with the vaccine to save people) she was killed and the vaccine was stolen.
He asks to find a cure and save people. We dive into the portal.
Chapter 3.

Stagecoach.
In the foreground is a stagecoach and two people lying next to it.
The woman is killed, the man is unconscious.
Inside the stagecoach we take flint E.
On the hill we see a castle.
Let's go there.
At the castle walls.
Click on the glowing area near the wall, zoom in on the image and begin searching for objects.
An ax goes into inventory.
Find shovel F.
We return to the stagecoach.
Stagecoach.

We dig out disk G with a shovel.
Using an ax we cut down a branch from tree H and cut off the branches from the branch.
A stick goes into inventory.
Use a stick to lift the back wheel of the stagecoach and pull out the whip J.
Let's go back to the castle.
At the castle walls.
In the same place we search for items from the list.
The chain is in inventory.

Use a whip to pull out the rope ladder and crawl inside.
Bridge control room.
Remove the halberd on the right from wall L.
There is a bucket hanging from the ceiling, which we tighten with the halberd M.
Use a bucket to scoop out the water from the barrel, at the bottom of which we take disk N.
We go to the three columns in the center.
Place the disks from the inventory on the left column.

Puzzle. You need to drag all the disks from the left column to the right.
The right column lowers and releases the bridge extension lever.
Turn the lever O.
The suspension bridge is lowered.
Now you can safely enter the castle through the gate.
Castle courtyard.

We hook the chain to the well, and place a bucket on the chain.
Click on the bucket - it falls into the well.
We take out a bucket of water.
Inside the bucket is the key to the prison cell.
We go through the basement door to the right.
Torture chamber.

In the inventory there is a cannon wheel.
Take the gem P from the skeleton's eye socket.
We open the prison cell with the Q key.
Take gunpowder R.
We go out into the yard.
We go right around the corner of the house.
Forge.
Take the hammer T on the anvil and one of the swords S.
Back to the yard.
Let's go left behind the building to the cannon.
We insert a wheel into it, add gunpowder, but there is no cannonball.
We return to the yard.
We return to the prison cell.
Torture chamber.

We rip up the mattress and get a U hacksaw.
Click on the glowing area to search for items from the list.
We find ticks.

We go to the house on the left and cut down the door with an ax V, and use a hacksaw to saw through the internal bolt.
Werewolf's Hideout.
Inside we take the cannonball W and lock the werewolf behind bars.
We return to the bridge control room.
On the window on the left, we remove the nail from the frame using V pliers.
We run to the gun.

We put the cannonball in the barrel.
Light the wick with flint.
The cannon fires (for some reason it blows out the door in the tower).
Let's go there to see what we've done.
Let's go inside.
Armory.
The cannonball got stuck in the wall opposite the door.
Click on the glowing area to search for items from the list.
The ring from the hatch goes into inventory.

We approach the hatch, insert ring 5.
We open the hatch and go down into the basement.
Basement.
In the chest we take the mold for casting 7, remove the bayonet 6 from the rifle.
We insert a stick into the upper part of the pick and for strength, hammer a nail 8 into it.
A whole pickaxe goes into inventory.
Let's go upstairs.
Armory.

Click on the glowing area to search for items from the list.
There is a coin in the inventory.
We approach the wall and hit it with pickaxe 9.
Cannonball in inventory.
Let's go into the yard.
Yard
Using a pickaxe, open the grate next to the well and take out coat of arms 10.
We go straight to the main tower.

There is a puzzle lock on the door.
We insert the coat of arms into the castle and assemble the mosaic according to the model on the right.
Let's go inside.
Main tower.

There is a book C on the table.
We read in it that a werewolf can only be killed with a silver bullet.
The book is in inventory.
We approach the knight in armor D.
We give him the sword.
In return we get a piece of the puzzle.
Let's go to the fireplace and take firewood B.
Let's go up the spiral staircase to the second floor.
Click on the glowing area to search for items from the list.
Another gold coin.

We approach the shelves on the left and put the book in place.
We get a piece of the puzzle.
We return to the first floor.
We approach the puzzle on the left F.

We insert the missing parts and look for identical pairs.
We receive a coin for winning.

We approach the table and insert three coins into the holes.
Glowing area by the sofa.
Click on the glowing area to search for items from the list.
We go to the eagle statue.

We insert stones instead of eyes for the eagle.
He gives us instructions for casting a silver bullet.
We return to the stagecoach.
Stagecoach.
We pick the chest lock.
To do this, insert a bayonet into the keyhole and hit the bayonet with a hammer.
From the chest we take a needle and thread and a wallet.
We go to the castle to the forge.
Forge.

We put firewood in the firebox, light the fire with flint, sew up the furs with thread and fan the fire.
We insert the mold into the block, pour silver into the ladle and move it into the fire.
We got a silver bullet.
We go to the main tower on the second floor.

We approach the table and put the silver bullet on the table.
We put the gun on the support.
We insert the barrel into which we pour gunpowder and a bullet.
We tamp it all down with a cleaning rod.
We take the pistol and go to the werewolf's hideout.

We shoot at him (the book didn’t lie - the monster got a skiff) and put the cannonball in the cup.
The grate rose.
From the first aid kit we take the vaccine and smelling salts.
Let's go to the stagecoach.
Stagecoach.
We put the vaccine in the man’s hand and let him smell the salt.
We return to the cemetery.
The doctor thanks us.

At the foot of the monument there is a suitcase, from it we will get a figurine of a raven 4.
We go to the cemetery gates.
On the right is the crypt.
We insert figurine 5 into the niche and go inside.
We open the coffin.
Near the skeleton we take the key to gate 6.
We insert the key into lock 7 and break out of the cemetery.
/ / Full version!
Game “Redemption Cemetery. Curse of the Raven" is a collector's edition from Alawar. Before downloading the game to your computer, we suggest you get a key for free registration in the game without sending an SMS. Torrent - 329 mb.
This mystical game is about a parallel world of the dead, in which you are assigned an important mission to the cemetery. And it all starts with the fact that your car is broken down and there seems to be nowhere to come for help. Take with you everything you might need and go on an afterlife journey through parallel worlds. Well, are you ready? Now look around and boldly enter the territory of the kingdom of the dead!
What is this? Did the gate slam shut? This means that your fate in this mini-game is doomed, now you have to figure everything out in order to get out of this evil place. Start by examining the final resting places of deceased people, especially paying attention to the signs on the crosses. Some of them have different photographs, which is what you will need. What now? They probably want to talk to you now...
Some ghosts, although good-natured, are still from the other world, and each of them has their own unwholesome task, because of which they cannot leave the world of the living. Help the ghosts in the cemetery find redemption, and then the ghosts will help you too. Search for objects, solve puzzles, play mini-games and help lost souls lift the raven's curse and find peace. The main thing is not to worry and you will definitely succeed!
For anyone who has encountered difficulties in completing the game "Redemption Cemetery: Curse of the Raven" I suggest you read this article.
journal-world.ucoz.ru
In the dead of night, driving past a cemetery, you get into a car accident. Sotka is not plowed, not a soul is around. What would any sane person do in such a situation? Well, of course, he goes to meet the dead.
We go through the gates of the cemetery. Click on the grave on the left and take the iron rod (goes into inventory). Let's remove the crow from the gravestone and take a closer look at it. You need to lift the slab. Take the metal rod from the inventory and move the slab away. Let's raise half of the sign. At the fork we turn right. Let's drive away the raven and examine the photograph on the grave. Let's wipe away the leaf from the photo in which there is a little girl. Let's examine the grave nearby. There is no tombstone. Who is buried? H.Z. You can insert half of the sign here.
Let's read the newspaper. The girl was burned in a fire! Go ahead.
We see a guardhouse. Let's go inside. Let's find all the items from the list. We received the second half of the sign. We return to the graves. The spirit of a man appears and begs you to save his daughter. There is nothing for him here anymore. But the daughter must live! A portal appeared. Let's jump into it.
Episode 1.
We were transported in time and space to the very beginning of the fire, at the moment when the child was still alive. The house is burning in front of us. Click on the girl in the window on the second floor. She calls for help. Take the newspaper from the mailbox (into inventory). We drive a magpie out of a tree. We take part of the lighter from the nest (into inventory). In the grass next to the house we take the awl (into inventory).

We approach the door. To the left of it we take a bottle of cleaner (into inventory). We put the newspaper under the door and push it forward. Using an awl, we pick out the key stuck in the keyhole on the other side of the door. The key falls on the newspaper. We take out the newspaper. Use the key to open the door.
Hallway.
Hard to see. The room is very smoky. Take the owl figurine 1 from the shelf next to the door and break the window with it. The smoke gradually dissipates through the hole. We take brush 4 on the table near the portrait of the girl, and from the first aid kit (on the chair) we take out bandage 6. Let's zoom in on book 5, in which we see a piece of paper with the numbers 6385. Open the top shelf in the closet and grab a flashlight 3. On the hood, remove the ventilation grille 7, shine the light into the hole with a flashlight and take out the fuse from there. We are trying to enter the door directly. Crap! The door handle is hot. We inspect the window and take away hammer 2. Use a hammer to knock out the support from under barrel 8.
She rolls up to the basement. We hammer on the barrel from above with a hammer. The barrel breaks, water spills out and puts out the fire in the basement. We go down to the basement.
Basement.
On the right is the fuse panel. Let's bring it closer. One fuse is missing. Place the found fuse in the shield. Puzzle. Arrange the fuses so that the total in each row and column is 15.

The fuses have been replaced. Click on the broken wires in the upper left corner of the panel. Based on color, let's connect the wires. Let's press the lever.
The electricity is off. Let's go to the closet. We collect items from the list. An ax goes into inventory. On the left, under the table, we find a dirty metal box with a combination lock. Spray the glass with cleaner and scrub it with a brush. We put code 6385 in the box.
We take the gloves from him. We go out into the hallway. Let's put on gloves and open the first inner door.
First floor corridor.
The girl's dad is lying on the floor. We won't be able to help him anymore. We take the key from his palm. We are trying to go further along the corridor, but the collapsed ceiling and fire block our path. We enter the room to the right of dad. It looks like a storage room where all sorts of rubbish is stored (so I could live like that - a storage room about twenty meters long).
Pantry. In the closet we take the handle from the vice, and in the top drawer of the nightstand there is glue. There is also something on the shelf on the left, but apparently we didn’t eat much porridge as a child. Can't get it. Using an ax, we cut a hole in the wall on the left (in the place where there is no wallpaper).

Let's rush there.
Living room.
Take the tongs from the stand near the fireplace. We return to the basement.
Basement.
We take the scissors on the table and insert the handle into the vice. We turn the handle, releasing the screwdriver (into inventory). Let's move to hallway. We take up the broken stool. Place a bandage, scissors and glue next to it. Using scissors, cut off a piece of bandage and the cap of the glue. We spread glue on all the wooden parts of the stool, assemble them together and wrap the leg with a bandage.

We take a stool with us.
1st floor corridor.
Let's turn left from the man. Kitchen. Click on the glowing area, zooming in on the kitchen furniture. We are looking for items from the list. We receive a knife from generosity. We go to the sink and remove the valve with a screwdriver. Let's go to pantry. We substitute a stool and take out a ballerina figurine from the top shelf. IN living room We cut off a piece of carpet with a knife and take it to basement. We throw the carpet into a puddle of water on the floor. The wet carpet is returned to inventory. IN corridor 1st floor throw the wet blanket on top of the blazing fire (we learned the profession of a firefighter along the way)
and go up to the second floor.
Second floor corridor.
We pick up a mop from the floor. We examine the table near the left wall. There is a clock on it. Let's remember the time on the clock: 10.05 On the right wall, opposite the table, there is some kind of mechanism. Most likely, it is needed to lower the stairs to the attic. We enter the room on the right. Bathroom. Open the cabinet above the sink and take the wire cutters. We approach the bathroom. We take the weight from the clock and screw on the handle from the faucet. Water is pouring, but there is no container to collect water. We'll find a screw under the carpet.
Let's go out into the corridor and go into the second room on the left. Bedroom. We take a ruler in the bedside table, and a winch handle on the bed under the blanket. On the window, insert a screw into the latch and tighten it with a screwdriver. We open the window and look outside. We scare the crow, it flies away, throwing the key, but it is far away. There’s no way to get it (children - eat the carrots).
We return to the basement. The closet sparkled. Let's zoom in on this part of the basement and start searching for items from the list. A wrench went into inventory. There is a pry bar on top of the window. Let's get it out with a mop. Let's go back to kitchen. Use a pry bar to open the hood. Inside, use a knife to cut the tape holding part of the lighter. Click on the sparkling area. We are looking for items from the list. We find the oil can (in inventory). Telephone to living room. We assemble a lighter on the windowsill and fill it with gasoline (or gas) from a can.
Let's go to bedroom. We use a lighter to warm up the ballerina who is frozen to the chest of drawers and take her with us.
In the corridor of 2 floors unwind the winch trigger mechanism. But here it’s a complete bummer - there are no gears. Let's go back to living room. We insert a couple of ballerinas into the music box. The lid opened. Puzzle. Arrange the pebbles according to color.
Having completed the puzzle, insert the key into the box. The ballerinas start dancing, the side panel tilts to the side. We unscrew the three gears with a screwdriver and run with such happiness to the second floor corridor. We insert the gears and handle into the winch mechanism. Lubricate the mechanism with oil from an oil can and turn the winch. The stairs go down and we go to the attic.
Attic
Glowing area. We are looking for items from the list. We take the pulley. We approach the grandfather clock, hang the weight and set the time to 10.05 (as on the clock in the corridor). The door opened. Let's take the plate. We rip open the bag on the column with a knife and take another part of the plate. Let's hang the pulley to the hoist.

Let's go down to bedroom. We insert two plates into the lock of the chest by the window. Puzzle. You need to assemble a mosaic by swapping the plates. As a result, we get an image of the ship.

The lock unlocked. Take the key from the chest. They open the first room on the left on the 2nd floor.
Library.
Click on the glowing area and begin searching for items from the list. Take electrical tape. On the windowsill, we cut off the wire from the electric razor with wire cutters. In the closet on the left, unscrew the door with a screwdriver. Let's go to bedroom. We look out the window, place the door from the closet and, using this improvised bridge, take the key. Using a ruler, we move the bolt on the shutters of the window next to the bedroom and find ourselves in the room with the girl. The room is on fire. We take the hook with tongs.

Let's go to library. Click on the glowing area and search for items from the list. We take the fuse. Open the bookcase with the key. We rearrange the books on another shelf to get to the instructions for assembling the winch motor.

We rush with the trophy attic. We assemble the engine using instructions and a screenshot.

Attic.
We insert the wire into the socket and wrap the connected wire with electrical tape. We put a hook on the winch. There is a glowing area in the corner on the right. Search for items from the list. We take the drive belt from the engine into inventory. We put the belt on the engine. Insert the fuse into the engine control panel on the pole and press the bottom button. The load lifted, and we received a gaff for inventory. Remove the drive belt from the engine. Let's go to the basement.
Basement.
We connect the wire and wrap it with electrical tape. We put a belt on the shaft of the elevator mechanism.
Let's go to kitchen. Press the elevator button. The bucket went down. Let's go back to the basement for the bucket. Let's go to bathroom, we collect water in a bucket. Back in basement. We pour it from the bucket onto the ladder and pull it out with a hook. We go outside. We place the ladder under the window with the girl. She is saved.
We return to the cemetery. The ghost thanks us for saving his daughter. The girl’s grave disappears, and in its place we pick up a clean gravestone.

Let's go to the guardhouse. Let's go inside. Click on the glowing area. Search for items from the list. We get a hammer and chisel. Let's return to the place where the game began. At the fork we turn left. We place the slab on the unmarked grave, and with a hammer and chisel we knock out the name Catherine Steward on it. The ghost of a woman begs us to help her find her killer. A portal has opened. We're kind today. We need to hurry. We jump into the portal.
Episode 2.
We find ourselves in front of the mansion where Katerina once lived. We are trying to take something here, but nothing works. We'd better go somewhere else. We go to the gardener's house past the mansion. The gate to the backyard and the house door are locked. We take a hand rake in the garden cart. On the path we take the stairs. We attach it to the gardener’s house, from the roof of which we privatize the wire.
Take the stairs to the inventory and head to the main entrance to the mansion.
Main entrance.
Let's put the ladder next to the street lamp and take the valve from there. We remove the grate near the fountain. We lean over the hatch. It's full of foliage. We rake the leaves. In front of us is a sewer pipe, into which we insert it, and then turn the valve.

All the water flows out of the fountain. Click on the empty fountain and start searching for items from the list. We get the key. We go to the mansion, open the door with the key. Let's go inside.
Hall.
Fun business. Looks like they're celebrating Halloween here. In the middle of the hall there is a coffin with Catherine's corpse. Let's come up and see how she's lying there. Not bad, but something is wrong with the hands. We go left to the dining room.
Dining room.
Take a knife on the table with wheels. We take a banquette near the large table. Let's take a look at the table itself, where we liked a piece of sausage under a silver lid. We steal the candle from the candlestick.

Let's take a look at the chest of drawers. As the postman Pechkin used to say, “They would have gone for mushrooms with a suitcase.” The people in this mansion are definitely not all at home. For some reason they nailed up the chest of drawers. We move into the room to the right of the chest of drawers.
Kitchen.
We take a piece of cheese from the table, put our sausage on the cutting board and cut off a piece. Click on the glowing area on the right and search for hidden objects. We got a corkscrew. Click on the wood and take the hacksaw. We go out into the hall. We go up the stairs. in the niche at the feet of the statue we take the ring and go straight along the corridor. We place the bench next to the closet and remove the curtain tassels from above.

We enter the first room on the right. This is the bedroom of the deceased mistress.
Bedroom.
It’s a little dark, so that it becomes light we tie the curtains with tassels. On the dressing table on the right we see a box. Let's open it using the ring. We take tweezers in it. On the chest of drawers next to the photo of Katerina’s son we take the envelope. Let's grab a pen on the bedside table. Let's leave the room. On the door opposite there is a lock with a secret, but there is not enough ball to open it. The far door on the right is locked. Let's point our feet outside.
Main entrance.
There is a shovel on the parapet of the stairs. Let's shorten it with a saw. We attach a candle to the cutting and connect them with wire. Take the candle on a stick into your inventory.

The fountain glows. Let's start searching for hidden objects. There are wire cutters. We return to dining room. We approach the boarded-up chest of drawers and use wire cutters to pull out the nails. In the drawer we take a pen and an oven mitt. In the kitchen Use an oven mitt to open the stove door and light a candle on a stick. We go out into the hall. We go up the stairs to the second floor, but now we turn left.
Library.
There is a gas lighting switch on the wall to the left. We insert the handle into it and turn it. The chandelier came on. As always, there are a lot of incomprehensible objects: on the table there is a stack of papers, in the fireplace there are burnt letters. Let's go to the portrait on the wall next to the bear. We take away the diagram with the image of a ship sticking out from behind the picture. We approach a shelf with books, near which there is a mobile ladder, but now something is hindering the movement. We take out a pin from under the wheels with tweezers. Let's click on the aquarium. There is a piranha swimming there. Let's distract it with a piece of sausage and (while the fish is eating) take the sailor figurine out of the aquarium.

Let's move the stairs. There is a bottle with a boat on the shelf. Use a corkscrew to remove the cork from the bottle. Using tweezers we push the sailor onto the boat in accordance with the diagram. We found a ball.
We pass along the corridor to the doors with a puzzle lock. We insert the found ball into the lock. Puzzle. Place the balls as shown in the picture on the right.
The lock opened. We enter the room.
This is the room of the owner's son.
Click on the glowing area. Search for items from the list. We find a cage. Let's take the jar from the nightstand. In one of the small drawers of the bookcase, take the threads and the label. There are instructions on how to catch mice on the floor, let’s read them a little. Let's go to Katherine's bedroom. There are a couple of bottles of medicine on the bedside table. Glue a label on one of them. This is a sleeping pill.

Let's go to kitchen. Click on the glowing area. We are looking for hidden objects from the list. A nutcracker (rich Russian) goes into inventory. On the right, behind the bedside table in front of the mouse hole, we build a mousetrap from a cage, thread, a piece of cheese and a pin. The mouse crawled out to eat the cheese (naive).

We catch a mouse. The cell with the loot goes into inventory. In my son's room there is a puzzle on the table. We launch Berlaga (mouse) into it. The goal is to guide the mouse to a piece of cheese by rearranging the glass tubes.
The panel on which the key lies comes out. Glowing area. Search for items from the list. We received a figurine of a sailor. Let's move to library.
We insert the second sailor figurine into the glass bottle with the boat. The numbers 41 72 appeared on the sail. We go to the gardener’s house.
Gardener's house.
We open the door with the key. Let's go inside. Glowing area on the bed. We are looking for items from the list. A sponge (SpongeBob) gets into the inventory. Take a rake near the bed and tags in the chest. There are cages with snakes on the table. One is more poisonous than the other. Let's go back to mansion. We approach the coffin. We rub the deceased woman's hand with a sponge. Under the layer of makeup, a snake bite became visible. Let's go to gardener's house. Glow near the bed. Search for items from the list. The bolt cutter goes into inventory. We head to the table in the right corner. You need to place tags with the names of the snakes on the cages. It is not yet clear how to do this.
Let's go out into the street and turn right. We cut the wire with a bolt cutter and enter the gate leading to the backyard. We see a shepherd in a doghouse. We give the dog a piece of sausage, but it’s a bummer, she ate it and didn’t choke. Only the barking became stronger.

Let's go to kitchen for a new portion of sausage. We cut it off with a knife, mix sleeping pills into the sausage until it piles up, and return to the good dog. We feed this mash to the dog. She goes into nirvana, and we remove the key from the collar. We use a rake to clear away the pile of leaves against the wall. We get a book about snakes and a Dreamcatcher amulet. Let's go to gardener's house. We open the book. We look at the pictures and stick tags with the names of the snakes on the cells.

We push the green snake into the jar and go to mansion.
In the second floor corridor we approach the second door on the right. We insert the key into the lock and open the door of the room.
Husband's bedroom.
We take an hourglass from the coffee table, and an inkwell from the large table by the window. We approach the safe built into the wall. Dial code 4172 (remember the boat from the bottle).

The safe is open, but there is another lock inside - a puzzle. Wow! The hole in the safe opens into Catherine's room. Now it is clear how the snake bit the owner of the mansion. The creators of the game clearly stole the idea and the old Conan Doyle. We put a snake from a jar in the safe.
Kathleen's bedroom.
There is some kind of string hanging under the picture above the bed. We tie the Dream Catcher to it. Let's pull on it. A snake slides down the cord onto the bed and hides under the pillow. We put our hand under the pillow (we are not afraid of anything) and find the key. We open the dressing table drawer with the key and find a sheet of paper.

Let's go to the library.
Library.
We put the piece of paper in a stack of papers on the table. Place the following items from your inventory nearby: an hourglass, a feather, an inkwell, an envelope and a nut cracker. Let's restore Kathleen's will using the items on the table. Break the hourglass with a nutcracker and pour sand onto the paper. Let's place the pen on the paper on which the letters appear. Click on the inkwell and again on the paper. We put the letter in the envelope. A sealed envelope with a will goes into inventory.

We go outside to the mailbox and mail the will. Hubby gets arrested.
We return to the cemetery.
We find ourselves at Katherine's grave. Her spirit thanks us for taking care of her son and offers us help on how to get out of here. Click on the scarecrow next to the grave. We take the key from the scarecrow's eye. Let's go to the barn. Behind the house, open the storage room with the key and take a shovel.

Let's return to Katherine's grave and turn left. Here we see another grave with a crypt. We dig a hole with a shovel to the right of the grave and find a slab. We put it on the grave. The spirit of Marie Madison appears and tells us about her problems. They say that she was a doctor and during the epidemic (when she was traveling with the vaccine to save people) she was killed and the vaccine was confiscated. Asks us to find a cure and save people. We can't sit down today. We dive into the portal.
Episode 3.
Stagecoach.
Before us is a night road. In the foreground is a stagecoach and two people lying next to it. The woman is killed, the man is unconscious. Inside the coach we take the flint.
On the hill we see a castle. Let's go there. There is a luminous area near the wall, we zoom in on the image and begin searching for objects. An ax goes into inventory. We find a shovel. They wanted to climb the rope ladder, but someone dragged her up. Let's return to the stagecoach. We dig out the disk with a shovel. We use an ax to cut down a branch from a tree and cut off the branches from the branch. A stick goes into inventory. We lift the back wheel of the stagecoach with a stick and take out the whip.

Let's go back to the castle. In the same place we search for items from the list. The chain is in inventory. Use a whip to pull out the rope ladder and crawl inside.
Bridge control room.
We remove the halberd on the right from the wall. There is a bucket hanging from the ceiling, which we tighten with a halberd. Use a bucket to scoop out the water from the barrel, at the bottom of which we take the disk.

We go to the three columns in the center. Place the disks from the inventory on the left column. Puzzle. You need to drag all the disks from the left column to the right. The right column lowers and releases the bridge extension lever. We turn the lever. The suspension bridge is lowered.

Now you can safely enter the castle through the gate.
Castle courtyard.
We hook the chain to the well, and place a bucket on the chain. Click on the bucket - it falls into the well. We take out a bucket of water. Inside the bucket is the key to the prison cell. We go through the basement door to the right.
Torture chamber.
Click on the glowing area. Search for items from the list. In the inventory there is a cannon wheel. Take the gemstone in the skeleton's eye socket. We open the prison chamber with the key. Let's take gunpowder. We go out into the yard. We go right around the corner of the house.
Forge. Take the hammer on the anvil and one of the swords. Back to the yard. Let's go left behind the building to the cannon. We insert a wheel into it, add gunpowder, but there is no cannonball. We return to the yard. Let's go back to the secret chamber. We rip up the mattress and get a hacksaw. Glowing area. Search for items from the list. We find ticks. We go to the house on the left and chop down the door with an ax, using a hacksaw to saw through the internal bolt.
Werewolf's Hideout.
Inside we take the cannonball and lock the werewolf behind bars. Let's run to gun. We put the cannonball in the barrel. Light the wick with flint. The cannon fires (for some reason it blows out the door in the tower). Let's go there to see what we've done.

Let's go inside.
Armory.
The cannonball got stuck in the wall opposite the door. Glowing area. Search for items from the list. The ring from the hatch goes into inventory. We approach the hatch, insert the ring. We open the hatch and go down into the basement. In the chest we take the casting mold and remove the bayonet from the rifle.

We return to bridge control room. On the window on the left, we remove the nail from the frame with pliers. We return to basement. We insert a stick into the top of the pick and hammer a nail in there for strength. A whole pickaxe goes into inventory. Let's go upstairs. Glowing area. Search for items from the list. There is a coin in the inventory. We approach the wall and hit it with a pickaxe. Cannonball in inventory. Let's go into the yard.
Yard Using a pickaxe, we open the grate next to the well and take out the coat of arms. We go straight to the main tower.

There is a puzzle lock on the door. We insert the coat of arms into the castle and assemble the mosaic according to the model on the right. Let's go inside.
Main tower.
A book is on the table. We read in it that a werewolf can only be killed with a silver bullet. The book is in inventory. We approach the knight in armor. We give him the sword. In return we get a piece of the puzzle. Let's go to the fireplace and take firewood.

Let's go up the spiral staircase to the second floor. Glowing area. Search for items from the list. Another gold coin. We approach the shelves on the left and put the book in place. We get a piece of the puzzle. Let's go back to the first floor. We approach the puzzle on the left. We insert the missing parts and look for identical pairs. We receive a coin for winning.

We approach the table and insert three coins into the holes. Glowing area by the sofa. Search for items from the list. We received a gem. We go to the eagle statue. We insert stones instead of eyes for the eagle. He gives us instructions for casting a silver bullet.
Back to stagecoach. We pick the chest lock. To do this, insert a bayonet into the keyhole and hit the bayonet with a hammer. From the chest we take a needle and thread and a wallet.

Let's go to the castle forge.
Forge.
We put firewood in the firebox, light the fire with flint, sew up the furs with thread and fan the fire. We insert the mold into the block, pour silver into the ladle and move it into the fire. We got a silver bullet.

Let's go to main tower to the second floor. We approach the table and put the silver bullet on the table. We put the gun on the support. We insert the barrel into which we pour gunpowder and a bullet. We tamp it all down with a cleaning rod.

We take a pistol and go to werewolf hideout. We shoot at him (the book didn’t lie - the monster got a skiff) and put the cannonball in the cup. The grate rose. From the first aid kit we take the vaccine and smelling salts.
Let's go to stagecoach. We put the vaccine in the man’s hand and let him smell the salt.

Happy end. The city is saved.
We return to the cemetery.
The doctor thanks us. At the foot of the monument there is a suitcase, from it we will get a figurine of a raven. We go to the cemetery gates. On the right is the crypt. We insert the figurine into the niche and go inside. We open the coffin. Near the skeleton we take the key to the gate. We insert the key into the lock and break out of the cemetery.

Everyone who has not yet turned gray from these nightmares is offered a bonus level.
Bonus level.
We go to the shed and begin searching for items from the list. A knife goes into inventory. Let's go around the corner into the pantry and take the pruning shears. We go to the man's grave. We take the figurine in the hollow and move to Katherine’s grave. In the best traditions of horror films, we cut the scarecrow with a knife ("Saw 3" is resting) and take a stick. We leave the cemetery into the city.
In front of us is a square with three houses. To the right is a flower shop, to the left is a residential building, and straight ahead is an antique store. Use a stick to move the lantern and take a watering can. We go to the glowing area. Search for items from the list. A brush goes into inventory. With a brush we sweep away the ashes from the ashes and select the ring with the diamond.
We enter the door of a residential building. Glowing area. Search for items from the list. The suction cup is in our inventory. We go out into the street and go to the antique dealer. Let's go inside.
We approach the glass display case. We attach a suction cup to the glass. We cut a hole in the glass with a ring, pull it out with a suction cup and take out the hook. We go into the far room. We take half of the photo on the table. There is a carpet hanging on the wall. A drawing is attached to it with a pin. We approach the dressing table and take the key next to the woman’s photo.
We go outside. We used a hook to clean the drain of a residential building. Water poured into the barrel. We fill the watering can with water and water the rose. We cut it off with pruning shears. Rose in inventory.
Let's go to the flower shop. There is a puzzle lock on the door. We insert the rose into the vase. You need to assemble a picture from pieces (a game like tag). The lock opened. Let's go inside. Let's take the kettle. On the shelf above the bed we take matches and insert half of the photograph into the frame. We go out into the yard and fill the kettle with water.
We go to the antique dealer in the back room. There is a stand on the table. We put the kettle on it. Light the candle with matches and heat the kettle. We take boiling water and a candle into inventory.
Let's go to a residential building. Pour boiling water into the frozen fireplace and take the other half of the photograph.
We return to the flower shop. Insert the second half of the photo. The mirror cracks and we take the key.
We return to the residential building and open the door with the key to the back room. Let's go inside. We begin searching for hidden objects from the list. In inventory there is a weight. Let's take a cane.
In the flower shop we insert the candle into the box on the table. We light a candle. We get a wax star. Let's go out.
There is a glowing area in the courtyard of a residential building. Search for items from the list. The scoop goes into inventory.
In a flower shop we take some sand from a pot with a cactus.
We return to the cemetery to the barn. A hollow log lies in front of him. Using a cane, we take out the scales from it. Glowing area in the barn. We begin searching for hidden objects from the list. Hammer in inventory. Let's go to the doctor's grave. We break the pot on the left with a hammer and take the figurine.
In an antique store in the back room we see a dirty spot on the ceiling. We hit it with a stick, the handle falls. In the next room, insert the handle into the cash register. We pull on it and get several gold coins.
In a residential building, in the back room, we put scales, gold coins, a weight, sand, and a wax star on the table. We put a weight on the scales and measure the same weight with coins. We put coins in the ladle. Use a blowtorch to melt them. We place the wax star in the sand and pour molten gold into its imprint. We get a rough golden star. The glowing area is on the right. Search for items from the list. The file is in inventory. We see a vice in the closet. We insert the star into them and grind it with a file. Gold star in inventory. There is a glowing area in the near room. We begin searching for items from the list. We get a figurine.
In the flower shop, we insert a gold star into the box, take a figurine and part of the amulet from it.
In an antique shop in the back room we put figurines on a table with scales. The dog figurine weighs 3 grams, the snakes 2, the gorgon 1. On three scales we set the combination 574. A passage to the basement has opened under the buffet. Use the key to open the nightstand on the right. Let's take the book. We put it on the stand. The book opened and the magical symbols were taken. They need to be inserted into the cover of the book, as shown in the diagram from the carpet. They took the second part of the amulet.
We go to the crypt at the gate. We insert the pieces of the amulet into the niche. The spirits of lovers unite.
You win.
Copying and distribution of this article in part or in whole is permitted only if you provide an active direct link to the website journal-world.ucoz.ru
Take everything you need with you and go on an exciting journey through parallel worlds. Just don’t sit for a long time in a broken down car, crying about what’s happening and hoping that help will appear out of nowhere. It’s not for nothing that they say that you can’t even pull a fish out of a pond without difficulty. Look around, assess the situation and boldly enter the territory of the mysterious cemetery. What? Did the gate slam shut? It's a sign! This means that it is not yet time for you to leave here and a special mission awaits you, which the higher powers could not entrust to anyone else. First, take a closer look at the final resting places of people who have passed on to another world and take a closer look at those where the cursor changes its shape. Be sure to pay attention to the sign - you may need to assemble it in parts or scratch out the missing inscription on it. But that's only half the battle! Next comes the most interesting part! Good-natured but restless ghosts who did not have time to sort out their affairs in a past life and now cannot leave this earth with a light soul will want to talk to you. Help save their relatives or find those responsible for their own death, and disembodied well-wishers will definitely come to your aid. In each world you have to explore many locations in search of useful items that you can use in appropriate cases. If you need to consult a hint, it will be available to you in the lower right corner. You can open locked doors and pick up keys to the most unusual locks if you complete amazing mini-games. By the way, with their help you will be able to repair various mechanisms. As soon as you make amendments to the past of the saddened ghosts, you will immediately be able to get out of this eerie place, shrouded in unsolved secrets and curses. The main thing is to remain calm and the solutions will come to you!
SYSTEM REQUIREMENTS
- OS: Windows XP/Vista
- CPU: 1.4 GHz MHz
- RAM: 1024 MB
- DirectX: 9.0
- Hard Drive: 518 MB
RELATED GAMES
SEQUELS & PREQUELS
Escape from a mystical cemetery in Redemption Cemetery: Salvation of the Lost! A late-night subwa...
We offer a complete guide to the game "Redemption Cemetery: Curse of the Raven" with pictures and detailed explanations.
If you still have questions about how to complete the game "Redemption Cemetery: Curse of the Raven" - write on the forum.
Redemption Cemetery: Curse of the Raven Walkthrough - Part I
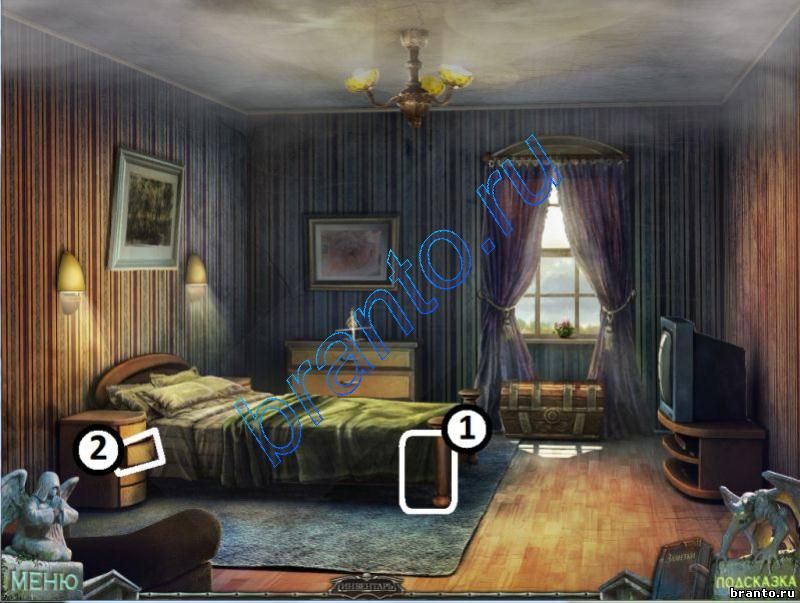
CemeteryAt the beginning of the game you will find yourself in a cemetery after a car accident.
1. Zoom into the grave and take metal rod.
2. Immediately after this, a black raven will fly.
Click on it to drive it away.
The plate under the raven will become active for actions - use it on it metal rod to move the plate and take part of name plate.
Follow the arrow to the right.
*all pictures can be enlarged by clicking on them
1. Click on the crow to scare it away.
2. Zoom in on the photo of Anna Maria and remove the maple leaf from it.
3. Read the article in the newspaper.
Continue right.

The sparkling area near the entrance to the hut is a search area for objects.
Collect all the necessary items (they are given randomly in each game, so it is impossible to take a universal screenshot, use the hints if necessary).
Among the things there will be a second part of name plate(open the fireplace door to find it).

Follow the arrow down and then zoom in on the sign on the grave with the statue of a man.
Put two back in place parts of name plate
.
Listen to the ghost's speech, and then step through the portal that appears in the upper left corner.

1. Look out the window - the girl will ask you for help.
2. Take from the mailbox newspaper.
3. Zoom into the bushes to find sewed O.
4. Scare away the crow, and then remove it from the nest lighter body.
Go to the front door.

1. Take a cleaning product.
2. Put newspaper under the door and press on it to push it inside.
3. Zoom into the keyhole and use it on it awl to push out the key.
4. Click on the newspaper again to pull it towards you and take it key.
5. Key open the lock and go into the house.

1. Take figurine owls.
2. Use figurine to break out the window. Examine the broken window area to find hammer.
3. Open the locker and take flashlight.
4. Zoom into the book - it contains number 6385 - this information will be useful to you later, but for now it will be written down in your diary.
5. Take from the first aid kit bandage.
6. Lying near the photo brush.
7. Zoom into the ventilation grille and then click on it to remove it. It's too dark here, so use flashlight to find traffic jam.
8. Knock hammer hit the barrel - it will roll away from the door. Hit it again to extinguish the fire.

Go down the left arrow to basement.
1. Zoom into the shield on the right side, open the door and solve the puzzle using traffic jam from your inventory.
To solve, you need to arrange the plugs in such a way that the sum of the numbers on the plugs in all columns and rows is 15.
2. Once the plugs are in place, move the wires to the left of the plugs.
Trace the entire path of each of the wires to connect the ends and beginnings of the same color.
3. Press the switch handle.
4. Zoom into the desktop and grab it scissors.
5. Look under the table - there is a suitcase with a code there.
Use cleaning agent
, and then brush to remove dirt, then enter code 6385.
The lock on the suitcase is open, pull it out protective gloves.
6. Go through a hidden object hunt to find axe.
Some items are hidden in the cabinets and jug, open all the doors and look inside.


Follow the down arrow to return to the first room.
Use protective gloves
on the hot door handle and go into the first floor corridor.

1. Try to climb the stairs and the ceiling will collapse.
2. Bring Anna-Maria's father's hand closer and take key.

Go through the near right door.
1. Open the locker and find vice handle.
2. Examine the drawer of the nightstand, there is glue.
3. Use axe to break through the wall and into the living room.

Living room
Zoom into the fireplace counter and take forceps.

Follow the arrow down 2 times into the hallway, and then go through the near left door into the kitchen.
In the sparkling zone near the microwave - search for objects. Collect all offered items to receive knife(to do this you need to open the bread bin).

Exit the kitchen and then follow the arrow down into the first room.
Click on the broken chair to activate a puzzle.
Place in front of the chair bandage, scissors And glue.
1. Grab the scissors with your mouse and point them at the bandage to cut off a piece. Take the scissors again and cut the cap off the glue bottle.
2. Take open glue and use it on all the broken wood parts.
3. Place all the wooden parts coated with glue in place.
4. Use a cut piece of bandage to wrap the broken leg (upper right) of the stool.
After you fix stool, add it to your inventory.


Follow the arrow forward (up) into the corridor, and then go through the nearest right door.
1. Substitute stool under the shelf.
2. Examine the shelf to find ballerina.

Go through the hole in the wall into the living room.
The carpet is pressed to the floor by a wardrobe and an armchair. Use knife to trim the edges, then take carpet.

Follow the down arrow 3 times to return to the first room, and then go down to the basement (left arrow).
1. Zoom into the workbench with the vice. Paste into place vice handle and press it to release the vice. Get it screwdriver.
2. Use carpet on the floor with water everywhere. Get wet carpet.

Go to the corridor.
Put wet carpet onto the fallen burning boards, and then climb the stairs.

Second floor corridor
1. Take floor brush.
2. Zoom into the vase on the nightstand - near it lies a clock that has stopped at 10:05
.
This information will be useful to you later, but for now it will be recorded in your diary.
3. Click on the far door, after which the ceiling will collapse, blocking the passage.
Go through the near right door into the bathroom.

Bathroom
1. Zoom into the drawer above the sink, click on the small green handle to open it, then take the side cutters.
2. Move the rug closer to the floor, press the edge to bend it back and find screw.
3. Take from the bath watch weight.

Follow the down arrow into the hallway and then go through the far left door into bedroom.
1. Approach the edge of the bed, pull back the covers and take winch handle.
2. Open the middle drawer of the nightstand and take ruler.
Follow the down arrow 3 times into the first room and then go down into basement(arrow to the left).
1. In the corner where the closet is, a new hidden object area has appeared. Collect everything to find wrench. 2. Use floor brush on the window to get mount.


Go to the kitchen.
1. Mount break off the hood cover and then bring it closer. With a knife cut the electrical tape and take lighter inner body.
2. Do a Hidden Object Scene to get oil can.


Go to living room.
Zoom in on the lattice window right in front of you. Place it on the windowsill lighter body
, then lighter inner body
.
Take the inner body of the lighter and point it (by pressing) at the gasoline can.
Take the gasoline-filled inner housing of the lighter and insert it into the body of the lighter.
Pick up the finished one lighter.

Return to bedroom on the second floor (far door on the left side).
Behind the bed there is a chest of drawers with a figurine.
Use it on her lighter until the wax is completely melted.
Take the second figurine ballerinas.

Go to living room.
Zoom into the music box and insert both figurines into the round metal stands on the upper corners ballerinas.
Click on the box to open the lid and activate a puzzle.
Your task is to arrange the gems according to the color around each cell.
After completing the mini-game, insert it into the keyhole key and turn it.
The ballerinas will begin to spin and converge in the center. Click on the gray lid of the box that is on the right side of the box.
The bottom panel of the box will move away, revealing the gears.
Screwdriver unscrew the 3 screws in the center of each gear, and then take all 3 gears.


Go up the stairs to the second floor corridor.
Zoom into the lifting device on the wall on the right side.
wrench Unscrew the nut in the center and remove the cover. Insert into the round recesses 3 gears, to the center - winch handle. Lubricate the center of the mechanism with oil cans, and then press the winch handle to lower the ladder.


Climb the stairs to attic.
1. Zoom in on the clock. Hang watch weight.
Using the hour and minute hand switches, set the time to 10:05. The dial will open, the first one is hidden behind it. piece of coinage.
2. With a knife open the bag (you need to cut three times in total) to find the second piece of coinage.
3. Go through a hidden object hunt to find pulley.


Go to bedroom.
There is a huge chest under the window.
Bring it closer and return it to its place two parts of coinage.
By swapping parts, assemble the drawing. There are 3 parts to assemble: inner, central and outer.
If one of the parts is assembled correctly, then you can grab it with the mouse and twist it - this is necessary to align the pattern.
Take from the opened chest office key.

Follow the down arrow to exit second floor corridor
.
Zoom into the locked door (closest to you on the left wall).
Use office key
on the keyhole, turn it, and then go into the office.
Cabinet
1. Open the cabinet door on the left side.
Approach both door hinges one by one. Use screwdriver on “sparkling” screws (you need to unscrew 2 on top and 2 on bottom).
Take cabinet door.
2. Inspect the left window.
By using side cutters have a snack and take the wire.
3. Do a Hidden Object Scene to get electrical tape.


Get down to basement.
1. Electrical tape connect the damaged wire.
2. Zoom in on the shield and lift the switch up.

Go up to the first floor and through the near left door enter kitchen.
Inspect the water tap. Screwdriver unscrew the screw and take valve.

Go up to the second floor and go to bedroom.
Zoom in on the window and then insert screw in place of the missing latch handle.
Screwdriver tighten the screw and press it to open the deadbolt.

Click on the window to open it, then look through it.
1. Put cabinet door between two window sills.
2. When the crow flies away, pick up bookcase key.
3. Zoom in on the closed shutters and use rulers remove the bolt.
Click on these shutters to open and enter the girl's room.

1. Try to reach the girl - nothing will work, because... the ceiling will collapse.
2. Approach the burning debris and use forceps take a red-hot one hook.
Get out of the room through the same window as you entered here.

Go up to the attic.
Move the lifting mechanism slightly to the right and above the grandfather clock.
1.Push into place pulley.
2. Press down on the rope to throw it over the pulley.
3. Hang it on the loop of the thrown rope hook.
A new hidden object area will appear in the lower right corner of the attic, near the boxes.
Collect everything to get transmission belt.


Go down the stairs to the second floor hallway and go through the near left door into cabinet.
1. A search area has appeared where the desktop is located.
Collect everything to get fuse.
2. Zoom into the cabinet lock, insert it into the keyhole bookcase key
and turn to open.
When the cabinet opens, click on the books to activate a puzzle.
Rearrange the books correctly, and when finished, inspect the winch assembly diagram.


Climb up attic.
1. Zoom in on the winch mechanism and assemble it in the order shown in the screenshot.
After assembly: plug into socket the wire, connect it electrical tape with the motor wire and pull on the round parts gear belt.
2. Paste fuse into the control panel and press the down arrow button.
The winch mechanism will come into action and lift the load. Beneath it lies hook.
3. Zoom in on the winch mechanism again and remove it from it gear belt, it will still be useful.


Get down to basement.
Put it back in place gear belt.

Climb up kitchen.
The dumbwaiter is now working, click on the down arrow to make it start moving.

Return to the basement and take empty bucket.

Go to bathroom(second floor, door to the right).
Zoom in on the bathtub faucet, insert valve and press on it to let the water flow.
Place under running water empty bucket, wait until it is filled to the brim - you will receive bucket with water.

Get down to basement.
Use bucket with water on the fire in the lower right corner.
When the fire goes out, hook pull forward and take stairs.

Go outside.
Bring the window with the girl closer and place it under it stairs so that Anna-Maria can get out of the burning house.

After a short video clip, you will find yourself in a cemetery.


