Is it possible to insert a sd card. The computer does not see the USB flash drive, “insert the disk into the device” - how to fix it? How to know that the computer has seen a memory card
If your Android 6.0, 7 Nougat, 8.0 Oreo, or 9.0 Pie phone or tablet has a memory card slot, then you can use a MicroSD memory card as your device's internal memory, this feature first appeared in Android 6.0 Marshmallow.
On the latest version of Android, all the steps for turning a MicroSD memory card into an internal one are almost the same, but just in case, I will separately describe the steps and provide screenshots (do not forget that all data from the memory card will be deleted in the process, take care of saving important files) :
This will complete the procedure. All features of operation and the method of returning the memory card to the mode of operation as a portable storage device remain the same as for previous versions Android.
Video instruction
Features of the memory card as the internal memory of Android
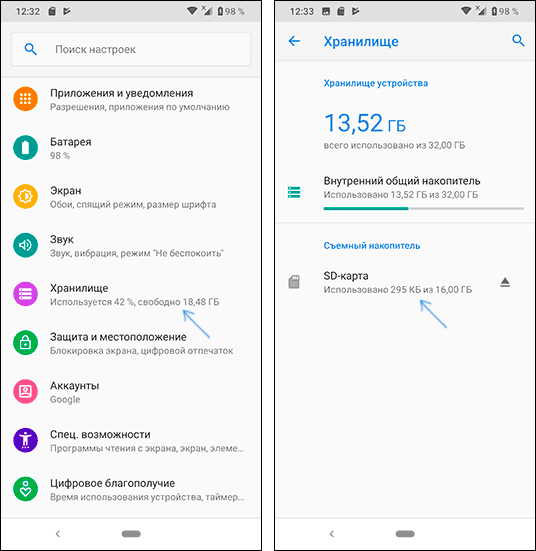
It can be assumed that when Android's internal memory of N capacity is added to the size of the memory card M, the total available internal memory should become N+M. Moreover, this is roughly displayed in the device storage information, but in fact everything works a little differently:


As a result - after the moment when the SD memory card began to be used as internal memory, the user does not have access to the "real" internal memory, and if we assume that the device's own internal memory was larger than the MicroSD memory, then the amount of available internal memory after the described actions will not increase, but decrease.
Formatting a memory card for use as internal storage in ADB
For Android devices where the function is not available, such as Samsung Galaxy S7-S9, Galaxy Note, it is possible to format the SD card as internal memory using ADB Shell.
Since this method can potentially lead to problems with the phone (and may not work on every device), details on installing ADB, enabling USB debugging and running command line in the folder with adb I will skip (If you do not know how to do this, then perhaps it is better not to take it. And if you do, then at your own peril and risk).
The necessary commands themselves will look like this (the memory card must be connected):
- adb shell
- sm list disks(as a result of running this command, note the output disk ID of the form disk:NNN,NN - you will need it in the next command)
- sm partition disk:NNN,NN private
When formatting is complete, exit the adb shell, and on the phone, in the storage options, open the "SD card" item, click on the menu button in the upper right and click "Transfer data" (this is mandatory, otherwise the phone's internal memory will continue to be used). When the transfer is completed, the process can be considered completed.
Another possibility for such devices, if you have root access, is to use the Root Essentials application and enable Adoptable Storage in this application (potentially dangerous operation, at your own risk, do not perform on old Android versions).
How to return the normal functioning of the memory card
If you decide to disconnect the memory card from the internal memory, it's easy to do - transfer all important data from it to your computer, and then go to the SD card settings, just like in the first method.

Then, in the menu of actions with a memory card, select the item "Portable media" and, following the instructions, format the memory card.
Comments (268) on SD card as Android internal memory
03/08/2019 at 13:52
05/23/2019 at 15:41
05/23/2019 at 20:12
- Connecting a flash drive to a computer is very simple: just remove the cover from it and plug it into a USB port.
- Getting to some of them is not always convenient, especially if we are talking about an outdated PC with connectors exclusively on the back of the case. If we have a more modern computer, you can look for them in front.
- Notebook owners are advised to look from the sides.
- With a little effort, we connect the USB flash drive to the USB port. If something does not work out for us, we turn it over and try again.
- You can insert the drive only in a single position, and therefore we need to decide what it is. Most flash drive manufacturers supply the side we need with appropriate pictures or subtle images.
- After the flash drive is connected, operating system should automatically recognize it. If the dialog box does not appear, you can search for the flash drive as new disk through My Computer.
- In addition, a message will usually appear in the bottom right pane stating that a new device has been found. You should wait for the system to notify that it is installed and ready to use. After that, you can reset the data to the USB flash drive.
- If we want to transfer information from a memory card to our home computer, we need a card reader with a suitable input.
- On the one hand, it is connected to the USB port of a laptop or PC, and on the other hand, a USB flash drive is installed into it until it stops (so that part of it remains on the outside).
- First you need to decide what kind of memory card we have, and look for the corresponding input on the card reader. Today you can find many online stores that describe in detail which memory cards can be installed in a particular device.
- For example, most card readers support micro-SD.
- After installing the memory card, you need to make sure that our PC or laptop saw it. You can also check the appearance of a new removable disk through "My Computer".
- You can open the folder with the flash drive directly from there. After that, you can start copying files.
- SD 1 - from 8 MB to 2 GB in size;
- SD 1.1 - up to 4 GB;
- SDHC - up to 32 GB;
- SDXC - up to 2 TB.
- Storing photos, videos and music in the cloud
- Using a microSD card
- First of all, open the notification shade and click on the gear-shaped settings button. You can also log in "Settings" through the app drawer.
- Open a tab "Device", go to the tab "Applications", and then "Application Manager". On some devices "Application Manager" has a name "All Applications".
- Then go to your apps list, find the app you want to move. We will be moving the NPL app to the SD card.
- Once you find the application, click on it, then click on the button "Change" as shown below. Select "Memory card" (Click on the picture to enlarge).
- Insert an SD card, open the notification shade and press "Tune". You can use the SD card as portable storage or as internal storage. If you select the function, the system will format the SD card and then integrate with the device.
- After that, all data on the smartphone will be installed on the memory card by default.
- Open the menu, select "Settings", and then "Applications" and move any app to SD card. To do this, simply click on the application and click on the button "Move to SD card".
- Download the AppMgr III application, wait for the automatic installation (takes 2 to 5 minutes).
- Now open the AppMgr III application and wait for the list to load installed applications on your phone. After that, click on the application you want to move, select "Move", and then in the standard Android functionality, move the app to the SD card.
- Go to "Settings" → "Applications".

- Select Application Manager.

- Click on the desired program.

- Select Memory.

- Click Edit → Move → Memory Card.

03/08/2019 at 10:47
Articles and Lifehacks
Every day, while working on a PC or laptop, we perform dozens of various operations, and this process is so familiar that we don’t even think about them.
However, many users are still encountering something for the first time - in particular, they are interested in how to connect a flash drive, as well as how to insert a USB flash drive from a phone into a computer. This article will help you figure out how to do it.
Connecting an ordinary flash drive to a PC
Connecting a memory card
One of the most important criteria when buying a mobile phone for a modern person is the support of memory cards. The volume of the card, as a rule, is chosen at its own discretion.
Today, one of the most popular media types is the flash drive. And no matter what anyone says, the CD/DVD age is coming to an end. Moreover, the price of one flash drive is only 3-4 times more than the price of a DVD disc! True, there is one small “but” - it is much more difficult to “break” a disk than a USB flash drive ...
Although not often, one unpleasant situation sometimes happens with flash drives: you take out a microSD flash card from your phone or camera, insert it into a computer or laptop, but he does not see it. There can be quite a few reasons for this: viruses, software errors, failure of a flash drive, etc. In this article, I would like to dwell on the most popular causes of invisibility, as well as give some tips and tricks on what to do in such cases.
Types of flash cards. Is SD card supported by your card reader?
Here I would like to stop in more detail. Many users often confuse one type of memory card with another. The fact is that there are three types of SD flash cards: microSD, miniSD, SD.
Why did manufacturers do this?
It's just that there are different devices: for example, a small audio player (or a small mobile phone) and, for example, a camera or camera. Those. devices are completely different in size with different requirements for the speed of flash cards and the amount of information. For this, there are several types of flash drives. Now in more detail about each of them.
MicroSD flash cards are very popular thanks to portable devices: players, phones, tablets. Using microSD, the memory of the listed devices can be increased by an order of magnitude very quickly!
Usually, when buying, they come with a small adapter so that this flash drive can be connected instead of an SD card (more on them below). By the way, for example, to connect this flash drive to a laptop, you need to: insert the micsroSD into the adapter, and then insert the adapter into the SD slot on the front / side panels of the laptop.
Once popular cards used in portable technology. Today, they are used less and less, mainly due to the popularity of the microSD format.
Flash cards: sdhc and sdxc.
These cards are mainly used in devices that need a large amount of memory + high speed. For example, a video camera, a DVR in a car, a camera, etc. devices. SD cards are divided into several generations:
Very important points when working with SD cards!
1) In addition to the amount of memory, SD cards indicate the speed (more precisely, the class). For example, in the screenshots above, the class of the card is "10" - this means that the exchange rate with such a card is at least 10 MB / s. It is important to pay attention to what flash card speed class is required for your device!
2) microSD using special. adapters (they usually write adapter (see screenshots above)) can be used instead of regular SD cards. True, doing this always and everywhere is not recommended (just because of the speed of information exchange).
3) SD card readers are backwards compatible: i.e. if you take a device that reads SDHC, it will read SD cards 1 and 1.1 generations, but will not be able to read SDXC. That is why it is important to pay attention to which cards your device can read.
By the way, many "relatively old" laptops have built-in card readers that are not able to read new types of flash SDHC cards. The solution in this case is quite simple: buy a card reader connected to a regular USB port, by the way, it looks more like a regular USB flash drive. Issue price: several hundred rubles.
SDXC card reader. Connects to a USB 3.0 port.
The same drive letter is the reason for the invisibility of flash drives, hard drives, memory cards!
The fact is that if your hard drive has a drive letter F: (for example) and your inserted flash card also has F:, then the flash card will not be displayed in Explorer. Those. you will go to "my computer" - and you will not see a flash drive there!
To fix this, you need to go to the "disk management" panel. How to do it?
In Windows 8: press the combination Win + X, select "disk management".
In Windows 7/8: press the combination Win + R, enter the command "diskmgmt.msc".
Next, you should see a window that will show all connected drives, flash drives, and other devices. Moreover, even those devices that are not formatted and that are not visible in "my computer" will be shown. If your memory card is on this list, then you need to do two things:
1. Change its drive letter to a unique one (just click right click mouse on the flash drive and select the operation of changing the letter in the context menu, see the screenshot below);
2. Format the flash card (if you have a new one, or there is no necessary data on it. Attention, the formatting operation will destroy all data on the flash card).
Change drive letter. Windows 8.
Lack of drivers is a popular reason why the computer does not see the SD card!
Even if your computer / laptop is brand new and only yesterday you brought them from the store - this absolutely does not guarantee anything. The fact is that the sellers in the store (or their specialists who prepare the goods for sale) could simply forget to install the necessary drivers, or simply be too lazy. Most likely you were given discs (or copied to a hard drive) of all the drivers and you only need to install them.
In general, there are special programs that can scan your computer (more precisely, all its devices) and find the latest drivers for each device. I already wrote about such utilities in previous posts.
Connecting an SD card via USB using some device
If the computer does not see the SD card itself, then why can't you try to insert the SD card into some device (for example, a phone, camera, camera, etc.) and connect it to the PC already? To be honest, I rarely take out a flash card from devices, preferring to copy photos and videos from them by connecting them to a laptop via a USB cable.
Do I need special programs to connect my phone to a PC?
New operating systems such as Windows 7, 8 are able to work with many devices without installing additional software. Drivers are installed and the device is configured automatically when the device is connected to the USB port for the first time.
For each brand of phone / camera, there are utilities recommended by the manufacturer (see the manufacturer's website) ...
PS
1. Try to connect the card to another computer and check if it recognizes and sees it;
2. Check your computer for viruses. Rarely, but there are some types of viruses that block access to disks (including flash drives).
3. You may need an article about data recovery from flash drives.
If your device is low on internal storage and you constantly find yourself having to delete apps, photos, and videos to make more space for installing larger apps, then you need to read this article.
In this article, we will explain in detail how to install or move Android apps to SD card on smartphone or tablet and how to make apps install to Android memory card.
How to move apps to SD card?
There are currently two ways to solve this problem:
If your Android phone or tablet allows you to install an SD card, then be sure to install an SD card. In this case, the external memory will be for storing photos, videos and music, and the internal memory for applications.
However, there are situations where the owner needs the apps to be saved to the SD memory card. Thus, the question arises, how to install or transfer any suitable application to a microSD card?
So, next we will describe in detail how to make applications installed on the Android memory card by default. As a result of such manipulations, internal memory will be significantly freed up, which will positively affect the operation of the Android system.
Instructions for devices version up to Andoid 6.0
The instructions below may vary slightly for different phones. Some phones may just have a button "Move to SD". Thus, you need to pay attention to every word associated with "Move", SD etc.
If your device needs to free up internal storage, move any number of apps, photos, or videos to the SD card. Also, open the app "Camera" and go to settings and set save to SD card. Instructions on how to move apps to Android storage card:
It is worth noting that any game or application where speed is important is best left on the internal memory, as data transfer speeds are much faster on the smartphone's internal memory than on an SD memory card.
Instructions for devices with Android Marshmallow version 6.0 and above
In older versions of Android, the SD card worked as portable and removable storage. On devices running Android 6.0 Marshmallow and above, a feature called Adoptable Storage has been added. Thus, when you insert an SD card into the device, the system will automatically sum up the internal memory and SD card memory and display the total memory.
The advantage is that all applications are automatically installed on the SD card. As a result, there will be no need to move applications manually.
However, the use of such a function fully integrates the SD card with internal memory, and now it will not work with other devices. This means you can't just take it out and plug it into your computer to download music, photos, or videos from your computer.
Be sure to back up any data or information on your computer before selecting the "Use as internal storage", since Android will completely format the SD memory card.
It is worth noting that at any time you can go to the settings according to our instructions above and move the apps from the SD card back to the internal storage.
Android 5.0 Lollipop and higher
If you are using a smartphone or tablet running Android 5.0 Lollipop or higher. Your device will use the SD memory card as portable and removable storage. This means that you can remove the SD card and download photos or music from your computer, and then install the SD card again on your Android device.
In the event that you need to move applications to an SD memory card, use the instructions below:
However, remember that applications that come with pre-installed software cannot be transferred to an SD memory card. Typically, applications installed from Play market.
Other Methods (Apps to Transfer to SD Memory Card)
The Play Market has many third party applications, which allow you to transfer applications to an SD memory card. Most of the applications, of course, require root access. But, there are some apps that let you transfer apps without root access.
AppMgr III (App 2 SD)
The most popular application that allows you to transfer almost any application to an SD memory card. It is worth noting that the application does not require root access, which is especially important for inexperienced users.
In addition, AppMgr III is feature rich and provides many other useful features.

Users often notice a disadvantage free space in the internal memory of their phones. This problem is solved by using a memory card to store large data, including applications. This article will show you how to install apps on the Android SD card.
Using built-in tools
The installation of applications here should be understood as the initial installation of software, as well as the transfer of programs with (or without) saving data.
The SD card has a large capacity compared to the built-in memory of a smartphone (especially older models). Here we will consider several options for different versions OS.
Note! Not all software is transferred to the card due to optimization by their developer to function only on system memory.
Pure Android 2.2–5.0
Transferring applications to another storage has become possible since Android 2.2.
Note! The instruction describes the basic principle of operation, but appearance and the location of the elements may differ depending on the specific version of the OS.
After that, the system will notify you of the result of such an action.
Samsung
For phones from a South Korean company with Android up to version 6.0, the instructions are slightly different with menu elements.
Android 6.0 and above
AT latest versions With its OS, Google has rethought how a phone works with flash memory. Previously, it was only portable storage, but then a new solution was added to it - Adoptable Storage, which integrates a flash drive with internal memory. The convenience is that, by default, programs will be installed on the SD card, and also solves the problem when software is not installed on it.
The downside of this idea is the inability to insert a USB flash drive into a computer to transfer files.
To activate the mode:

Transferring files
Android stock tools allow you to transfer not only applications, but also user files, including multimedia

The method allows you to transfer a large number of files to a USB flash drive at a time.
Using External Programs
There are programs in the Play Market that perform similar actions, but in a simpler form. The Titanium Backup application is considered as an example.


