How to make applications installed on a memory card on Android. How to transfer a memory card to standard mode. Connecting a microSD card in Android devices
Many modern smartphones are equipped with a hybrid slot for SIM and microSD cards. It allows you to insert two SIM cards into the device or one SIM paired with a microSD. Samsung J3 is no exception and contains this practical connector. The article will tell you how to insert a memory card into this phone.
Installing a memory card in Samsung J3
This process is quite trivial - remove the cover, take out the battery and insert the card into the correct slot. The main thing is not to overdo it with removing the back cover and not to break the SIM card slot by inserting a microSD drive into it.
- We find a notch on the back of the smartphone that will allow us to access the inside of the device. Under the removed cover, we will find the hybrid slot we need.

- Insert your fingernail or something flat into this depression and pull up. Pull on the cover until all the "keys" are out of the locks and it pops off.

- We take out the battery from the smartphone using the recess. Just grab the battery and pull it out.
- Insert the microSD card into the slot indicated in the photo. An arrow should be marked on the memory card itself, which will let you know which side it needs to be inserted into the slot.

- The microSD drive should not be completely sunk into the slot, like a SIM card, so do not try to push it through using force. The photo shows what a properly installed card should look like.
- We collect back the smartphone and turn it on. A notification will appear on the lock screen stating that a memory card has been installed and you can now transfer files to it. Simply put, the Android operating system tells you that the phone is now endowed with additional disk space, which is completely at your disposal.

Do you want to use microSD card as a real memory extension and install applications on it? To do this, you need to format it as internal memory. This is fairly easy to do on most phones, but unfortunately some manufacturers like Sony, LG or Samsung don't have this feature by default. But if your smartphone is equipped with Android Marshmallow or newer, then you can use the command line. True after that, avoid Android updates. How to combine memory correctly, we will tell in this article.
Jump:
The easy way
If you're lucky, your smartphone will allow you to do this without connecting it to a PC. This method will most likely be your only hope if you are using more new version Android (7.0 Nougat or 8.0 Oreo). Here's how to check:
- Install the SD card in android phone and wait for it to be recognized
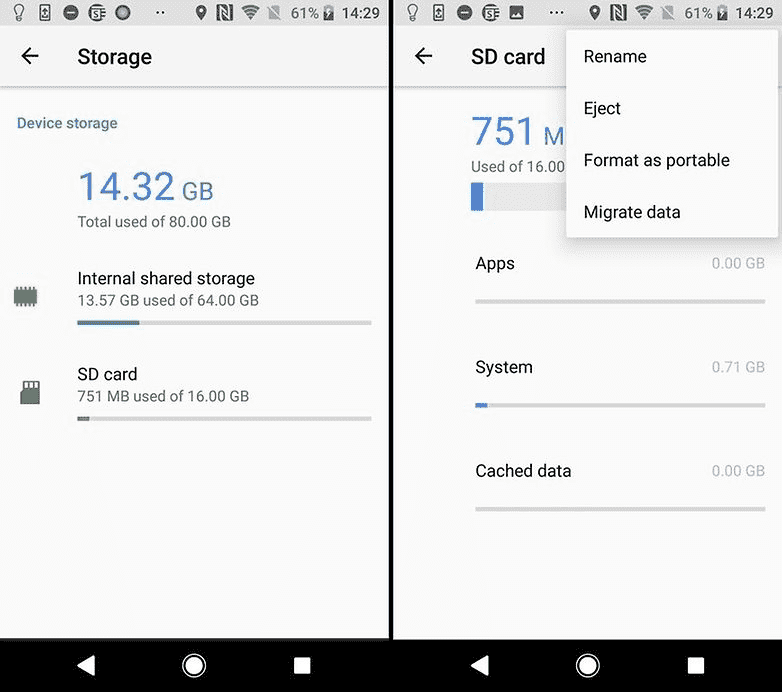
- Open Settings > Storage
- Touch the name of your SD card.
- Touch the three vertical dots in the upper right corner of the screen.
- Click "Settings" .
- Select Format as internal memory.
- Click "Clean and Format"
- Android will then prompt to transfer the data
If your smartphone does not allow you to do this, the process becomes more difficult. We will move on to it below.
What to do if your phone won't let you format microSD as internal storage
Some smartphone manufacturers disable the normal Android feature for microSD formatting as internal storage, hiding the ability to do so from your phone. But you can still activate this process using a PC without requiring any root privileges.
The exact steps vary depending on android versions your phone. This method worked well with Android 6.0 Marshmallow and Android 8.0 Oreo, however we ran into trouble on Android Nougat.
For phones using Android 6.0 Marshmallow
When the MicroSD card is formatted as internal memory, applications can be fully stored on it. This means that if you download an app with a total size of 2 GB, then there should be 2 GB of space on the SD card. If, however, the MicroSD card is formatted only as a backup, there will not be enough memory, as it says PLATYPUS_DIARRHEA on reddit.
Just because a menu option is invisible doesn't mean it doesn't work. A few days after posting on Reddit, it was revealed that it was also possible to format the MicroSD card as internal storage in the Galaxy S7 using the command line. We have successfully tested the instructions with Samsung Galaxy S7, Sony Xperia Z5 and LG G4 running Android 6.0 Marshmallow.
All three smartphones work from the factory or have been updated with Android 6.0 Marshmallow and have a microSD card slot. Also, there is no menu option to format the microSD card as internal storage. The feature is only available on HTC One A9 and Motorola on all Moto smartphones.
Why did Samsung, LG and Sony hide this item? I connected each of the three smartphones to the computer, and each of them had one microSD card.
I then entered in the commands described in my blog. Once you open a command prompt window and connect your smartphone, you can enter the first command:
- adb shell
Now command line ready to run system commands on your smartphone. In this case, we want to format the SD card or part of it as internal storage. Even if Sony, Samsung and LG deny us this option in the graphical user interface, we can still execute this command through the console. First, however, we need the ID of the SD card. You can find it out with the following command:
- sm list disks
In my case the disk is called 179.64 . Perhaps yours is different. Note the exact ID. In the following command, we will format and partition the MicroSD card. Your content will be removed. If there are important files on the card, copy them to another drive or computer. If you want to keep a MicroSD card in your smartphone all the time, you can now partition all your memory. To do this, enter:
- sm partition disk:179,64 private
The operation takes a few seconds or minutes, depending on the capacity of the memory card. If you want to use only a certain percentage so that other devices can read it, you must exclude it from the personal section. The 50:50 split command looks like this:
- sm partition disk:179.64 mixed 50
This is the end of Paul O'Brien's guide, but not the end of the job. If you now want to use the reallocated memory, you must migrate applications and data as well. This can be done through the "Storage" section in the Android settings menu. Select the MicroSD card, then go to the top right side of the menu and click "Move data". You cannot select this menu item before splitting.

Now all downloaded applications will be completely written to the MicroSD card. Only system apps and updates use internal memory. This means that you will never get an error due to lack of space.

Smartphones with Android Oreo
Recent Android updates have changed the rules a bit, but it's still possible to use this method with ADB. Just start working with ADB by the method above, but after entering shell adb you will be prompted to set certain values.
Enter the following lines to unlock the ability to format microSD cards as internal storage on your phone:
G8141:/ $ sm set-force-adoptable true
G8141:/ $ sm list-disks
disk:179.0
G8141:/ $ sm partition disk:179.0 private
G8141:/ $ sm set-force-adoptable false
G8141:/ $ exit
We tested this method on a Sony Xperia XZ Premium running Android 8.0 Oreo and it worked. In the screenshots below, you can see a 16 GB microSD card installed as internal storage:
Problems with system updates and Nougat
Some readers have reported difficulties installing system updates in Android 6.0 after using the above methods. Upgrading to Android 7.0 Nougat is not possible after installing MicroSD as internal storage. Our test devices with Android 7.0 Nougat don't even respond to the console commands shown above.
Due to the lack of documentation on the web, we can only recommend that you perform a number of operations before updating the system. Back up your photos or music to your computer or the cloud and free up as much space on your SD card and smartphone as you can.
Delete unnecessary applications and return the data to the internal memory. Then format the MicroSD card as removable media. Only then can you safely install the Android update.
What's the catch?
MicroSD cards do not work as fast as the built-in memory of a smartphone. So don't waste your money on cheaper ones, and instead buy yourself memory cards with reasonable read bandwidth. Extreme Pro and MicroSD from Sandisk were, in our opinion, the best in terms of price / quality ratio. With a write throughput of 74 MB/s, you shouldn't experience lag. Such cards are best suited for installation as internal memory.
Interestingly, only the LG G4 was able to read the extended memory correctly. Samsung showed an unnaturally large amount of occupied memory, and Sony's memory was even negative. However, we didn't have any complications, and even when we were connected to a computer, we were able to access all of our data properly, although we could only see the general and not the specific part of the memory. Difficulties arose only in the case of a system update (see above).
Memory Boost: Complete Success
We subjected all the smartphones described above to a single endurance test. We have established final fantasy IX on all devices. The game size is 1.8 GB. After installation, it is easy to see which of the two types of memory, internal or SD card, was used. In all cases, after installing on the SD card, there is 1.8 GB less space. This degree of success cannot be achieved with SD cards formatted as external memory, as full data migration is not possible.
Compare the values of internal memory and SD card memory in the screenshot to confirm.

What happens if you remove the microSD card?
Of course, the question is what happens if the MicroSD card disappears from the system. In fact, this creates a serious problem for your applications. Eventually, they can no longer access their data. Since sections from your operating system and factory reset information is still stored in the internal memory, a removed or broken SD card cannot do much harm. When we removed the microSD card, the app icons simply disappeared, and when we reinstalled them, they returned back.
If you lose or break your SD card, your data will be lost. Since they are encrypted as internal memory, you may not hope for data recovery. Instead, use regular backups. So feel free to enjoy the cheap memory expansion of your Marshmallow smartphone.
Safe removal of an internal broken SD card
To safely remove the SD card from your smartphone, you must reverse the process above. Since you probably don't have enough internal storage space, you'll first need to move your photos and other data to some other storage, such as your PC's hard drive.
Then go back to settings "Storage and USB drives" and press "Move data to internal memory" on the menu. Then format the SD card as an external memory. Perform both steps (backup and format) so that your data cannot be lost and you can use the SD card with other devices.
The now popular Chinese company Xiaomi has released several lines of phones, including such popular models as Xiaomi Redmi 4A, Xiaomi Redmi 3s, Xiaomi Redmi 4 Pro, and many others.
These models have in common that the SIM card can be inserted in a completely identical way. How to insert a SIM card into Xiaomi Redmi 4 (and into many other models, for example, in Xiaomi Redmi 4A) - this is our today's article.
To perform this operation, you will need the Xiaomi smartphone itself, plus a paperclip to open the tray, which already comes with the kit in the box with the phone. The tray itself is located on the left side of the device, and you can also insert a microSD flash drive there instead of a second SIM card.
Sequencing
- Insert the paper clip into the small hole on the tray;
- Press until it clicks, remove the inserted paper clip;
- We take out the tray from the phone.
Here you will see two places at once - for nano and micro SIM cards (in Redmi 3), and a hybrid tray in Redmi 3 Pro, 3X and 3S (instead of a second SIM card, you can insert a memory card there).

You need to install the cards in the desired slots, then carefully insert the tray back into the smartphone. If everything is done correctly, you will hear a click and feel that the tray is even with the body of the phone.
Give gifts
How to insert a memory card
Anyone who has repeatedly put SIM cards into their Xiaomi knows that not only they are inserted there. The card in Xiaomi Redmi 4, as always, can be placed in another - micro SD, which serves as an internal drive. It can store pictures, photos, music, videos, install applications and much more. You can do without a flash drive, but the built-in memory is not always enough, so users have to choose - either two mobile numbers, or additional space for files.
To install a memory card, you need to perform almost the same steps as in the previous paragraph - insert a paper clip into the hole on the SIM tray, press until it clicks, pull out the tray and install the SIM card in the first slot, and the SD memory card in the second.

Simultaneous placement of two cards and SD-drive
Yes, yes, there is such a way, but we consider it our duty to warn you: any actions are performed at your own peril and risk, they can harm your smartphone. If you want a Xiaomi smartphone to simultaneously serve both two phone numbers and a large number of personal files and programs, follow the instructions below.
To do this, you need to warm up the SIM card under a lighter for 15-20 seconds, and then carefully remove the electronic chip from the plastic shell and insert it, as well as the SD memory card, into a special slot in the tray. But do it in such a way that the golden contacts do not overlap each other, but can be recognized and separated by the smartphone as separate ones. After that, insert the tray into Xiaomi Redmi 4 Pro as usual and check if this method works by turning on the gadget. With a high degree of probability, the phone will see both SIM cards and a memory card at the same time, however, we do not guarantee the absence of malfunctions in the device.
In any case, we advise you to be careful and once again not risk the integrity and safety of your gadget - it is better to choose one of two real options than to regret your ingenuity over a broken phone later.
From time to time, it becomes necessary to connect a memory card to a PC: upload pictures from a digital camera or recordings from a DVR. Today we will introduce you to the most simple ways connecting SD cards to PC or laptops.
The first thing to note is that the process is almost the same as connecting a regular flash drive. The main problem is the lack of a suitable connector: if most modern laptops have slots for SD or even microSD cards, then this is a rarity on desktop computers.
We connect the memory card to a PC or laptop
In most cases, inserting a memory card directly into a desktop computer will not work; you need to purchase a special device - a card reader. There are both adapters with one connector for common card formats (Compact Flash, SD and microSD), and combining slots for connecting each of them. 
Card readers are connected to computers via regular USB, so they are compatible with any PC running the current version of Windows.
On laptops, things are a bit easier. Most models have a slot for memory cards - it looks like this. 
The location of the slot and the supported formats depend on your laptop model, so we recommend that you first find out the specifications of the device. In addition, microSD cards are usually sold with full-size SD adapters - such adapters can be used to connect microSD to laptops or card readers that do not have a suitable slot. 
We finished with the nuances, and now we go directly to the algorithm of the procedure.
If you are having difficulty, please refer to the paragraph below.
Possible problems and solutions
Sometimes the connection to a PC or laptop memory card runs with problems. Consider the most common of them.
Card not recognized
This alignment is possible for a number of different reasons. The easiest solution is to try reconnecting the card reader to a different USB port, or pulling out and inserting the card into the card reader slot. If it doesn't help, then refer to this article.
You are prompted to format the card
Most likely, there was a failure in the file system. The problem is known, as are its solutions. You can find them in the corresponding guide.
I get the error "This device cannot start (Code 10)"
Pure software bug. Ways to solve it are described in the article below.
Summing up, we remind you - in order to avoid problems, use only products from trusted manufacturers!
To date, the method of storing data on portable flash drives has gained quite a lot of popularity. And now all manufacturers of flash drives are fighting for the creation of the smallest and largest flash drives in terms of memory, the leading position in the minimum size is occupied by Micro SD cards.
Micro SD flash cards are by far the smallest storage devices that have been put into mass production.
Due to the very fragile structure, these drives often become unusable due to physical damage, or incorrect completion of work with such flash drives.
It is not uncommon for cases when, after a short period of work with a card, it ceases to be read or is not detected at all by devices, so you cannot rely on the long-term operation of such a drive. I advise you to use the Micro SD card as a space for work, and not for permanent storage of information. Although every day the manufacturers of such SD cards improve their durability and bring them closer to the possibility of using them for permanent and durable storage of information.
Reasons why the computer may not detect the Micro SD card:
· Hardware problem.
Flash drive failure.
· Assign an already assigned partition letter.
· File system conflict.
· Malicious programs in the operating system.
If your Micro SD card is no longer detected by your phone, camera or other device, then you need to remove it and insert it into your computer to diagnose, identify and fix the problem.
Let's move on to reviewing and eliminating the most common causes of failure of such a flash drive.
How to check if a Micro SD card is detected on a computer?
In order to understand whether your computer has detected your Micro SD card, you can use 2 methods.
First way. Open my computer and check the connection of the new partition. If you have appeared new disk, then the flash drive was defined. 
The second way. If nothing appeared in the explorer, then it is worth checking whether the computer has determined at all that an SD card was connected to it. To do this, go to my computer, click right click mouse on the computer and select "Manage" from the drop-down menu. 
After that, the Computer Management window will open, in it there is a menu on the left side. We need to select the "Disk Management" section.
In the displayed statistics, we can see all the drives connected to the computer, determine their volume, or set the partition letter.
If you did not see your SD card in this list, then read the following reasons and their solutions.
hardware problem
If you are trying to connect your SD card to a computer through an adapter or through a card reader, and nothing happens, the first thing to do is to check these interface devices for operability.
If you use a card reader to connect the card, then try inserting a known working Micro SD card into it, if a known working card is also not detected, in this case check and reinstall the card reader drivers. If after all the attempts made nothing has changed, then most likely the problem is in the card reader.
If you are using a laptop, then most likely you are trying to insert an SD card through an adapter, directly into the laptop's built-in card reader. If nothing happens when using this connection method, then I recommend checking the drivers for the built-in card reader first, and then checking the adapter for operability.
Drivers for card readers can be downloaded and installed from the manufacturer's official websites, if you have a portable card reader that connects via a USB port, then download the drivers from the manufacturer's website. In the event that you use the built-in laptop card reader, then you can download the drivers from the official website of your laptop manufacturer.
In order to check whether the driver of your card reader is detected by the system, you need to open the “Device Manager”, to do this, press the key combination Win + R and in the “Run” line that opens, enter the command “devmgmt.msc”.
The "Device Manager" window will open in which you can see devices on which the driver is not installed. Such devices will be marked with a yellow triangle with an exclamation point. If there are no such devices, then expand the "Portable devices" section and make sure that the computer has detected the card reader itself in order to discard the option of a non-working device.
Flash drive failure
In the event that you have checked the performance of the above devices and made sure that they are in good condition, then it is worth checking the Micro SD card for physical damage, cracks, chips, deformation or damage to the outer layer, since such a flash drive consists of many small tracks, which are easy to scratch and tear.
Try to connect it to any device - a smartphone, camera, etc. If the flash drive is not detected in any device, then most likely it is physically damaged and cannot be repaired. Only the presence of important information on the map can motivate you to contact the service center.
Assigning an already assigned partition letter
This type of problem is quite common. This happens when an SD card is connected to a computer, the system assigns it the same letter as the existing partition, because of this a conflict occurs and we do not see our flash drive in the list of computer disks.
In order to fix this type of problem, open the "Computer Management" section described above.
After getting into the "Disk Management" section, we need to find our flash drive, focus on its volume, select a disk that matches the volume of our Micro SD card. Right-click on it and select "Change drive letter or drive path ..." from the drop-down menu.
A window will open in which we need to click the "Add" button.
In the window that opens, select the letter for this section and click OK.
Done, we set the letter to our section, now we check its presence in the explorer.
File system conflict
It is not uncommon for cases when a flash drive is defined, but it cannot be opened. The reason for this may be a file system conflict or a damaged file system of the Micro SD card itself. If the data on the flash drive does not play any role for you, then you can try formatting it to the NTFS file system.
To do this, right-click on the flash drive and select "Format" from the drop-down menu. 
In the formatting window that opens, in the "File system" section, select NTFS, set the Volume Label and click the "Start" button.
Thus, we formatted the Micro SD card to NTFS format, after which you can open it.
Malicious programs in the operating system
Faced with the problem of detecting a Micro SD drive, you may not suspect that malware, the so-called viruses, can be the culprit for all this, which can block USB ports and prevent the computer from working with your memory card.
In this case, your best bet would be to perform a full system scan with your antivirus program, or use free antivirus programs that can help you with this.
One of these I will advise you is Dr.Web CureIt!
The program is absolutely free and is intended only for scanning and finding virus programs and removing them.
To download this program, go to the official website of Dr.Web at the link https://free.drweb.ru/cureit/
Download the program and start scanning.
After the end, remove all found malware and after restarting the computer, try connecting the Micro SD card again.
Conclusion
As you can see, there are many reasons why your computer does not see the Micro SD card, so it is impossible to unequivocally answer the question “Why does my computer not see the memory card?”, As this can be caused by various problems. In order not to make a mistake and solve the problem, it is worth doing all the steps described in this article in turn.
Also, do not forget that when formatting, all information from the flash drive will be deleted.
And I still advise you not to store important information on drives of this type, as they most often fail to work due to a very fragile structure. Use these types of drives to work directly with files, saving them to more secure locations.


