Step-by-step assembly of the Rubik's Cube 3. How to solve the Rubik's Cube and save the nervous system. Solving the puzzle - preparatory work
Collecting a Rubik's Cube can be difficult for both an adult and a child, and if after several attempts you fail, do not despair, simple and understandable 3x3 patterns will help you figure out the puzzle. There are many various ways in order to do this, because the best minds once spent their energy on this and gave amazing results in the form of schemes and algorithms.
The easiest way to assemble for those who have just started
This scheme is considered the simplest and is great for children. It starts with the assembly of the cross, in other words, each edge should have the same color of the central plate and corner elements. At the beginning of the assembly, the Rubik's cube must be disassembled. Assembly scheme 3 * 3 in 8 stages.
First you need to take the cube in your hands and turn one of the sides towards you, respectively, taking its frontal - F, all remaining according to the scheme. Assembly must start from the bottom (H).
scheme this approach place it below:
- Having chosen the color that you want to start first, proceed to the assembly of the lower cross. This is a simple stage, the complexity of which ends solely with the choice of color. What is at this stage on the other sides of the cube should not attract attention.

Rubik's Cube Step
- It is necessary to assemble the cross correctly - the cross must end on adjacent faces. This means that the faces located at the top of the mating sides must have the same color as the bottom cross. If this did not happen during assembly, then there are two available algorithms that can correct the situation:
- The mismatch on two adjacent sides is corrected by the scheme:
P V P»V P V2 P V
- If the opposite parts of the cube have an error, then you can try the following formula:
F2 T2 N2 F2 T2
When working with these algorithms, the cross should be at the top.
- We collect completely one of the sides of the Rubik's cube. To do this, you need to put the corners in place. Turning the puzzle over with the already assembled cross down, it will become noticeable that the upper corners of the sides adjacent to H have acquired the same color as the cross. That is, if the cross is yellow, then the considered corner elements will also be yellow. With such a scheme, only three options for the position of the base color can be possible: on the left, on the right, or on top, and for each such position there is its own assembly scheme:

The result of applying such algorithms is one fully assembled color, and the adjacent side of the upper strip has one color.

We continue the assembly
- If you want to solve the Rubik's Cube for speed, then there are a few more important and relevant formulas for you to remember. We unfold the side that is already completely ready up. We begin to twist the bottom edge until the color of one of the side elements matches with any of the sides and form the letter T. Then, it is necessary to move the side element from the bottom edge to the middle until it matches the color of the adjacent sides. As a result, we get two versions of the provisions, in which:
- Left turn required: N L N "L" N "F" N F.
- Move to the right: N "P" P N P N F N "F".
- Now it's time for the third layer. We turn the toy itself over so that the side that has not yet been folded is at the top. Most likely, white became the opposite color if you chose the most popular yellow color to start the assembly. If there are white plates in front of your eyes with any position described below, then I act according to the following formulas:
White dice: central and 2 opposite F P V P "V" F".
White dice: center and two on the side F V P V "P" F".
White dies in the center, choose the scheme you like and repeat 2 times.
- Another regular cross with the upper face matching in color with adjacent ones, in which 2 outcomes are most often possible:
But, if this does not affect the situation in any way, then you can use any options.
- A rather difficult stage at which it is necessary to put the corner elements in their rightful places. And it's not that easy. Most often there is a lot of confusion in the layers, but if everything is done correctly, then in the end, each color block will stand where you need it.
- Stage number eight is connected with the same angles and roundabouts:
Clockwise P2 V2 » P F P» V2″ P F P .
And in the opposite direction: P "F P" V2 "P F" P "V2" P2 .
Any of these algorithms will also come in handy when moving in corners: crosswise or opposed.
The mirror cube is assembled using the same algorithms, but those who want to break the record should know that only the 3 * 3 model applies to this indicator.
The assembly of the 3 * 3 model for clarity can be seen in the video below:
How to solve a Rubik's cube 3x3 - quickly and easily. The best technique for beginners.
Seven steps to build
- First, make sure that the cube is disassembled. This will mark the beginning of stage number 1. The stage ends with the assembly of the cross on the top side of the cube, and the upper middle faces of the sides should match the center in color. One of the plates of the upper cross should be located on the edge of the bottom. To do this, we take either the first or the second option.

![]()
The operation is repeated for all remaining cubes of the cross B.
- Stage two starts with the assembled cross of the upper part, ends with the fully assembled. How does this happen? The diagram is popular to explain the entire sequence of actions. We take the corner element of face B and translate it into H. Depending on the color distribution, you need to choose your own solution.


With three cubes of the corner of the upper face, you need to repeat exactly the same thing.
- It is easy to guess that the beginning of the next stage is always the result of the previous one. As we remember, the previous goal was to assemble the face completely. If the goal is achieved, then you can begin to implement a new task: the assembly of the two upper layers.
To simplify, we turn again to the help of diagrams. It is necessary to move the selected side cube down. Next, choose:

We continue the assembly
As usual, we repeat everything and stir the last dies.
- The cube assembled with two belts must be placed in layers down. This part will end with the cubes from the cross B in their place, but turned upside down. You just need to rearrange the cubes In the middle part until the moment when everyone falls into place.


These actions will give the effect of breakage, but you should not be afraid. Repetition is the mother of learning. We fix the algorithm and voila - we have a cube in front of us where everything is in place. But you need to spatially change the wrong cube in your hands a little, turning it over to the side on the right.
- In this step, the beginning, as always, is taken from the end of an already completed step. We go according to the scheme.

- At the end of the step, the cube will be fully assembled, but it will start with the fact that all the corners will be where they should be, but possibly upside down.
There may be two positions.

To do the flip, do the following:

The algorithm is applied until the PV becomes correct. Again, things can get messy, but that's okay if you trust consistency over and over again. Before repeating, we put another “wrong cube” in the corner on the right. Repeat until the cube is completed.
The Jessica Friedrich Method
Jessica Friedrich's method, as one of the fastest methods for solving a Rubik's cube.
In 1981, Jessica Friedrich developed her build plan, which has all the same basic points and fundamental differences does not, but it greatly speeds up the process. You just have to learn "only" 119 rules. If you want to break a record, you have to strain your brains.
If you are just starting out and spend two minutes or more on assembly, then this method is not for you yet, practice with eight step instructions.
- This method begins with the same assembly of a cross with edges on the sides. In English, the name of this step sounds like Cross and in translation means a cross.
- The second stage implies the assembly of two layers of the cube at once and is called F2L (an abbreviation for the phrase First 2 Layers, which literally translates as the first two layers). The algorithms describing this path are given below:

- The OLL stage means assembling the top layer of the Rubik's Cube. It will be described by 57 formulas.

- The final, fourth stage is called PLL and means the placement of all elements in their places. The last stage can describe these algorithms:

15 steps to assemble a 3*3 cube
In 1982, for the first time, competitions appeared in which those who wanted to solve the puzzle as quickly as possible took part. In connection with the discovery of such games, more and more new formulas and algorithms for solving the problem began to appear. But, in fifteen moves, no one has yet been able to cope with the task. Even an assembly using 8 stages implies many more moves. The algorithm of God given below has twenty such moves.
Belongs to the discovery of such quick assembly team from Google, in 2010 they released their solution to the Hungarian sculptor's puzzle.
Now, if you hear somewhere else about the 15-step solution system, you can safely argue with him, there is no chance that his resource will exceed the resources of such a powerful company. Those who wish to learn how to solve the cube by the fastest and probably the youngest method among the ambulances can pick up toys and use the scheme shown in the picture below.

Secret assembly technology
Those who want to cope with the task, in a time equal to or less than a minute, should learn a few simple rules.
- White and yellow color will be a great solution to start the assembly.
- Many precious seconds are wasted on turning the Rubik's Cube in hand, which, of course, has a negative effect on temporary results. That is why they start assembling, collecting a cross on the bottom face of the puzzle. So you save time on the confused turning of the toy.
- The 3*3 cube is well suited for the hand and its surface is quite slippery and rotates well, but for greater success, you can purchase a special, not very expensive lubricant for such items.
- Always be one step ahead: at the moment when the mental stress has already subsided and you are completing one of the algorithms that will definitely lead to success, it's time to think about the next step.
- Use all resources: all your ten fingers. This is what will lead to new records in the assembly of the cube.
With closed eyes? Easily!
Do you want to surprise everyone with the ability to solve a Rubik's Cube without watching the process? Learned algorithms will help to cope with this. In addition, follow a few simple rules:
- Keep in mind the picture of the puzzle, it should always be mentally in front of your eyes and remember the golden rule, which says that it is best to start assembling from the bottom edge. And do not forget about the immobility of the centers relative to the sides.
- Assembling a cube with tied or eyes closed sure to amaze those around you. The invented algorithm says: orient the corners correctly! As a rule, all corners contain two colors: it is either yellow or white.
- Correctly position the side elements of the problem and whether its orientation is correct.
Modern varieties of the Rubik's Cube
The Rubik's Cube was created by a scientist from Hungary, Erno Rubik, a professor and sculptor using this model to explain to his students the basics of mathematics, namely the mathematical theory of groups. In that same 1974, Rubik could not even imagine that this attempt to demonstrate mathematics would make him a millionaire.
The assembly of the item lasted about a month, during which time it underwent many changes, mainly related to the size. The scientist tested the future toy on his friends and loved ones. The patent was obtained in 1975, and the first batch was published only in 1977. “Magic Cubes”, as the invention was dubbed, first appeared in Budapest, in a small cooperative just in time for the Christmas holidays. Several pieces from that very first batch also ended up in the USSR.
Such mathematics soon interested the minds of other people. Tibor Lakzi took up the promotion of the cube as a puzzle game. It was with his help that the world recognized the now beloved cube. Lakzi lived at that time in Germany, but often visited his homeland, where an object he liked was discovered. In one of the cafes where the entrepreneur was having lunch, he saw a funny little thing in the hands of the waiter. He, as a mathematician and as a businessman in the computer field, immediately saw the prospects and contacted the inventor. Another game inventor, Tom Kremer, who by that time had already founded Seven Town Ltd, was involved in the promotion.
First popularity
And now, at the end of the 20th century, hundreds of millions of copies of the Rubik's Cube went on sale, making it exciting game and hobby. In European countries, the little thing spread in 1980 in May, and the USSR saw it a year later. Of course, in our country it was not without curiosities. Some officials were given bribes with these toys, for which citizens had to stand in line and enter the circle twice.
The desire to solve the puzzle and learn its secrets enlivened the minds of everyone, even those who did not have it in their possession. And in 82, an article appeared in the well-known magazine "Young Technician", which provided schemes and methods for making a foreign toy with your own hands. And, of course, they could not do without stigma - a bourgeois toy that takes a lot of time from the workers. But these arguments did not exist for long, and soon articles with schemes for assembling the Rubik's cube appeared on the pages of scientific journals.
So that people who could not cope with this difficult task and did not suppress their failures in alcoholic binges to destroy the failed one, special plastic hatchets were developed for the opposite model.
A little more history

In the year 82 of the 20th century, the first puzzle assembly competitions were held. The venue was the capital of Hungary - Budapest, where the game was invented. 19 countries participated, represented by best players, winners of local competitions. The winner was Minh Thai, an American student from Los Angeles, who at the time was 16 years old. He coped with his task in 22.95 seconds. Although at that time there were persistent rumors about craftsmen who could complete the assembly in just 10 seconds. Of course, compared to Mats Wolf's current record, these numbers seem huge.
The Dutchman does it in just 5.5 seconds. Although there is a video where the previous record holder Felix Zemdegs collects a magic cube for 4.21, he has no official confirmation. But there is another record, also officially not included in the Guinness Book of Records. The CubeStormer-3 robot managed to beat Zemdegs as well, spending only 3.25 seconds on the task. Let's hope that someday one of the people will be able to break the record of the program.
Today it is the best-selling toy in the whole world, which everyone tried to collect. She has several awards to her credit: she repeatedly received the National Hungarian Prize as the best invention, won in France, the USA, Germany and the UK. In 1981 he received his rightful place in New York, at the Museum of National Art. There is even a special Rubik's Foundation, established in 88. It was founded to support young inventors.
Surely each of us knows the Erno Rubik's Cube, or as it is customary to call it in the common people "Rubik's Cube". Oh, how much nerves and time we spent trying to figure out how to collect this tricky cube in order to get all sides of the same color. It turns out that there are whole schemes for collecting this "beast", about which we will now tell you.
Before proceeding with the assembly of the cube, it is necessary to understand what elements it consists of. Like all brilliant things, the cube is simple. The most popular 3x3 cube among ordinary people, consisting of 12 edges, 6 centers and 8 corners. Inside the cube there is a cross, thanks to which the faces of the cube move. The crosspiece is not movable and does not take part in the assembly.
Each center of the cube is painted in a certain color, and it indicates what color the side will be in the assembled state. The cube centers are not movable and they do not change their position in the process of assembling all the elements.
Edges are always painted in 2 colors. This is a solid element and cannot be broken when rotating the faces.
The corners of the cube are painted in three colors, which also do not separate during rotation.
This is how all 3x3 cubes are arranged and it doesn’t matter if it is fast or bought on the market in the nearest tent.
3x3 Rubik's cube assembly scheme for children, step by step instructions for beginners (the easiest way)
To understand the formulas that are used to assemble a cube, it is necessary to become familiar with the language of rotations. These special designations of the movements of the faces of the cube, with the help of which one or another assembly algorithm is written, will help you achieve heights in the assembly of the cube.

There are also designations for changes in the position of the cube in space, they are called intercepts. 
If only the letter (R) is indicated in the prescribed algorithm, then the position of the cube changes clockwise. If the designation contains a letter paired with an apostrophe (R '), then the side changes counterclockwise. If there is a number after the letter, then this means that the side needs to be rotated the same number of times.
Initially, it is worth assembling the correct cross. Choose any center color and start assembling.
If the color of the center and rib stickers match, you have assembled the correct cross.

Put the center up, in our case it is white. We find 4 edges of the same color, select any of them and put it first. If the edge is in the middle layer, then with the movements L 'or R we put them to the white layer. Below are different situations and their solutions. 
Thus, you will get a cross. Most often at this stage it will not turn out right, so you need to swap the edges. Twist the top layer until the 2 edges match in color with the centers. At this stage, you may find yourself in one of two situations (shown in the picture).
The R U R 'U' algorithm is also called bang-bang.

Now you need to fold the first layer. To do this, find a white corner (you will have a corner of the color that you chose in the first step), find a place on the bottom layer where it should be, put the corner in its place. The picture below shows three typical situations that you may have. After completing the algorithm from the picture, you can put the corner in its place. 
We find 4 edges (with the exception of yellow). On the top layer, select the one you want to put first, then twist the top face until the center color matches the label of this edge. Next you will get one of the situations.

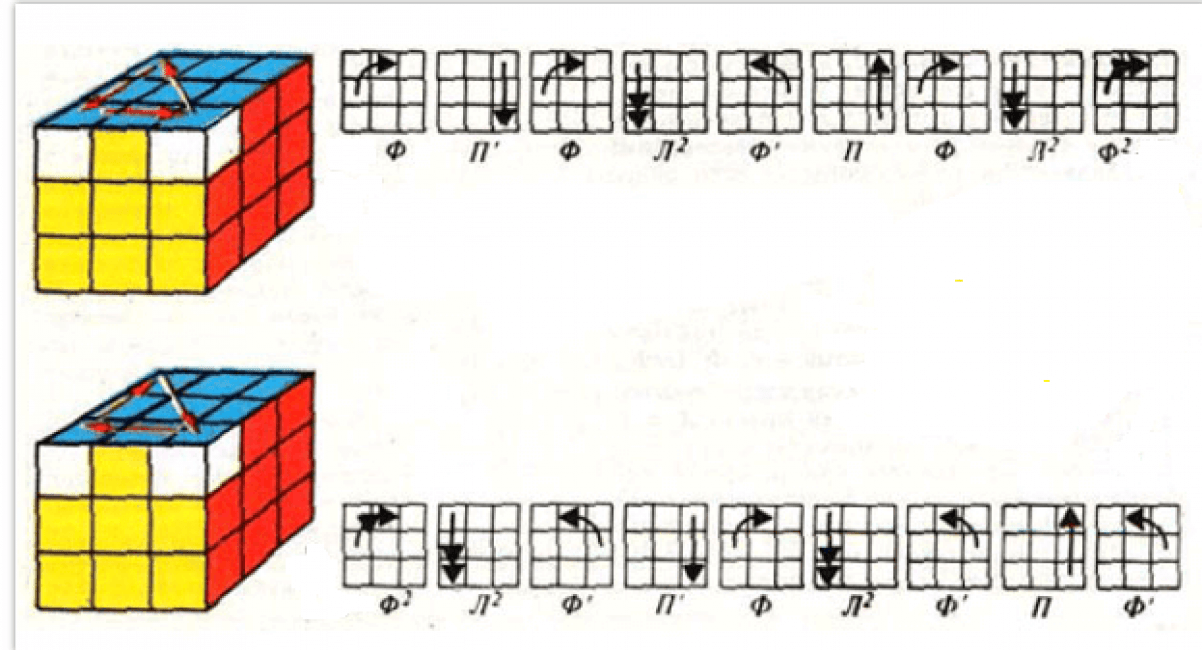
We collect the yellow cross. Please note that sometimes when carrying out the manipulations above, the yellow cross can turn out by itself. If this does not happen, find your situation and the algorithm for solving it in the picture below. 
Next, collect the entire yellow side. After collecting the yellow cross, one of the 7 situations described below may appear. Find yours, and make flips according to the specified algorithm. 
We collect the corners of the upper layer. Select any of the corners and use U, U2 and U’ to put it in place so that both corners match the color of the bottom layers. Take the white cube towards you and do one of the indicated algorithms. 
At this stage, some difficulties may arise:
- corner fell into place along with another corner. Rotate the top face of the cube so that it stands up as in the above algorithm;
- corner fell into place along with another corner diagonally. The output is exactly the same as above.
It remains only to put the ribs in their places. Consider in the picture what situation happened to you and, following the algorithm, collect the edges. 
Voila! The cube is assembled.
How to solve a Rubik's Cube in 20 moves, diagram?
For more than 40 years of the existence of the cube, a considerable number of schemes have been invented. most digestible and simple method considered to be a layered assembly. It consists of seven stages, which are depicted and painted in the schemes submitted by us. You may have to spend more time collecting for the first time than you thought. However, you can solve this puzzle by yourself or with your child.
To begin with, you must understand that when collecting a cube for the first time, you will not be able to achieve speed in a matter of seconds. In assembly, the main thing is to understand how the faces move correctly in the plane and learn how to determine their location. The simplest way, which should be used in the first couple, for children and adults, begins with the assembly of the cross on the upper edge. 


The principle of the assembly method from the initial cross is simple. To do this, you need to study the instructions presented by us and the location of the faces. 


At the sixth stage, it is necessary to send the corner cubes of the third layer to their places. 
At the final stage 7, you need to deploy the corner cubes of the third layer.
Rubik's cube assembly scheme 3x3 in 15 moves
Already 7 years after the invention of the Rubik's Cube, competitions for its high-speed assembly began to take place. Fans of this puzzle began to develop algorithms and strategies that will allow you to assemble the cube in the minimum amount of time and moves. To date, there is only one algorithm for assembling a cube in the minimum number of moves and it is called the "Algorithm of God". Accordingly, it is impossible to collect a cube in 15 moves. 
Video for beginners how to solve a Rubik's Cube 3x3
How to quickly solve a Rubik's cube 3x3 quick assembly scheme?
Building a cube takes a long time. Beginners in this business often wonder how to quickly assemble a cube and not waste time learning formulas. The whole process of quick assembly begins with the assembly of the lower cross. Further, according to the scheme that we posted below, collect the cube. 
Maxim Chechnev, how to solve a Rubik's cube?
On the net you will find a huge number of manuals on the techniques for collecting the simplest Rubik's Cube. The ways of learning on the World Wide Web are not much different from each other, but there is a catch - not all of them are understandable and accessible, especially to children. After rereading complex formulas, the child is unlikely to understand anything and will be able to assemble his first puzzle on his own.
A simple and affordable way of learning was invented by Maxim Chechnev. The fact that his training scheme works for kids, he was convinced by working in children's camps and teaching children there different ages collect a rubik's cube. 
The learning and assembly process will take your child several hours. Below will be presented video materials consisting of 9 lessons. It is always easier for children, and even adults, to understand how the assembly takes place using a good example, rather than trying to parse already complex formulas. In the final, the children will not only assemble this puzzle on their own, but will also remember all the stages of its assembly.
Jessica Friedrich, how to solve a Rubik's Cube?
Back in the 80s of the last century, another method for collecting a rubik's cube was invented by a Czech resident Jessica Friedrich. This method belongs to the layered and the cube is assembled, respectively, by layers. This technique was developed for beginners, but it has been improved. The thing is that Friedrich proposes to reduce the number of stages from 7 to 4. Initially, a side is selected and a cross is assembled on it, then the first and second layers are assembled simultaneously and only then the last layer, for which 2 stages were allocated. However, this method is by no means simple. Despite the reduction in stages, you will have to learn as many as 119 algorithms.
Experts do not recommend beginners to start learning how to assemble a cube. First, you should master the simplest layered technique, bring your collection skills to at least 2 minutes, and only after that proceed to the Friedrich method.


Professional Rubik's Cube
You may be surprised, but in the world there are competitions for the speed of solving a cube and only aces take part in them. Cubes for speedcubing are chosen especially carefully. First of all, they must be fast. Today on the market there are a huge number of cubes of various companies. Among professionals, cubes of the following companies are valued: QiYi, MofangGe, Valk, MoYu and others. 
The cost of the cube depends on the manufacturer and the materials from which it is made. By the way, most of the firms that we have indicated above are Chinese. You can also buy them on Chinese trading platforms, including . The average cost of a quality cube on Ali will be 500-700 rubles, which is an order of magnitude cheaper than in local stores.
How to grease a Rubik's Cube?
It may seem strange to you that the cube needs to be lubricated at all. Only the purchased cube always spins well and it never even crosses your mind that it needs to be lubricated. Over time, the cube may begin to creak, the sides will rotate with a stretch, and much more. To troubleshoot, you will have to lubricate the cube. If you have just started the first steps in mastering the cube, then you are unlikely to need a professional lubricant that is sold on the network. There are other cheaper ways to do it as well. In the bottom case, inexpensive silicone grease is perfect. It is sold in all radio parts stores. Buy two versions of this lube (water-like consistency and jelly-like consistency), mix and lubricate the cube if necessary 
Although the process of assembling the Erno Rubik's Cube at first glance seems to be something complicated and incomprehensible, even a child can handle it. The main thing is to have a great desire to spend your time learning this exciting process.
How to solve the Rubik's Cube
In a nutshell: if you remember 7 simple formulas with a length of no more than 8 rotations each, then you can safely learn how to solve a regular 3x3x3 cube in a couple of minutes. Faster than a minute and a half, this algorithm will not be able to solve the cube, but two or three minutes is easy!
Introduction
Like any cube, the puzzle has 8 corners, 12 edges and 6 faces: top, bottom, right, left, front and back. Usually, each of the nine squares on each face of the Cube is colored in one of six colors, usually arranged in pairs opposite each other: white-yellow, blue-green, red-orange, forming 54 colored squares. Sometimes, instead of solid colors, they put on the faces of the Cube, then it becomes even more difficult to collect it.
In the assembled ("initial") state, each face consists of squares of the same color, or all the pictures on the faces are correctly folded. After several turns, the Cube "stirs".
To collect the Cube is to return it from being stirred to its original state. This, in fact, is the main meaning of the puzzle. Many enthusiasts find pleasure in building "solitaire" - patterns .
ABC Cube
The classic Cube consists of 27 parts (3x3x3=27):
6 single-color central elements (6 "centers")
12 two-color side or edge elements (12 "ribs")
8 tricolor corner pieces (8 "corners")
1 internal element - cross
The cross (or ball, depending on the design) is in the center of the Cube. The centers are attached to it and thereby fasten the remaining 20 elements, preventing the puzzle from falling apart.
Elements can be rotated in "layers" - groups of 9 pieces. Clockwise rotation of the outer layer by 90° (when looking at this layer) is considered “direct” and will be denoted by a capital letter, and counterclockwise rotation is “reverse” to the direct one and will be denoted by a capital letter with an apostrophe """.
6 outer layers: Top, Bottom, Right, Left, Front (front layer), Rear (back layer). There are three more inner layers. In this assembly algorithm, we will not rotate them separately, we will use only the rotations of the outer layers. In the world of speedcubers, it is customary to make designations in Latin letters from the words Up, Down, Right, Left, Front, Back. 
Turn designations:
clockwise (↷ )- V N P L F T ⇔U D R L F B
counterclockwise (↶ ) - V"N"P"L"F"T" ⇔U"D"R"L"F"B"
When assembling the Cube, we will sequentially rotate the layers. The sequence of turns is recorded from left to right one after the other. If some rotation of the layer needs to be repeated twice, then the degree icon “2” is placed after it. For example, Ф 2 means that you need to turn the front twice, i.e. F 2 \u003d FF or F "F" (as convenient). In Latin notation, instead of Ф 2, F2 is written. I will write formulas in two notations - Cyrillic and latin, separating them like this sign ⇔.
For the convenience of reading long sequences, they are divided into groups, which are separated from neighboring groups by dots. If you want to repeat some sequence of turns, then it is enclosed in parentheses and the number of repetitions is written at the top right of the closing bracket. In Latin notation, a multiplier is used instead of an exponent. In square brackets, I will indicate the number of such a sequence or, as they are usually called, “formulas”.
Now, knowing the conventional language for notation of rotations of the layers of the Cube, you can proceed directly to the assembly process.
Assembly
There are many ways to build a Cube. There are those that allow you to assemble a cube with a couple of formulas, but in a few hours. Others - on the contrary, by memorizing a couple of hundred formulas, they allow you to collect a cube in ten seconds.
Below I will describe the simplest (from my point of view) method that is visual, easy to understand, requires memorizing only seven simple “formulas” and at the same time allows you to solve the Cube in a couple of minutes. When I was 7 years old, I mastered such an algorithm in a week and solved the cube in an average of 1.5-2 minutes, which amazed my friends and classmates. That's why I call this assembly method "the simplest". I will try to explain everything "on the fingers", almost without pictures.
We will collect the Cube in horizontal layers, first the first layer, then the second, then the third. The assembly process will be divided into several stages. There will be five of them in total and one additional one.
6/26 At the very beginning, the cube is sorted (but the centers are always in place).
Assembly steps:
10/26 - cross of the first layer ("upper cross")
14/26 - corners of the first layer
16/26 - second layer
22/26 - cross of the third layer ("lower cross")
26/26 - corners of the third layer
26/26 - (additional stage) rotation of centers
To assemble the classic Cube, you will need the following: "formulas":
FV "PV ⇔FU"RU- rotation of the edge of the upper cross
(P"N" PN) 1-5 ⇔(R "D RD) 1-5- "Z-switch"
VP V"P" V"F" VF ⇔UR U"R" U"F" UF- rib 2 layers down and to the right
V"L" VL VF V"F" ⇔U"L" UL UF U"F"- edge 2 layers down and left
FPV P"V"F" ⇔FRU R"U"F"- rotation of the edges of the lower cross
PV P "V PV" 2 P "V ⇔RU R"U RU"2 R"U- permutation of the edges of the lower cross ("fish")
V"P" VL V"P VL" ⇔U"R" UL U"R UL"- permutation of corners 3 layers
The first two stages could not be described, because. assembling the first layer is quite easy "intuitively". But, nevertheless, I will try to describe everything thoroughly and on the fingers.
Stage 1 - the cross of the first layer ("upper cross")
 The purpose of this stage: the correct location of the 4 upper edges, which, together with the upper center, make up the “cross”.
So, the Cube is completely disassembled. Actually not completely. Distinctive feature The classic Cube is its design. Inside there is a cross (or ball), which rigidly connects the centers. The center determines the color of the entire face of the Cube. Therefore, 6 centers are always already in their places! Let's start with the top. Usually the assembly starts with a white top and a green front. With non-standard coloring, choose whichever is more convenient. Hold the Cube so that the top center (“top”) is white and the front center (“front”) is green. The main thing when assembling is to remember what color we have top and what is the front, and when rotating the layers, do not accidentally turn the whole Cube and not go astray.
Our goal is to find an edge with top and front colors and place it between them. At the very beginning, we are looking for a white-green edge and put it between the white top and the green front. Let's call the desired element "working cube" or RC.
So, let's start assembling. White top, green front. We look at the Cube from all sides, without releasing it, without turning it over in our hands and without rotating the layers. Looking for RK. It can be located anywhere. Found. After that, in fact, the assembly process itself begins.
If the RC is in the first (upper) layer, then by double-turning the outer vertical layer on which it is located, we "drive" it down to the third layer. We act similarly if the RK is in the second layer, only in this case we drive it down not with a double, but with a single rotation.
It is desirable to drive out so that the RK turns out to be the color of the top down, then it will be easier to install it in place. When driving the RC down, you need to remember about the edges that are already in place, and if some edge was touched, then you must not forget to return it to its place later by reverse rotation.
After the RC is on the third layer, rotate the bottom and "adjust" the RC to the center of the front. If the RK is already on the third layer, then simply put it in front of you from below, rotating the bottom layer. After that, turning F 2 ⇔F2 put RK in place.
 After the RC is in place, there can be two options: either it is correctly rotated, or it is not. If it is turned correctly, then everything is OK. If it is rotated incorrectly, then turn it over with the formula FV "PV
⇔FU"RU. If the RK is "kicked out" correctly, i.e. top color down, then this formula practically does not have to be applied.
After the RC is in place, there can be two options: either it is correctly rotated, or it is not. If it is turned correctly, then everything is OK. If it is rotated incorrectly, then turn it over with the formula FV "PV
⇔FU"RU. If the RK is "kicked out" correctly, i.e. top color down, then this formula practically does not have to be applied.
Let's move on to installing the next edge. Without changing the top, we change the front, i.e. turn the Cube to itself with a new side. And again we repeat our algorithm until all the remaining edges of the first layer are in place, forming a white cross on the upper face.
During the assembly process, it may turn out that the RC is already in place or it can be put in place (without destroying the already assembled one) without first driving it down, but “immediately”. Well, good! In this case, the cross will gather faster!
So, already 10 elements out of 26 are in place: 6 centers are always in place and 4 edges we have just placed.
Stage 2 - corners of the first layer
The goal of the second stage is to collect the entire top layer by installing in addition to the already assembled cross four corners. In the case of a cross, we looked for the desired edge and put it in front at the top. Now our RC is not an edge, but an angle, and we will put it in front at the top right. To do this, we will proceed in the same way as in the first stage: first we will find it, then we will “drive” it to the bottom layer, then we will put it in the front bottom right, i.e. under the place we need, and after that we will drive it upstairs.
There is one beautiful simple formula. (P"N" PN) ⇔(R"D" RD). She even has a "smart" name -. She must be remembered.
We are looking for an element with which we will work (RC). In the upper right near corner should be a corner that has the same colors as the centers of the top, front and right. We find it. If the RC is already in place and rotated correctly, then by turning the entire Cube we change the front, and look for a new RC.
If the RC is in the third layer, then rotate the bottom and adjust the RC to the place we need, i.e. front bottom right.
We spin the Z-switch! If the corner did not fall into place, or stood up, but turned incorrectly, then turn the Z switch again, and so on until the RK is at the top in place and correctly turned. Sometimes you need to twist the Z-switch up to 5 times.
 If the RC is in the upper layer and not in place, then we drive it out of there by any other using the same Z-switch. That is, first we turn the Cube so that the top remains white, and the RC that needs to be kicked out is in the upper right in front of us and we turn the Z-switch. After the RC is “kicked out”, we again turn the Cube towards us with the desired front, rotate the bottom, put the already expelled RC under the place we need and drive it up with the Z-switch. We twist the Z-switch until the cube is oriented as it should.
We apply this algorithm for the remaining corners. As a result, we get a fully assembled first layer of the Cube! 14 out of 26 cubes stand still!
Let's admire this beauty for a while and turn the Cube over so that the collected layer is at the bottom. Why is it necessary? We will soon need to start assembling the second and third layers, and the first layer is already assembled and interferes with the top, covering all the layers of interest to us. Therefore, we turn them up in order to better see all the remaining and uncollected disgrace. Top and bottom changed places, right and left too, but the front and rear remained the same. The top is now yellow. Let's move on to the second layer.
I want to warn you, with each step the Cube takes on a more assembled look, but when you twist the formulas, the already assembled sides are stirred. The main thing is not to panic! At the end of the formula (or sequence of formulas), the Cube will be assembled again. Unless, of course, you follow the main rule - during the rotation you can not twist the entire Cube, so as not to accidentally go astray. Only separate layers, as written in the formula.
Stage 3 - second layer
So, the first layer is assembled, and it is at the bottom. We need to put 4 edges of the 2nd layer. They can now be located both on the second and on the third (now upper) layer.
Select on the top layer any edge without the color of the top face (without yellow). Now it will be our RK. By rotating the top, we adjust the RC so that it matches in color with some side center. Rotate the Cube so that this center becomes the front.
Now there are two options: our working cube needs to be moved down to the second layer, either to the left or to the right.
There are two formulas for this: 
down and right VP V"P" V"F" VF ⇔UR U"R" U"F" UF
down and left V"L" VL VF V"F" ⇔U"L" UL UF U"F"
If suddenly the RC is already in the second layer in the wrong place, or in its own place, but incorrectly rotated, then we “kick out” it with any other using one of these formulas, and then apply this algorithm again.
Be careful. The formulas are long, you can’t make mistakes, otherwise the Cube will “figure it out” and you will have to start the assembly again. It's okay, even champions sometimes go astray when assembling.
As a result, after this stage, we have two collected layers - 19 out of 26 cubes are in place!
(If you want to optimize the assembly of the first two layers a little, you can use here.)
Stage 4 - the cross of the third layer ("lower cross")
The purpose of this step is to collect the cross of the last unassembled layer. Although the unassembled layer is now at the top, the cross is called the "bottom" because it was originally at the bottom.
First, we will rotate the edges so that they are all facing up in the same color as the top. If they are already all turned up so that at the top we get a one-color flat cross, we move on to moving the edges. If the cubes are turned incorrectly, we will turn them over. There can be several cases of edge orientation: 
A) all wrongly rotated
B) two adjacent ones are incorrectly rotated
C) two opposite ones are incorrectly rotated
(There can be no other options! That is, it cannot be that there is only one edge left to turn. If two layers of the cube are collected, and an odd number of edges are left to turn on the third, then you can stop worrying further, but .)
Remember the new formula: FPV P"V"F" ⇔FRU R"U"F"
In case A) we twist the formula and get case B).
In case B), we rotate the Cube so that two correctly rotated edges are on the left and behind, twist the formula and get case C).
In case C), we rotate the Cube so that the correctly rotated edges are on the right and left, and, again, we twist the formula.
As a result, we get a “flat” cross from correctly oriented, but out of place edges. Now you need to make the correct volumetric cross from a flat cross, i.e. move edges.
Remember the new formula: PV P "V PV" 2 P "V ⇔RU R"U RU"2 R"U("fish").
We twist the top layer so that at least two edges fall into place (the colors of their sides coincide with the centers of the side faces). If everyone fell into place, then the cross is assembled, proceed to the next stage. If not everything is in place, then there can be two cases: either two adjacent ones are in place, or two opposite ones are in place. If they are opposite in place, then we twist the formula and get neighboring ones in place. If there are neighboring ones, then we turn the Cube so that they are on the right and behind. We twist the formula. After that, the edges that were out of place will be swapped. Cross completed!
NB: a little note about the "fish". This formula uses rotation IN 2 ⇔U "2, that is, rotate the top counterclockwise two times. In principle, for the Rubik's Cube IN 2 ⇔U "2 = IN 2 ⇔U2, but it's better to remember IN 2 ⇔U "2, because this formula can be useful for assembling, for example, a megaminx. But in megaminx IN 2 ⇔U "2 ≠ IN 2 ⇔U2, since one turn there is not 90 °, but 72 °, and IN 2 ⇔U "2 = AT 3 ⇔U3.
Stage 5 - corners of the third layer
It remains to install in place, and then correctly rotate the four corners.
Remember the formula: V"P" VL V"P VL" ⇔U"R" UL U"R UL" .
Let's look at the corners. If they are all in place and it remains only to rotate them correctly, then we look at the next paragraph. If not a single corner stands still, then we twist the formula, while one of the corners will definitely fall into place. We are looking for a corner that stands still. Rotate the Cube so that this corner is on the back right. We twist the formula. If at the same time the cubes did not fall into place, then we twist the formula again. After that, all the corners should be in place, it remains to rotate them correctly, and the Cube will be almost completed! 
At this stage, there are either three dice to turn clockwise, or three counterclockwise, or one clockwise and one counterclockwise, or two clockwise and two counterclockwise. There can be no other options! Those. it cannot be that there is only one corner die left to flip. Or two, but both clockwise. Or two clockwise and one against. Correct combinations: (- - -), (+ + +), (+ -), (+ - + -), (+ + - -) . If the two layers are assembled correctly, the correct cross is assembled on the third layer and the wrong combination is obtained, then again, you can not bathe further, but go for a screwdriver (read). If everything is correct, read on.
Remembering our Z-switch (P"N" PN) ⇔R"D" RD. Rotate the Cube so that the wrongly oriented corner is front right. Rotate the Z-commutator (up to 5 times) until the corner turns correctly. Next, without changing the front, we rotate the top layer so that the next “wrong” angle is in front on the right, and rotate the Z-commutator again. And so we do until all the corners turn around. After that, rotate the top layer so that the colors of its faces match the already assembled first and second layers. Everything! If we had an ordinary six-color cube, then it is already completed! It remains to turn the Cube with its original top (which is now on the bottom) up to get the original state.
Everything. Cube collected!
Hope you find this guide helpful!
Stage 6 - Rotation of centers
Why is the cube not going?!
Many people ask the question: “I do everything as it is written in the algorithm, but the cube still does not collect. Why?" Usually the ambush waits on the last layer. Two layers are easy to assemble, but the third - well, no way. Everything is stirred, you start reassembling, again two layers, and again when assembling the third, everything is stirred. Why can this be so?
There are two reasons - obvious and not so:
obvious. You are not following the algorithms exactly. It is enough to make one turn in the wrong direction or skip some turn to stir the entire Cube. On the early stages(when assembling the first and second layers) a wrong turn is not very fatal, but when assembling the third layer, the slightest mistake leads to complete mixing of all the collected layers. But if you strictly follow the assembly algorithm described above, then everything should come together. The formulas are all time-tested, there are no errors in them.
Not very obvious. And that's probably the point. Chinese manufacturers make Dice of different quality - from professional champion dice for high-speed assembly to falling apart in hands at the very first spins. What do people usually do if the Cube fell apart? Yes, they put back the fallen out cubes, and do not worry about how they were oriented and in what place they stood. And you can't do that! Or rather, it is possible, but the probability after that to collect the Rubik's Cube will be extremely small.
If the Cube fell apart (or, as the speedcubers say, “pomped”), and it was assembled incorrectly, then when assembling the third layer, there will most likely be problems. How to solve this problem? Take it apart and put it back together again!
 On a cube with two layers assembled, you need to carefully pry off the lid of the central cube of the third layer with a flat screwdriver or a knife, remove it, unscrew the screw with a small Phillips screwdriver, without losing the spring on the screw. Carefully pull out the corner and side cubes of the third layer and insert them correctly color by color. At the end, insert and screw the previously unscrewed central cube (do not overtighten). Rotate the third layer. If it's tight, loosen the screw, if it's too easy, tighten it. It is necessary that all faces spin with the same force. After that, close the lid of the central cube. Everything.
You can, without unscrewing, turn any face by 45 °, pry one of the onboard cubes with your finger, knife or flat screwdriver and pull it out. Just do it carefully, because you can break the cross. Then, in turn, pull out the necessary cubes and insert them back into their places already correctly oriented. After everything is assembled color to color, it will also be necessary to insert (snap) the onboard cube, which was pulled out at the beginning (or some other, but onboard, because the corner one will definitely not work).
After that, the Cube can be mixed and calmly assembled using the above algorithm. And now he's definitely coming! Unfortunately, one cannot do without such “barbaric” procedures with a knife and a screwdriver, because if the Cube is not folded correctly after falling apart, it will not be possible to assemble it with rotations.
PS: if you can't collect even two layers, then first you need to make sure that at least the centers are in the right places. Perhaps someone rearranged the caps of the centers. The standard coloring should have 6 colors, white opposite yellow, blue opposite green, red opposite orange. Usually white top, yellow bottom, orange front, red rear, green right, blue left. But absolutely exactly the mutual arrangement of colors is determined by the corner cubes. For example, you can find an angular white-blue-red and see that the colors in it are arranged clockwise. So, if the top is white, then the right should be blue, and the front red.
PPS: if someone joked, and not just rearranged the elements of the cube, but re-glued the stickers, then collecting the Cube is generally unrealistic, no matter how much you break it apart. No screwdriver will help here. It is necessary to calculate which stickers were re-glued, and then re-stick them in their places.
Can it be even easier?
Well, where is it easier? This is one of the simplest algorithms. The main thing is to understand it. If you want to pick up a Rubik's Cube for the first time and learn how to solve it in a couple of minutes, then it's better to put it aside and do something less intellectual. Any training, including the simplest algorithm, takes time and practice, as well as brains and perseverance. As I said above, I mastered this algorithm myself in a week when I was 7 years old, and I was on sick leave with a sore throat.
To some, this algorithm may seem complicated, because it has a lot of formulas. You can try to use some other algorithm. For example, you can assemble the Cube, really using one single formula, for example, the same Z-commutator. It just takes a long, long time to assemble in this way. You can take another formula, for example, F PW "P" V " PVP" F" PVP "V" P "FPF", which swaps pairs of 2 side and 2 corner cubes. And using simple preparatory rotations, gradually collect cube, setting in place first all the side cubes, and then the corner ones.
Algorithms are a huge pile, but each of them needs to be approached with due attention, and each requires enough time to master.
One of the most famous childhood puzzles is the Rubik's Cube. Every child has always wondered how Can you complete the Rubik's Cube? . Very often, the majority did not manage to collect it, and such fun was put aside in a box. Only a few managed to assemble the puzzle quickly and easily.
The most common version of the cube is considered to be a cube, consisting of fifty-four small cubes. Each face consists of nine dice, which are colored in such colors as yellow, white, blue, green, red, orange. The main essence of the puzzle is the ability to assemble the toy so that each face corresponds to a certain color.
In one of the modern cartoons called "Fixies", it is described in detail that a hero named Nolik recklessly said that he would easily assemble it. But he did not succeed, and Nolik, together with his friend Fire, dismantled and assembled the cube, fixing it in such a way that it was impossible to disassemble it again. This method deprived them of the most important thing - interest in the assembly process.
History of the Rubik's Cube
The inventor of this puzzle is Erno Rubik, lecturer at the University of Architecture. He came up with his masterpiece at the age of 30 in order to prepare study guide for students. With the help of the invention, the author wanted to introduce students to the theory of groups in mathematics. The puzzle in 1980 received awards and prizes for the originality of the invention.
The project itself was created over several years. Even the author himself understood that it was not so easy to assemble his invention. In 1975, the inventor managed to get a patent. And the first batch arrived in the USSR in 1981. Such a toy was very popular and scarce among the inhabitants of the USSR.
Now lovers of collecting puzzles participate in various competitions to assemble it. Only a man named Mats Valk managed to solve a Rubik's cube in 5.55 seconds, which is an absolute record in this moment time.

How to quickly solve a rubik's cube
In this part of the article, readers will learn how to learn how to assemble a puzzle. The steps for solving a Rubik's Cube include:
1. Assembly of the cross on one of the faces of the cube. Usually, the top edge is chosen. To build a cross, you need to choose any color, the fragment of which is in the center of the face. Then try to build a cross around it. In order for the cross to be assembled faster, it is necessary that its “branches” continue on the next faces, which consist of two similar fragments of the figure.

2. Directly layered assembly of the cube. It is necessary to collect the side of the same color. Pieces of the puzzle should form a special "belt", which is located near the assembled face. Then you need to assemble the second "belt".
3. You need to collect the cross on the side that is opposite the side containing the cross. And then fully assemble the side containing the second cross.
4. Arrange the corners of the cube so that all three sides match the faces in color.

5. Arrange the sides of the cube by color.
It is believed that the smallest number of steps by which this puzzle can be completed is twenty.
Having mastered the simple method, you can move on to the Jessica Friedrich method, which is more complex. According to this method, the assembly of the Rubik's cube proceeds as follows:
- Going to cross on the initial side.
- The first and second layers are assembled.
- Assembly of the remaining layers.
Thus, the process of collecting the Rubik's Cube is quite exciting and informative. Having learned how to assemble such a puzzle, you can impress both friends and ill-wishers with your intellect.
The implementation of these methods in practice is presented in the video selection below.
So, you got acquainted with the Rubik's Cube 3x3x3 puzzle and you liked it. But how to learn how to collect a cube, and even better how to collect it faster, you don’t know yet. Especially for you, novice puzzle lovers, I am making this instruction, which will not only help you learn how to solve the Rubik's Cube, but also do it faster than 1 minute (in the future, we plan to create instructions for those who want to solve the cube faster than 30 seconds).
Let's start with the fact that here you can, this is especially true for those who want to collect the cube quickly, and the old cube does not allow this for technical reasons =)..
The most common 3x3x3 cube assembly technique is Jessica Friedrich's technique. This technique breaks the assembly of the Rubik's Cube into 4 stages. And at the initial assembly level (at a speed of up to 1 minute), you need to learn not so many formulas. I will try to make instructions that will be understandable and will contain all the necessary information.
First, briefly about the assembly steps.
Steps to assemble a Rubik's Cube
1. We collect the cross. The task of this stage is to place 4 cubes in their places around the white center (many people use exactly White color as the main one during assembly, you can use any).
2. In the method of Jessica Friedrich, at the second stage, the first 2 layers are immediately collected ( F2L – first two layers). But for a beginner puzzle builder, this will be quite difficult, so we will look at how to do this step in 2 steps, simplifying the task a bit.

3. Assembly of the yellow side of the cube ( OLL-orientation of the Last layer). At this stage, we collect the yellow side of the cube. The assembly of this stage, even by advanced speedcubers, is not always performed using a single formula. We will look at how to assemble the yellow side in a few steps.

4. The last stage of the cube assembly is called Permutation of the Last Layer (PLL). At this stage, it is necessary to place the corner and edge cubes correctly in the last third layer of the puzzle.
Now let's move from theory to practice.
So, let's start assembling the cube. For the convenience of learning, please remember that the cube must be kept with the white center down and the yellow up!
The assembly of the die begins with a cross on the main side, usually white. In this manual, white will be the main. This stage is carried out completely intuitively, there are no formulas, but there are typical situations that should be remembered to speed up the assembly.
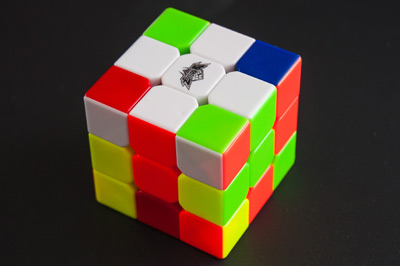
Important! Collecting is not just a white cross on the white side. Each edge cube has two colors, and it must match two centers, white and one of the other four colors (you can see in the photo how the orange-white and green-white edges match the orange and green centers).
1. Check the side with the white center for white edges. If they are, then simply by rotating the bottom layer of the cube, you can match this edge with the second center. See how to do it in the video below. Let me remind you that you need to collect the cube with the white center down!
2. If you have already completed the first step of this step, turn your eyes to the top of the die (the side with the yellow center). If there are white rib cubes near the yellow center, then it is easy enough to install them in the right place on the main side (with a white center). To do this, rotate only the top layer to match this edge with the second center (orange, red, green or blue), while turning the side on which the center and the edge coincided face you. After the edge coincides with the additional center, you need to rotate the front face two times so that the white color is not at the top of the cube, but at the bottom (where the white center is). Watch a visual application in the video below.
3. All other situations are solved by raising the die with the white side up (the side with the yellow center) and turning down to the white center as in point 2. Below is a video with illustrative examples.
I propose to assemble the first two layers in two steps. After assembling the white cross, our task is to install four corner cubes in their places, after which four more edge ones.
Like the assembly of the cross, this can all be done purely intuitively.
Installing corner cubes in the first (bottom) layer
For ease of perception of information, I will demonstrate how to install corner cubes.
To put the corner cubes in place, you need to learn one trick, which among the speedcubers is called “bang bang”. The formula for this looks like this R U R'U'. read here.
In the video, I looked at 4 situations that arise during the installation of corner cubes.
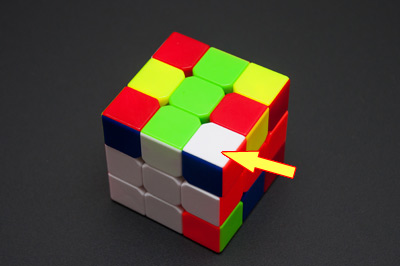 The corner cube faces the white side to the right (we hold the cube with the white center down). Doing the U'F'UF form
  The corner cube faces the white side to the left (we hold the cube with the white center down). We carry out the form URU'R'.
  The corner cube looks up with the white side (we hold the cube with the white center down). We perform the form R U R’ U’ R U R’ U’ R U R’ U’ (three bang-bang) The corner cube is in its place, but turned upside down (we hold the cube with the white center down). We perform the form R U R’ U’ (one bang-bang), after which the corner cube will be on top (on the side with the yellow center). From this position, we perform one of the formulas described above.
 After setting all the corners in place, the cube should look like this:

Installation of rib cubes
After you have placed all the corner cubes in the bottom layer, our task is to put the edge cubes in their places. After that, the F2L stage will be completed.
The installation of rib cubes is carried out using one formula and its mirror execution. Before executing the formula, the main thing is to set the edge cube in the right place, this is done by turning the top layer.
The edge cube must be set so that the color of the side face matches the color of the central cube of the middle layer.
1. If after that the rib cube is to the left of its place, we execute the formula URUR 'U'F'U'F.

2. If the edge cube is to the right of its place, then we perform the mirror formula U'L'U'L UFUF'.

3. There are cases when the rib cubes are not in their places, or in their places, but at the same time turned upside down. The above formulas will help lift the rib cube to the top layer, after which you can easily install it in the right place.

After assembling the first two layers, it is necessary to assemble the side with the yellow center, this stage is called OLL. At the same time, our task is simply to collect the yellow side, at this stage it is not at all necessary that all the cubes be in their places.
We look at the video how to install rib cubes when assembling the first two layers
1. Corner
After you have collected the first two layers, the yellow side of the cube may look like this:


But in practice, during the assembly process, other combinations may fall out. Consider how to get out of all these situations using universal formulas.
Our task is to make a corner of the yellow cubes. After assembling the first two layers, you can see completely different combinations of yellow cubes at the top, but most often we get either a corner or nothing. Nothing means that neither a corner nor a cross nor a fish fell out. There are several possible combinations in the images that can be before the corner is assembled.
The corner is very easy to assemble. We execute the formula: F RUR'U' F. After executing the formula, you will get one of the many combinations that are possible with an OLL assembly that contains a corner. Let's move on to the next step.

2. Cross
The cross can be assembled using one formula, but only at the stage of the assembled corner. There can be many combinations based on the corner, but to assemble the cross you need to know only one formula. So, before assembling, you need to take the cube so that the corner vectors look: one to the left, the second looks up. Next, we execute the formula: F RUR'U' RUR'U' F (turn the front, make 2 bang-bang and return the front). As a result, you will get one of the combinations based on the cross:

 After that, you can proceed to the assembly of the fish.
3. Fish
We need a combination of fish in order to use one formula to collect the entire yellow side. In fact, after assembling the cross, the same formula will help you make a fish, and after a fish, and completely OLL.
For this operation, there is a universal formula that will help us - RU'-RU-RU-RU'-R'U'-R2 (mirror version on the left: L'U-L'U'-L'U'-L'U- LU-L2). In the video, I tell you in which cases which formula to use.
2. Placement of corner cubes
In the video, I show you how to arrange corner cubes in two of the most common cases.
The formula for case one (the formula follows from the position shown in the video): R'U2RDR'U2RDR'U2RDDR'U2R
Formula for case 2 (the formula follows from the position shown in the video): R'U2RD2R'U2RD'R'U2RD'R'U2R
These formulas are easier to learn intuitively than just memorize.


