Ark how to speed up the appearance of dinosaurs. How are the dinosaurs doing? We test our favorite old programs in modern conditions. Additional UV work
Who doesn't know Winamp, The Bat, ICQ, Far Manager, WinRAR? Once upon a time, these programs were installed on every computer. Are they and their lesser-known contemporaries still alive today? Are they updated? Will the latest available versions work on Windows 10? Let's check!
winamp
The project is officially dead, and, apparently, no one is going to revive it. There is a poll on the Russian subsite asking whether to close the resource. Below is last news, and the latter - in the truest sense of the word. The top one is dated December 31, 2014 and says that Winamp has been rescued. That's just since that time - no new versions, no news. The last release with the number of the beast 5.666 appeared on December 12, 2013. That's all.
If you compare Winamp with a dinosaur, then it would be a tyrannosaurus, no less. In 2009, Winamp had 70 million users. Just think about this number! For example, according to the latest data, fewer people live in France - 64 million. The army of Winamp users is larger than the whole country.
However, on November 20, 2013, AOL, which owns Winamp, announced the closure of the project. Despite the fact that the program developed (for example, versions for OS X and Android managed to come out) and it still had millions of users around the world, AOL considered further investment of money unpromising. Monetizing the free Winamp hasn't been easy, especially given that the U.S. has seen the fastest drop in user numbers. Naturally, the closure of such a well-known project did not go unnoticed - even non-technical media wrote about it then.
This story had a continuation, which could mean the rebirth of Winamp. Two months after the announcement of the closure, Belgian Internet radio broadcaster Radionomy Group confirmed that it was buying Winamp from AOL. That is why a message appeared on the ru.Winamp.com website that Winamp was saved, but there were no new versions since that time.
Winamp was first shown to the public on April 21, 1997. The latest version was released in December 2013. Consequently, the project lived for sixteen years. Not bad, but it's far from a record. In our review there will be more ancient products.
Will our T-Rex be able to run on Windows 10? We download the latest version 5.666 and try to run it. The dinosaur is definitely alive!

True, he did not immediately see the contents of the Music library, he had to add it manually. In general, no rejection latest version Winamp does not call. On the contrary, his modern Bento cover looks quite impressive.

However, there is nowhere to go: offline music players are slowly dying off. Now it is customary to listen to music online - it's faster, and it's much easier to find new performers. Winamp and its livelier relatives are now needed mainly by music lovers who cannot part with the accumulated music library. Also, desktop players allow you to use an equalizer - this function has not yet been found in online players.
By the way, some traditional players have special plug-ins for playing music from the Internet. For example, AIMP can play music from VKontakte. And of course, there is iTunes with built-in Apple Music and unofficial for Google Play music.
The Bat
The Bat is a famous email client developed by the Moldovan company RitLabs. If I refused Winamp at one time, then I didn’t leave The Bat mail client, and I continue to use it. Why The Bat? Yes, because it is very convenient to organize work with several mailboxes. I think The Bat users, especially those who used to work with Outlook, will understand me.
Yes, there are no separate buns in The Bat that would be useful for working in a corporate environment, but this does not bother many users at all. If we compare The Bat with a fossil, then I would also choose chi - this is a dinosaur resembling a bat, which was found in China. But I would not call The Bat a fossil.
Continued available to members only
Option 1. Join the "site" community to read all the materials on the site
Membership in the community during the specified period will give you access to ALL Hacker materials, increase your personal cumulative discount and allow you to accumulate a professional Xakep Score rating!
So how do you make babies? Well, for starters, let's look at how to make dinosaur babies;) In this material, you will learn everything about dinosaur mating, fertilized eggs, the process of incubation, selection and dino growth stages in ARK: Survival Evolved.
Please keep in mind that this is the first stage of the implementation of the dinosaur breeding system in ARK: Survival Evolved and will undoubtedly improve and become more advanced as the game develops.
Pairing
Firstly, all your previously collected eggs will fit only for eating. They are not fertile. In order to get Fertilized Eggs in Update 219, you need to combine two tamed dinos of the same species together. In the patch, not all types of creatures can have offspring yet, but most already can. The fact that your dinos can have children, you will know by their indicator: "Enable Wandering to Mate". So get together an attractive female and male (tamed), let them roam freely ("Enable Wandering") and just in case, lock them in a paddock so they can be around for a while. If you did everything right, then beating hearts will appear above their heads and information about the mating process will be displayed on the indicator of the female. Both dinos will also have an indication of who they are mating with.

When the mating process comes to an end, the female will lay a fertilized egg. After that, she will not be able to mate for some time, this information will be displayed on her indicator. Males will be able to mate as often as needed.
Incubation

Fertilized Egg will not hatch while in inventory, place it on the ground or floor. A discarded fertilized egg will not spoil, but incubation will require maintaining certain temperatures specific to each species. Being outside the allowable temperature range, the egg will lose "Fertilied Egg Health" over time, and at zero it will be destroyed. All this will be displayed when you look at a fertilized egg, and you can also find out the names of the parents in the description of the egg.

Offspring
Upon successful incubation, a baby dinosaur will jump out of the egg. Children initially have an extremely low level of health, carrying capacity and stomach volume, so in the first days of their life they need to be carefully fed and cared for, otherwise they will soon die. Over time, as they mature, they will be able to carry more, gain more HP and a larger stomach capacity. Babies don't originally belong to anyone, so you need to "Imprint" them to prove your right to have babies after birth.

On the this moment, baby dinosaurs will not be able to attack or be mounted until they are fully grown. Therefore, they will avoid any fight.
Selection
The base stats of the cubs will be a random combination basic characteristics their parents (at the time of taming), as well as their color. And here is the most interesting:
Since a baby randomly inherits any of its parents' characteristics, it can have more "absolute" characteristics than its parents. For example, if you have a trike father with "natural maximum" HP (all the experience gained during the taming process went into HP) and a mother trike with "natural maximum" stamina, mating with each other MAY produce a cub with BOTH of the natural maximum characteristics, HP and stamina. Then, when the baby is older, you can mate it with another grown dyno that has other natural maximum stats, such as attack and carry weight. Thus, you will get an even more powerful trike of the third generation. And so on. With selective breeding like this (and the cubs have a 70% chance of getting the best stats), you can weed out the unnecessary stats, leaving the necessary ones, and after enough attempts, breed an Uber Dino with all the maximum stats... and the world will shudder.
However, you can't see the characteristics of the baby before it hatches, so some effort is required ;)
Also, dinosaurs don't have to be in the same tribe to mate. They just need to be non-aggressive, tame and close to each other. So a tribe can, say, rent their winning dino, and then both tribes share the resulting eggs.
Oh yes, the younger the cub, the less resources you can get when butchering it, but there is a high probability of getting Prime Meat. With newborns, you are almost guaranteed to get a couple of pieces of prime meat >: D
growth stages
The age of the babies is not expressed in days, as the length of the day in the ARK may vary. The process of growing up is displayed on their indicators, they grow in real time, and there are 3 stages of growth: infancy< 20%, юность < 50% и подростковый возраст < 100%.
So yes, it will take a significant amount of time and skill to bring out a super dino master race... and in real life is not it? ;) (okay, this has gone too far! :)
Have fun everyone, and as mentioned, this is only the first stage of a new complex dino breeding system. For the future, the developers are planning some additional layered systems, including random mutations and family trees, and soon enough, mammalian pregnancy.
ARK: Survival Evolved- a very difficult survival-action for beginners who immediately have a lot of questions. And when you have already built your first home and are more or less on your feet, the question arises, who should be tamed? And we will try to answer this question.
The guide was written based on the experience of playing on the map The Island , so it may not match the game on other maps.
Phiomia

These pig-like creatures live almost everywhere on the island. And this is one of the easiest creatures to tame. The fact is that if you attack phiomia, then it will simply try to escape from you. If you make her get stuck in some rock or wall of someone's base, then she can easily be stunned even with a club, and then simply tamed with berries, and taming takes a very short time.
The only caveat is that it is best to tame a wild phiomia of level 80 and above, because only then does it reveal its good potential for a beginner. It can be used as a mount, although it is quite slow. But, to be honest, a beginner doesn’t need to go anywhere very far before taming a pteranodon. Phiomia is also a good pack animal, in addition, it can be used as a good fighter. If you pump phiomia into health, then it will be able to cope with 1-2 dilo and defeat one raptor without any problems. And if you tame two fiomias, then you don’t have to worry about your safety on the beaches at all.
Parasaur

In fact, almost the same as the phiomia, only less health and stamina, but more speed, damage and weight tolerance, but the parasaur takes a little longer to tame. Cowardly, like phiomia. You can drive somewhere into the wall and score with a club or a slingshot.
Dilophosaurus

If you are thinking about who is better to tame, Dilophosaurus or Raptor, then the first option is best. Yes, the dilo is not as strong as the raptor, and you can’t ride it, but it is tamed much faster. Even 150 Dilos are very easy to tame. And besides, in battle, he will not interfere with you like a raptor, which constantly revolves around its victim.
But most importantly, why dilophosaurus is needed is their eggs, from which you can make food for as many as three types of dinosaurs. Moreover, two of them are the most useful dinosaurs-specialists Ankylosaurus and Doedicurus (kolobok). So you will need a few individuals in the future.
Triceratops (Trike)

Taming this dinosaur is not as easy as the previous ones, and it takes a lot of time. But in general, for a beginner, the task is not too difficult. The trike can be seen on the beach, where you will not be disturbed by strong predators. The main thing is to stun him with arrows, which do not require too much. And also put wooden fences around it and start feeding it with berries.
But if you tame it, you will get a very good fighting dino that can knock back its enemies, as well as a mount. It is also good for transporting goods. But it is most valuable because it can produce berries well. A couple of hundred valuable narcoberries can be collected in just a few minutes (berries are collected by attacking the bushes). The main thing is not to overestimate this dinosaur and do not go deep into the island on it. Maybe a 100+ trike can beat a rex or a spinosaurus. But God forbid you run into a flock of allosaurs that will tear you and your trike to shreds, and it’s not a fact that you can run away from them.
Dodo

Dodo is on this list for one reason only. These are their eggs, as they rush with great speed. And from eggs you can make food for three dinosaurs, moreover, the food is very easy to prepare. It does not need dried meat, which means that oil and a heating cabinet are not needed. And who will we tame with this food, we will talk further.
Pteranodon
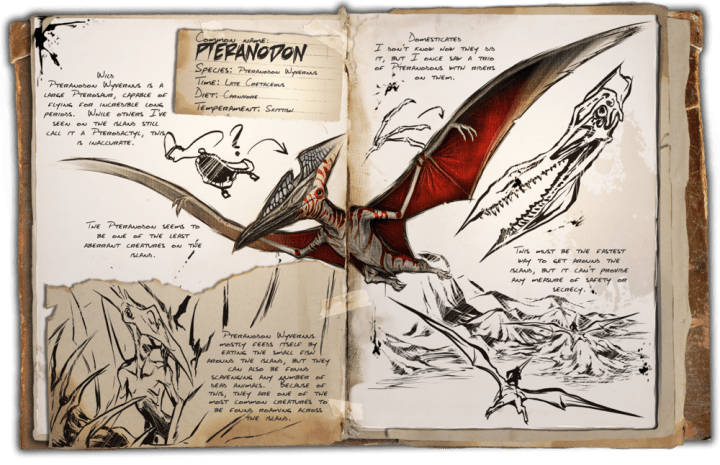
Pteranodon is the best dinosaur for a beginner. Firstly, it is very easy to tame it, it is enough to immobilize it with a bola, and then stun it, it is best with the help of tranquilizer arrows, then feed it with food from dodo eggs. The main thing is not to tame very low-level pteranodons. Those below level 70 should not be looked at at all.
A tamed Pteranodon has many benefits. First, it is one of the fastest flying creatures. For a beginner, to take off means to change your position at times. Now you can safely scout the whole island, find the rarest resources, study in which places which dinosaurs live.
Plus, Pteranodon is a great fighter. On the "C" key, he has a very powerful attack, with which you can even kill dinosaurs such as bronto, spinosaurus or rex. In addition, with the help of this attack, you can get a large amount of meat.
The saddle for this creature is crafted at level 35, but this can be achieved quite quickly, probably in one day of the game. A tamed Pteranodon is worth it. You yourself will notice how much easier it will be for you, and you will no longer play the role of lunch when you tame the Pteranodon.
Ark: Survival Evolved - universal game project in the genre of survival simulator, in which users go to the era of dinosaurs in order to survive and prove their superiority. In this game, you can create personal servers and control them not only with the help of special settings, but also through special console commands for Ark: Survival Evolved.
Why are these commands needed?
Console commands for Ark: Survival Evolved is a handy tool for server administrators. If you are such, then it is enough to call special console and enter a certain set of characters, after that you will get an advantage, a dinosaur or some useful action. These commands are specifically designed to make it easier game process, give server administrators greater power and expand their control. After all, the main creator must be powerful and not deny himself anything.

It remains only to figure out how to use them. In principle, there is nothing complicated in this. To activate console commands in Ark: Survival Evolved, just follow a series of steps:
- Press the Tab button to bring up a special console for input.
- We first enter the enablecheats AdminPassword command. If you decrypt it, it turns out that the enablecheats command is the main one, and AdminPassword is your password to the admin panel.
- After successful activation, call the console again using Tab.
- Then you need to enter a character set that is already programmed for a specific action.
- Press the Enter button and the command will be activated.

As you can see, there is nothing complicated in this, so you can safely start using new opportunities and achieve your goals.
Summon Dinosaurs
The most relevant and in demand are the console commands for Ark: Survival Evolved, which relate to dinosaurs. Thanks to the collection of these commands, it becomes possible to summon huge creatures for active use in terms of movement and battles.

First of all, we suggest you familiarize yourself with the collection of commands for land creatures, which are the most common in the game. We have presented them above. Next, we suggest taking the opportunity to call on water creatures.
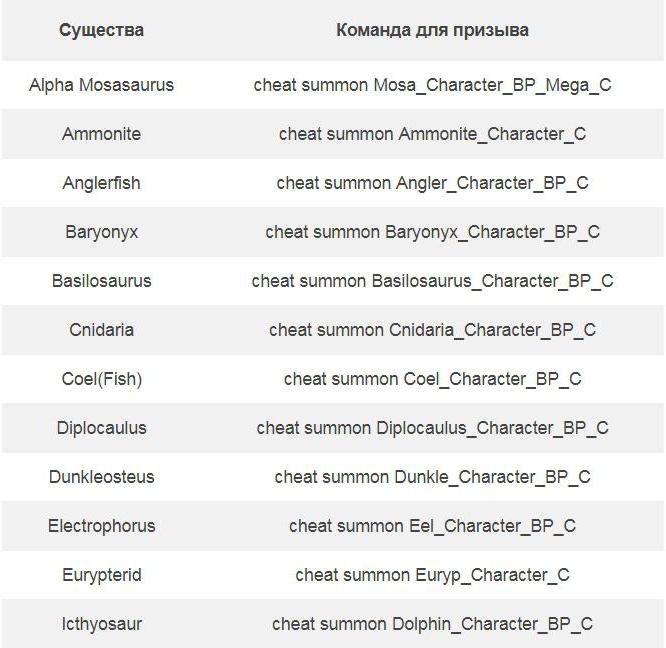
The commands listed below will also be relevant. The main thing is to enter them accurately.

A nice addition will be a small collection of flying creatures that will destroy the boundaries of your movement around the game world.

But don't limit yourself to just these options. For example, it can be used for arc games: Survival Evolved console teams of ID dinosaurs that are bosses.

Here, in fact, are all the variants of creatures that can become faithful partners in your adventure. Call, train and use them for different purposes.
A set of utilities for the player
If you do not need dinosaurs, but want to gain an advantage over other users, then the console commands in Ark: Survival Evolved for the player can help. These include: gaining experience, increasing damage, the ability to fly, freezing opponents, etc. All you need is just to enter the necessary command.

Here are some more commands that will be useful to you. They are also in demand.

Graphics settings
AT recent times the game began to develop actively, and now it is possible to make adjustments to the graphics settings using the usual commands and values. Console commands in Ark: Survival Evolved for graphics look like this:
- r.bloomquality 0 (bloom mode adjustment);
- r.lightshaft 0 (light level setting);
- r.shadowquality 0 (shadow control).

For now, that's all available commands for easy editing of visual design settings. In the future, the developers promise to make adjustments and significantly expand the choice of teams. In the meantime, you can safely use these options and customize the design of the game at the right time.

Now you are armed with big choice various console commands that can be actively used right during the adventure. Use our instructions, carefully type a number of characters and get the necessary actions. Thanks to them, you can comprehensively control the situation on your server, distribute gifts to participants, create chaos among the players and just have fun. This opportunity was created for this, so we recommend that you do not miss it and boldly operate with all available command options.
Jonathan Reilly, who has been working in game development on AAA games and in cinematography on special effects for over 15 years, will talk about the secrets of creating a realistic dinosaur.
Creating such an extinct creature as a dinosaur required good preparation and a lot of references. Usually, when I create a monster, I completely rely on a flight of fancy.
The creature underlying this project once really lived on our planet, so for quite a long time I collected a good library of references to make my dinosaur as realistic as possible, with real anatomy. Tyrannosaurus rex has always been a model representative of this extinct species for me, so when I was asked to recreate something similar, I settled on it without hesitation.
01 Setting the scene inMaya

For projects like this, references are key.
After selecting the dinosaur side reference, I loaded it into Maya to use as a guide when creating the dinosaur basemesh. The reference, as a texture, I assigned to a plane with a planar UV-scan along the X axis.
Then I made the image square for faster projection and the material semi-transparent. I added the reference to the Display layer, for which I set the mode to Reference so that the image could not be selected in the Maya viewport.
02 Preparing the base mesh

Start working on a dinosaur by extruding the faces of a regular cube, focusing on the reference
I started my 3D dinosaur modeling by creating a simple cube. Next, with the help of extruding, I created a silhouette of a dinosaur based on the reference. I modeled the basemesh using quads, especially not caring about small details, I only needed the overall volume. Try to distribute the polygons evenly at this stage, but don't go too deep into the details that you can always add in ZBrush.
03 Working on the details

Create a couple of spheres and place them in place of the eyes
Then I added a couple of spheres to the scene and placed them in place of the future eyes. In my opinion, a basemesh always makes it easier to sculpt a face. Next, I moved on to creating a language, which was still based on a regular cube. Finally, when the basic dinosaur model was ready, I exported the resulting result in .obj format to continue working in ZBrush.
04 Import toZBrush

Import the file in .obj inZBrush and split the mesh into separate subtools
I imported the .obj file into ZBrush. Then I split the geometry into separate subtools using the command Tool>Subtool>Split>Split To Parts. Next, I masked the various parts of the dinosaur's body using the ZBrush selection tools (+ and click) and created polygroups for them using the Tool> Polygroups>Group Visible command. Thanks to this approach, you can conveniently work with individual elements of the dinosaur's body.
05 Dino Blocking

Try not to pile on units unnecessarily
When working in ZBrush, it's important not to pile on subdivisions from the start. At this point, I just doubled the resolution of the mesh.
Using the Move, ClayTubes and Smooth brushes, I quickly sketched out the general shapes, trying not to rush into the muscles. At the same time, I worked in symmetry mode on both sides of the dinosaur at the same time, which always speeds up the sculpting process.
06 Muscle work

Use polygroups to hide parts of the dinosaur you're not working on
Then I polygrouped the parts of the dinosaur that I didn't work on. And, again, using the Move, ClayTubes and Smooth brushes, I quickly outlined the muscles. At this stage, you can already start increasing the number of subdivs, but I try to take my time, increasing the resolution only when it is really necessary.
07 Detailing the head

Mark the brow ridges and jaws withClayTubes
The head differs from the body in that it has fewer muscles, but the bones of the skull are present. In fact, the head is a skull with massive jaw muscles that create such sharply defined shapes.
I outlined the brow ridges and jaws with the ClayTubes brush. I masked the area around the eyes and with the Move brush I created indentations under the eyes. Then, again using polygroups, he isolated and carefully worked out the internal cavity of the mouth.
08 Body

Practice is the best teacher of a sculptor
Sculpting is a constant process of building up, smoothing and removing geometry, which is practically no different from working with ordinary clay. I created the volumes with the ClayTubes brush, then smoothed them out with the Smooth brush, and sharpened the features with the Crease brush.
Thus, a sculptor, even a digital one, can only create a finished product through constant practice, working and working on the geometry until he likes it. At this stage, try to pay attention to how the muscles interact with the skeleton and with each other.
09 Skin texture

Now that the muscles are ready, it's time to work on the claws and skin of the face, elbows, knees, etc.
Then I worked on the claws, folds, wrinkles and skin texture on the face, elbows, knees, etc. I scalped a couple of skin folds on the neck, which I applied with the Crease brush.
I softened wrinkles and depressions on the skin with the Smooth brush, trying to follow the natural direction of skin growth on the shoulders and collarbones. Further, I detailed the resulting geometry by increasing the number of subdivisions.
10 Geometry Clinup

Duplicate the dinosaur's body and draw guides forZRemeshwhere you want to get a neat grid
After duplicating the dinosaur's body, I drew the guides for the ZRemesh, drawing a grid around the eyes, mouth, elbows, shoulders, hips and knees. I also drew guides around the tail so the mesh doesn't spiral in that area.
I tried not to forget and turn on the symmetry to make the mesh more accurate. I decided to stop at a polygon of 15,000 polygons, in a matter of seconds I got a neat dinosaur with a new topology.
11 CreationUV-sweep

Creation of polygroups for variousUV-shells
To create the UV map, I used the UV Master in ZBrush. For the various UV shells, such as the head, mouth, arms, body, and legs, I created separate polygroups by turning on the Color Painting function in the UV Master. This allowed me to mark the areas where the seams should be.
For the seams, I chose those areas of the mesh that are not visible, such as the inside of the legs or the skin folds. Thus, I got a scan with seams in clearly marked places.
12 Additional work withUV

To work better withUV-Scan export.obj-file inMaya
Then I decided to work on the UVs more carefully and exported the .obj file to Maya. I configured the UV shells in such a way that the head and mouth are located on one UV sheet, and the body with legs on another. Next, once the geometry and UVs in Maya were fine with me, I imported the new basemesh into ZBrush. I still made the head a separate texture, because, due to the emphasis placed on it, it had to be of sufficient resolution.
13 Transferring parts

Transfer the detail from the old mesh to the new one
At this stage, I needed to transfer the detail from the old mesh to the new one. To do this, I duplicated the old subtool with the body of the dinosaur, made the UV subtool visible, and descended to the lower level of the subdivisions of the original geometry.
Next, I used the command Subtool>Project>Project All to transfer the detail from the old mesh to the new one. Moved to more high level divisions of the old mesh and rendered the new one. Then I repeated this operation until the result began to suit me.
14 Small parts

ATZBrush there are some useful alphas
There are some very useful alphas in ZBrush, but personally, I usually use my own alphas, pre-created in Photoshop. With alphas, I work with a Standard brush with an intensity of 10 in DragRect mode, thus transferring details from the image to the geometry.
Sometimes, to increase the speed of work, I turn on symmetry in some areas, but with the head and body I try to work without symmetry, avoiding the “butterfly effect”.
15 Basic colors

Blocking a pass with primary colors usingpolypaintinZBrush
The main colors I always paint with Polypaint in ZBrush. At the same time, it is better to paint the model before posing, since with this approach you can safely work with symmetry turned on, which greatly speeds up the work process. For basic coloring of geometry, the Standard brush in Color Spray mode is quite suitable, as well as alpha No. 07. The undoubted advantage of this approach is that you do not have to worry about seams, as, for example, when working in Photoshop.
16 MapSpecular

Usagepolypaintto create a seamless grayscale image
With Polypaint, you can also quickly paint a seamless grayscale image, highlighting more highlights and vice versa. These maps can then be easily exported to Photoshop using the Multi Map Exporter.
In addition, you can create a Cavity map, which can also emphasize finer details in the render.
17 dinosaur posing

Posing is very important, so it is worth the time spent
The posing stage is very important, so you need to spend enough time on it. At this point, it is better to already understand exactly how the character will be positioned, since this will significantly speed up the process of positioning him. So, I put the character in a T-pose using the Transpose Master, then masked and moved the various elements of the model accordingly.
18 Texture maps

Creating a texture map with basic skin colors usingZApp Link andphotoshop
To create a texture map with basic skin colors, I used ZAppLink and Photoshop. To get this map, I focused on the main skin colors with a small amount of Noise.
Alternatively, you can use the skin reference of an elephant or a rhinoceros, for example, and then using ZAppLink, project the texture onto a dinosaur without worrying about the seams at all.
19 Texture baking

Bake the cards from the final model withMulti Map exporterinZBrush
Next, I baked the maps from the final model using the Multi Map Exporter in ZBrush. Baked Color, Cavity, Ambient Occlusion and Normal maps at 8k resolution. For the dinosaur I used two sets of texture maps, one for the body and one for the head (UDIMS).
20 Mapdiffuse

Try to work inphotoshop with file format.psdwith unflattened layers
In Photoshop, it is very convenient to work with an image in layers, storing the file in .psd format for a rainy day. With this approach, you can always make any changes to the image. As a basis, I took a texture with primary skin colors, on top of which I sequentially placed Ambient Occlusion, Cavity and Base Color maps, adjusting, if necessary, brightness, contrast and transparency. Try to work carefully and carefully at this stage so that you don't have to struggle with the light in the render later.
21 Additional details

Create a small fake bump by copying the blue channel from the exported mapNormal
On top of all layers, I created a small fake bump by copying the blue channel from the exported Normal map. Then again adjusted the brightness, contrast, transparency and layer blending mode. At the same time, I tried not to forget that I had two different UV sheets that had to be seamless, so any changes in one required instant changes in the other. By the same principle, I textured the tongue and eyes.
22 Finishing inphotoshop

Improving the final image with filters
In Photoshop, I placed the KeyShot render of the dinosaur on top of the background image. I made a small color correction of various layers, set the Overlay and Multiply blending modes for some of them. The effect of the render can also be improved with the help of various filters, stylizing the image accordingly.
.


