Nancy Drew passing the cast of the castle. Entries tagged nancy drew and the ghost of malloy castle walkthrough. Night walk in the garden
Walkthrough:
English - language name of the game: Nancy Drew Haunting Of Castle Malloy
Infiltrating the castle
So, on the way to the castle, something crosses your path, and you drive into a ditch. They went out and looked around. We approach the arch and select the doll. We examine the arch, we see some kind of puzzle on the right. In order not to waste time in vain, we begin to collect it. We get this:

One tile, of course, is not enough. We approach the gates of the castle, from where we are treacherously expelled. We inspect the territory to the left of the gate, take stones from the ground ... We asked ourselves ... We are not shy, we take a larger stone and aim something like this:

The window is broken, we are invited in ... After that, we have to listen to Kyler's long whining, from which we learn that Matt (her fiancé) has disappeared and that Kyler herself considers this nothing more than a stupid prank. Needless to say, we are asked to find him….
Library tour
Immediately behind Kyler we take the book "Signs of the Zodiac" from the shelf. In the same place, we open the knight's helmet and find a puzzle with gears ... Obviously, something is missing. Let's leave it for later.
In the next closet is a problem with a pyramid. Through logical efforts, we transfer all the disks from left to right ... As a reward, we get a lamp ...
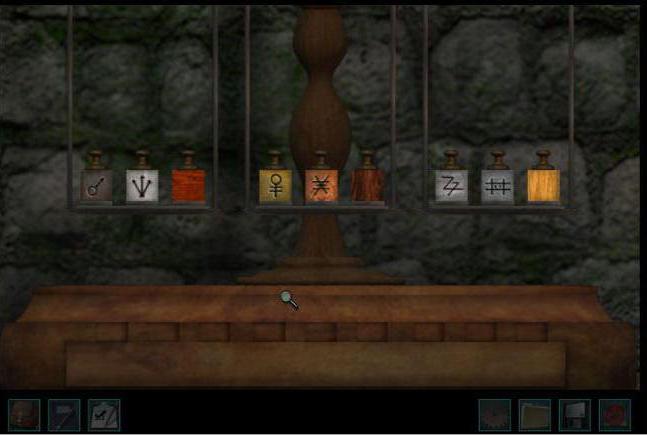
We approach the table with weights. Logically, two weights are missing. We also leave. Bye. But just in case, we still open the box under the scales and look at the symbol table. And also on the same table we look through the table of binary codes. Well, nonsense ... my God ...
This concludes the preview of the library. Before leaving, we talk with Kyler again. It turns out downstairs, in the hall there is a printing press, and she asks us to print several invitations. She herself, of course, does not understand anything in technology ... Well. No problem. We're dumping before we load something else ....
Fiona's children's room
In the nursery, a crow arranges an act of vandalism - picks out glass from a colored panel! Frightened by our appearance, she flies away, leaving her prey to us ...

Raise the glass, put it in place. We continue the inspection. By the fireplace we find broken glasses. We touch the horse, we get a coin. What else we find: There is a book with a strange name on the mirror, a box with dolls to the left of the mirror. If you wish, you can practice arranging the dolls.
We get a prize - one more coin.
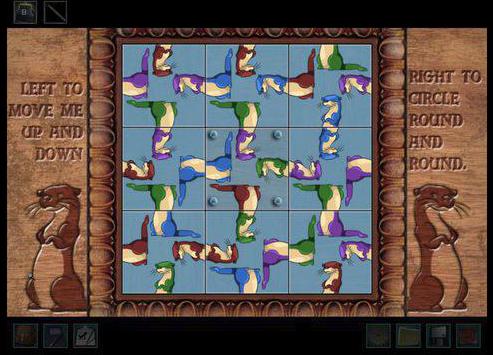
AT bookcase find a puzzle with meerkats. Having exhausted ourselves, we still find the right combination:

We get one missing wheel from the mechanism. Preliminary inspection of the children's room is completed.
Big hall
Out of curiosity, we examine the destroyed staircase, after which we descend into the large hall.
To the right of the fireplace we find a photo in which Kyler hugs with some type. It's not Matt. And a little to the right we find a certain young man with a black eye. Here it is - the face from the photo! This man introduced himself as Keith, Matt's best friend. He's sure Matt just ran away from his fiancee...
After talking, we approach the table and find one of the missing weights.
We go to the printing press. We find a strange iron plate. The print plate is already on the table. We fill it with black paint, put a sheet of paper on top, roll it, dry it, we are surprised ... It turns out that the witness is a completely different person, and not Keith, who supposedly “ best friend» groom. We do the whole procedure 2 more times - Kyler's task is completed!
Near the main gate is a machine gun "Madame Isabella". There is a coin on the floor. Now we have 3 of them, just as many as the machine requests. Well, let's launch it. Thus, we lose all the money, but we get the second missing weight. Quite fruitful...
Library again.
We report to Kyler about the completed task, and at the same time we are interested in why Matt's witness Alan, and not Keith, is his best friend. Kyler gives us Alan's phone number and leaves us free to act. Looks like it's time for a walk. Moreover, Donal, the caretaker of the castle, began to appear quite often in conversations ...
But first, let's go to the scales. Based on the table of materials (from light to heavy from top to bottom), we set the weights according to the principle that the scales are on the same level. As a result, we take the missing tile from the arch.

Now to the pub...
Getting to know the pub
On the way, we make a stop and insert the missing mosaic element into the arch. We get the second printed plate. We approach the sign "Pub" and here we are already there. But first we go to the phone booth and talk to Alan. It turns out that Kyler, Matt and Keith often quarreled with each other ....
Donal Delaney is resting in the pub. This mischievous old man refuses to talk to us, and we go to prepare a cocktail for him .... As a result, they also earned extra money ....
After the cocktail, Donal definitely becomes kinder and puts forward his version of what is happening - Matt was kidnapped by elves .... He also shares interesting facts with us.
We go to the slot machines in the corner. For winning darts we are given a blue doll, for a vigilant detective - a whistle.

It's time to return to the castle - and find out something ...
Lock. New facts.
When trying to find out from Keith the true cause of his bruise, we fail, he constantly answers evasively and refers to employment. We will be happy to help him seat the guests. If you follow the instructions carefully, it's not that hard to do.

When the task is completed, we receive a book from Kit, which he found in the room where Matt lived. Let's chat with him a little more. It's time to explore the garden...
Night walk in the garden.
With a lantern we find the following fields in the garden:
Wall with signs (to the right of the path), Garden with leprechauns, Swamp, Crosses, Something incomprehensible.
Crosses do not give us anything yet, we cannot cross the swamp with all our desire.
Let's try to solve the problem with leprechauns. Having carefully studied the book that Keith gave us, we find out that each rank has its own quatrefoil (exactly the same leaves on the clothes of the figures in the garden). Moreover, the capital letters of the quatrains tell us where this or that leprechaun should be turned. H - back, B - forward, P - right, L - left. Actually, we arrange them like this:

So we destroyed the crow's nest and got everything that she managed to steal. We turn and go to the bench, on which we find a sheet with confessions (?) Kyler. Another suspicious nuance ....
Color panel in the nursery and a secret passage.
All the missing elements of the color panel were found in the crow's nest. So that's where we're headed... We return…. Putting glass in place. Now press the following combination: F-S-G-Z-F-O-K-K-O-F-Z-G-S-F
A secret door opens in the fireplace, we enter ... On the right we take the board, on the left we have a diagram of the passage through the swamp. There is nothing more to do here ... we leave.

Hut in the swamp
Now, armed with a board and a map, you can try to cross the swamp. We put a board on the stones and go.
Further we go focusing on the stones. 1 forward, 1 right, 2 forward, 2 right, 2 forward, 4 left, 2 backward, 2 left, 3 backward, 2 left, 1 forward, 1 left, 2 forward, 1 right, 2 forward, 2 right, 1 forward , 1 right, 2 forward, 2 right, 2 forward, 4 left, 2 back, 2 left, 3 back, 2 left, 1 forward, 1 left, 2 forward, 1 right, 2 forward, 2 right, 1 forward, 1 right, 2 forward, 2 right, 4 left, 2 back, 2 left, 3 back, 2 left, 1 forward, 1 left, 2 forward, 1 right, 2 forward, 2 right, 2 right, 2 forward, 1 right, 1 forward. Ready!
We go inside and find a tightly closed box on the table. Something must have died in the cage. We don’t climb inside the cage - we disdain. But, if you delve into the recipes on the table, then the flies are not a problem for us. We put the following ingredients in the mortar: tansy, fleaberry, wormwood, thyme and cat. Grind - the mixture is ready. We drive away annoying insects, we take out the lens from the cage. Familiar shape, isn't it?
Before leaving the hut, we examine the baskets near the entrance. In one of them we find a rocket pack. Cool!
Crosses and wall
We go to the crosses. We insert the lens one by one into each and remember the years and signs that we see.

The next step is to approach the wall with signs and press in ascending order of years. We get access to the closed part of the garden.
We study the territory. On the porch of the sheepfold in bells we find another gear - now we have the whole set. At the old, gnarled tree we find a leaf with a plan for developing the territory. We also see strange totem poles with incomprehensible writings. We go to collect the mechanism.
Gears and the missing doll
On the way to the library, we'll drop in on Keith. As expected, the building plan is his work. In the library, Kyler interferes with our urgent plans. She, you see, needs to pick flowers. That's lazy mother! Okay, we'll get it, but only in between.
We approach the box with the mechanism, lay out the gears and start the mechanism.

We get another puppet scheme. We examine it and understand that we do not have enough one doll to lay it out.
Bouquet
We find a rose in the garden with leprechauns
Yarrow in a strange clearing
Lavender at stone pillars
Verbena to the left of the entrance to the arch
Spur on a dead end road
Digitalis grows in the swamp
And sage - in the hut
The bouquet is ready!
There, in the hut on the table, we find another puppet diagram and an unfinished doll. I need to stuff it with fur...
We return to the castle. Needless to say, Keith is not there. Great chance to rummage under his bed. Surprisingly, we find Matt's things there. What is curious. We go to give the bouquet to Kyler, but we hear her dialogue with Keith outside the door. Let's not disturb them - we'll take a walk to the pub.
Donal boasts that he has a book with which to read the letters on the totems, but makes us play the drum for her. Spit once!
We get a book. We return to give the bouquet. We talk with Keith about Matt's things under his bed. Keith is surprised.
totem poles.
Having studied Donal's book, as well as a book with constellations, we go to the totem poles and easily collect them. Starting from the main and counter-clockwise:

We get another printed plate.
By the way, if Keith didn't hide things, then maybe Donal? It's worth asking.
Sheep
Donal does not hide this at all, but at the same time he seems to be angry with us ... He gives us the key to the sheepfold and makes us collect the sheep. Sheep 10. We see a sheep, blow the whistle and thus collect everyone. We go into the sheepfold, we go out, everything - the door is locked!
So, we have sheep basic terms of delivery incoterms. It's a sin not to use and cut some wool to stuff the doll. But first, let's ask Donal's permission. Of course, he gives us the task to cut as many as 3 bags of wool!
The haircut code is made up of the color of the group, the name of the family and the emotional state of the animal chimneys and chimneys prices. . solving problems in molecular physics questions on the site. . children's books. We move away from the console, blow the whistle, a sheep comes out. Adding all three numbers, we get the result. 2 sheep = 1 sack of wool.
When all three bags are packed, we take some wool for ourselves and go to stuff the doll.
The doll is ready, let's go to collect the scheme.

Printing press
So we now have all 4 printing plates and a table of two-digit codes (library - table). It is generally not difficult to calculate which plate to fill with which color, but if you are too lazy:
01011001-Y
01000011-C
01001011-M
01001011-K
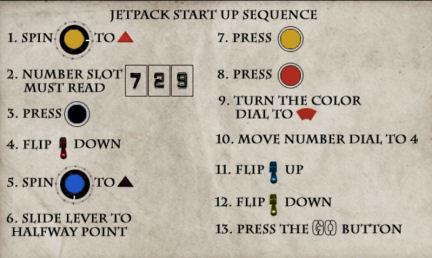
Having rolled all 4 plates, we get instructions for launching a rocket pack.

tower room
We leave the castle, we get a backpack. Follow the instructions step by step, take off!
We fly through the window of the tower.
We approach the secretary ... familiar combinations ... We drive in the letters from the cover of the children's book.

In the table we find another riddle. Apparently the secretary has 2 opening options. Well, let's fly to the library, solve a puzzle with books. 3 books are on the shelves, 1 on the table with scales. We get the letters K C G X.
The 5th letter remains. We fly to the island, not far from the strange lawn. Find L
We return to the tower. We enter the code. In the secretary we take the doll and the key to the box in the hut in the swamp. You can now try to arrange all the dolls and get an egg, or you can not do this ....
Let's open the box...
locked up
We open the box and are somewhat disappointed .... Just a postcard? After a few seconds, this is compensated ....
Having fallen into the dungeon, looking around, we go through the tunnel. We leave into the round room and light the switch. At the same second, a man’s cry is heard that we did it in vain. He is isolated from us by a door. Yes, it's Matt! We talk about everything with him, and go to inspect the room.
As soon as you approach it, the task “how to assemble the ladder” will automatically pop up. Well, you will not have problems with this task. Having collected it, we rise and take out the nose of the rocket! , the light will automatically turn on.
We examine the rocket. Below, there is an active zone, open it. Wires, and even how many, and even tangled! We continue the round. We approach the table. We take a journal with notes and read it very carefully, there are a lot of clues. Near the table, a little higher hangs a note. This is the instructions for launching the rocket. She will be very useful to us. Under the instructions was a red button! Maybe this is the way out? We turn it on and .... oops! We just didn't have enough! Here are the chemical elements. It's time to show off your chemistry knowledge.
We approach the table, look at the periodic table. There is another one at the bottom of the table. The table of "incompatible reagents" - that's what we need. We write out the reagents for ourselves in this order:
We return to the chemical elements. Before you is a field with scattered chemical elements, 3 storages (categories) and a "hand". Press the red button and start arranging them into storages into categories. The control panel is on the right. At the top there are 4 arrows with which you will move the automatic hand forward - backward - right left.Under it, a scale that opens the "claw". With this "hand" you have to work. The task is to categorize the elements in the storage soybeans, and not explode.
HAND MOVEMENT ADVICE: When bringing the claw to the flask, look at the grip, it should be at the level of the element. The claw should be opened wider than the flask, and closed not completely (except for small cones). Bring the element into storage (category), clearly Having brought the large element to the end, fully open the claws ("click" back), narrow (2 clicks). Leaving the storage, do 2 two "clicks" - back.
Here, in this sequence, we start the chemical elements. The number of the category (repository) where it is necessary, to place, the element is indicated in brackets.
NH3(1), P (1), H (1), H (1), H (1), I (2), NH3(1), H (1), F (3), I (2), Hg (3), P (1), H2O (2),
F (3), Rn (3), H2O (2), Br (3), P (1), K (1), LOX (2), Hg (3), I (2), K (1), CI (2), K (1), Rn (3),
F (3), Br (3), CI (2), H2O (2), H (1), key (1).
You are given a key to start. Now you can go unravel the wires.
Rocket.
Unravel the wires. We connect them as follows: gray to yellow, black to blue, purple to red, brown to green, pink to orange. In numbers (from top to bottom) it will be like this: 4 2 3 1 5.
Now we go to the stairs that lead to the rocket, put the nose of the rocket. We approach the board at the remote control. We pay attention to the note, remember the code 90.1. We go to the laboratory, pick up the stand - the holder for the rocket. It is in the middle, red with a circle inside. We approach the rocket, to the active zone, where the wires were unraveled. We take from the inventory a red plate with a circle, put it on, clicking it on the rocket just above the wiring.
Launch.
1. Insert the key.
2. Open the first two red levers.
3. Set the angle - 90.1.
4. Open the last red lever.
We start as usual with an introduction. Nancy's room. On the desk is the book What a Detective Should Know, a file of past cases, a wedding invitation, and a phone card. Once you're ready, take the phone card and invitation from the table. You will be prompted to select a difficulty level.
Nancy arrives in Ireland to attend her friend's wedding. Driving down a deserted night road, Nancy decides to call Ned. And, of course, she assures him that she will not get involved in any business. She's on her way to the wedding. As soon as Nancy finished talking, something shaggy and white rushes in front of the windshield of the car. God!!! What was it? Man? Or a ghost?
As a result, the car ends up in a ditch. It's good that it happened near the castle itself.
On the paved road, we pass under the arch. Here we are at the place. We knock. The door is opened by an unkind person and immediately closes it, declaring that there will be no wedding. And for the night he sends Nancy to a pub called Banshee's Cry. Nothing to do about. Let's go to the pub.
We go from the gate back to the arch, carefully looking under our feet. Near the arch, on the ground, lies a groom's doll with a ring around its neck. From the arch we turn left and see a pointer. We go there.
Having reached the pub, another trouble awaits us. There are no seats. Well, it doesn't work that way. But there is one plus. We found a pay phone. By the way, Nancy's cell phone crashed along with the car. Let's run here and call. You can go to the pub, look at the photos on the right wall, look at the slot machines in the corner. But Nancy can't play yet. There is no money. Well, let's go back to the castle.
Again we approach the doors, knock and say that there are no places in the pub. But the vile old man does not want to listen to anything. We'll have to find our own way to the castle.
We turn left and see the path (it will be active). We pass and see the light in the window. It's useless to scream. We select stones from the ground. We choose the largest. Let's throw it out the window.
Keiler looks out the window and goes to open the door for us. Finally, we are inside the castle.
We pass into the library. We talk with Keiler. We ask her all the questions. At her request, we begin the investigation. Let's start with the child.
Exit the library and enter the first door on the right. We see a magpie stealing colored pebbles from a panel near the fireplace. Shh! A thief flies away, and we pick up a pebble.
We look further. Standing next to the bed Dollhouse hic (what a charm), but we don't need it yet. Nearby, on the floor, a horse, anu-ka, swing more. Oh! We take a coin.
We approach the bookcase, we are looking for an active point. Here is the first riddle! On the box is a puzzle with otters.
Junior detective level solution:
1. Tile No. 4 combine the blue otter.
2. Swap tiles number 2 and number 3, combine the purple otter
3. Tile No. 6 combine the green otter.
4. Swap tiles number 9 and number 8, combine the green otter
5. We change tiles No. 9 and No. 1. We combine the pattern.
6. Tiles No. 9, No. 7, No. 3 combine otters.
Solution for senior detective level: 
1. Swap tiles number 3 and number 4, combine the blue otter.
2. Swap places No. 1 and No. 6, combine the green otter.
3. Swap places No. 7 and No. 8, combine the brown otter.
4. Change No. 1 and No. 2, combine the purple otter.
5. Change No. 1 and No. 7, combine the pattern.
6. Rotate tile number 3.
The box is open. From it we take the gear. We look at the panel near the fireplace, pick up pebbles, so we will look. We look at the fireplace itself, below we see broken glasses, we pick them up. We look at the table near the bed, we examine the book. Everyone, Exit and go back to the library.
Library.
We look at the shelves, near another door (it is advisable not to rush into it too much, you can screw it up). The active zone is on the pyramid. This is the second riddle. We shift the rings so that they would be transferred from the left stick to the far right. Elementary!
Solution for junior detective level: (columns are numbered from left to right 1,2,3)
From 1 we shift to 3.2 2.1 2.3 3.1 1.2 3.1 3.4 2.1 2.2 1.1 1.3 2.1 3.2 2.1 2.5 3 .1 1.2 3.1 3.3 1.1 2.2 1.1 1.4 3.1 3.2 2.1 2.3 1.1 1.2 3.1 3.
Solution for senior detective level. (seven rings)
From 1 we shift to 3.1 2.3 2.1 3.2 1.2 3.1 3.1 2.3 2.3 1.2 1.3 2.1 3.1 2.3 2.1 3, 2 1.2 3.1 3.2 1.3 2.3 1.2 1.2 3.1 3.1 2.3 2.1 3.2 1.2 3.1 3.1 2.3 2 .3 1.2 1.3 2.1 3.1 2.3 2.3 1.2 1.2 3.1 3.2 1.3 2.3 1.2 1.3 2.3 1.2 1.3 2.1 3.1 2.3 2.1 3.2 1.2 3.1 3.1 2.3 2.3 1.2 1.3 2.1 3.1 2.3 2, 1 3.2 1.2 3.1 3.2 1.3 2.3 1.2 1.2 3.1 3.1 2.3 2.1 3.2 1.2 3.1 3.2 1 .3 2.3 1.2 1.3 2.1 3.1 2.3 2.3 1.2 1.2 3.1 3.2 1.3 2.3 1.2 1.2 3.1 3.1 2.3 2.1 3.2 1.2 3.1 3.1 2.3 2.3 1.2 1.3 2.1 3.1 2.3 2.1 3.2 1, 2 3.1 3.2 1.3 2.3 1.2 1.2 3.1 3.1 2.3 2.1 3.2 1.2 3.1 3.
After solving the puzzle, we get a lantern.
We turn from the cabinet to the table. We look at the scales and at the text about binary codes. We open the table, look at the sheet which describes how much each weight weighs. For now, we can't do anything. We are missing two weights.
We go further, to the closet, near which sits Keiler. There are two active zones. We take a book on astrology, and click on the helmet, there is a box with a mechanism. Again no luck. We don't have two wheels. We go down to the first floor.
At the end of the hall there is a huge table. We come, we look ... oh! weight. We pick it up. We go to the “Madame Isabelle” machine gun, look at the floor from it (on the right) - a coin!
We throw a coin into the machine and get the second weight. We rise to the second floor to the table with scales.
The task is very simple. It is necessary to put 3 weights on the bowls, left and right, so that they would have a total weight of 300. We get: the left bowl of the weights is iron, silver, mahogany. The right bowl is lead, zinc, oak. The middle bowl is brass, copper and the remaining weight .
Voila! We get a puzzle, which is located on the arch when entering the castle.
We run into the yard, to the arch. Click on the active zone (column on the right) and play puzzles. If you need to see what exactly the picture will be, look at the left column of the arch. If you put everything together correctly, Nancy will say that one puzzle is missing. We take out ours, insert it, they give us a thin, metal sheet.
For those who still don’t know how to play tag, here is the solution: (from left to right we number 1,2,3, etc.)
Solution for junior detective level. Move the chips in the following order: 2 1 5 9 13 14 10 11 12 16 15 14 10 6 7 11 10 9 13 14
15 11 10 14 13 9 5 6 2 3 7 8 4 3 7 6 2 3 7 6 5 1 2 3 4 8 7 3 4 8 7 11 12 8 4 3
2 1 5 6 7.
Senior detective solution: 7 11 15 14 13 9 5 1 2 3 7 11 12 8 4 3 7
11 15 14 13 9 5 1 2 3 7 11 15 16 12 8 7 6 5 1 2 3 7 8 4 3 7 11 12 8 7 6 5 9 13 14
15 11 7 6 5 1 2 3 7 8 4 3 7 8 4 3 2 1 5 6 7 8 12 11 10 9 13 15 16 12 11 10 9 13 14
15 11 12 16 15 14 13 9 10 6 7 8 12 11 10 6 5 9 10 11 7 6 10 11 12 8 7 6 5 9 10 11
12 8 7 6 10 11 12 8 7 11 10 6 7 8 12 11 7
We return to the castle. It's time to meet another guest of the castle. This old friend the bride and groom (is the bride's friend?)
We ask Keith about everything. Including a bruise under the eye. He answers all questions except the bruise. His answer is simple, there is a lot to do. We agree to help him.
He gives us the guest list. The task is just as simple. It is necessary to properly seat the guests.
See the picture below. 
Heather sits in the yellow square without a name.
We give the guest list to Keith and in return we get a book about leprechauns. It will be very useful to us in the future. It's time to make a call. one thing, I hope you do not forget to mark completed tasks in a notebook?
I'm going to the pub.
There sits an old grumbler who wouldn't let us in. He again does not want to talk to us, because, you see, they did not bring him a cocktail. My God, rolling your eyes, what nonsense! We will do everything now!
We go to the kitchen of the pub and open the recipes for drinks. There will be saucers on the counter and a “head cap” on which there will be those cocktails that you need to make. We open recipes and prepare drinks. It is advisable to start with those that are near the call. Only when you have prepared 2 cocktails, you can give a call. You have to be within 30 seconds. Otherwise, you will not earn money, but we need them now, oh how we need them.
We take the tip and go to the slot machines. Let's play detective first. I can’t help here, since all the tasks are different, but if you win (without losing all the money), they will give you a pipe (maybe even a magic one).
You can try to play darts right away. What if you get lucky and get another doll (a blue dog), which will be very useful to you in the castle. If you don’t get it, don’t be upset, next time you will definitely win. I’ll note from the game of darts: there you need to score NOT a “more” number of points, but a smaller one! I advise you to throw darts exactly at the bullseye and quickly. If at the end of the game they wrote you “000-bad”, you need to replay. Only when they write "000" will you get a blue rabbit.
We return to the castle. We talk with Keiler, she asks us to print only three invitations. Yes please! We go downstairs, go to the table. An antediluvian photocopier awaits us. Well, we'll figure it out. First, we take a sheet (bottom right), they give us a metal plate. We take it for ourselves. To the left we put a sheet, fill it with black paint, turn the wheel, pick up the sheet and put it on the machine on the right. We press the button. Aha! We have a strange invitation. It turns out to be the best man and not a close friend at all! We make two more sheets and go to Keiler.
Then there are two options: Either go spend money in the machine, or go check (finally) the yard.
Yard.
Exit the castle, turn right. We find the active zone (blue) in the form of a small cellar. We go to the garden. On the left, on the bench we find a letter. Let's go to the leprechauns. The vile magpie-thief is circling in the same place. Does she have a nest somewhere nearby? And I wonder if she pulled a lot of good there. We pay attention to their tummies. Clover. Remember the book Kitt gave us. Let's open it and look at it. On the pages of the book, too, there is such a flower. I wonder if you turn to where the leaf is dark? Who could not turn the leprechauns, see the picture:
Ha! Here it is! Nest! We take everything that is there.
Where did we see these stones? Well, of course! In the nursery near the fireplace, where the crow picked out our first pebble! We return to the castle, go to the nursery.
We insert the pebbles into the panel. Now you need to figure out how to press the pebbles to open the fireplace. Having suffered, we solve this riddle. Well, who did not guess, do the following:
Insert the pebbles as shown in the picture. Above the panel we see a rainbow.
Click in reverse order of the rainbow F S G G F O K, then on the non-rainbow color (at the very bottom), and then in the correct order (rainbow) K O F G S F, and the fireplace opens.
We go inside, take the board, turn around again and take the paper from
stones painted on it (instruction for the swamp). So much effort for the board and what paper!
Alright, let's take a look around the yard. We pass by the cemetery (blue zone) and look in. Hmmm...weird crosses. in the middle there is a place for something. What? This is what we have to find out.
We go around everything we can, we find two more active zones (blue). We inspect one zone (such as a flower bed) and leave, go almost down and to the left. There is an active zone (blue, long)
So. We've come to the swamps. We have a board, put it down and go over it. We also have a leaflet with a hint. Alas! He will not tell us anything plainly, except for one thing, from it you can understand in which direction and how many times to turn.
Here's how to move through the swamp (steps are counted from the stones): 1 forward, 1 right, 2 forward, 2 right, 2 forward, 4 left, 2 backward, 2 left, 3 backward, 2 left, 1 forward, 1 left, 2 forward , 1 right, 2 forward, 2 right, 2 forward, 1 right, 1 forward (how many steps, so many mouse clicks). We go to the gypsy hut.
Hut.
We go into the hut. On the right, in the corner, there are baskets, open one. What is it? Backpack - rocket! This is very useful for us. We approach the table (on the left) We look at the book and herbs. Now we turn around and look at the cage, in which there are a huge number of midges. And in the cell, something lies. We need to remove midges with herbs. We approach the table with herbs again and make an herbal mixture that will remove flies from the cage. The order is: Tansy, fleaberry, wormwood, thyme and cat. We crush with a mortar and place it in a place where insects accumulate.
As soon as the cage is cleared, we take a round glass in a frame.
We approach the table near the cells. Strange, but here is a diagram from our dollhouse. Let's take it. We look at the box, but we cannot take or open it. We look at the sheep doll. Eh! We would sew it now! But there is no sheep's wool to stuff the doll.
We leave the hut. We leave this location. We go to the old cemetery. See crosses. Wow! And the glass exactly fits the hole in the middle. We begin to insert the glass from the left cross. We look and remember the signs, move away, now we insert it into the central cross, remember, move away. And finally the third. Everyone wrote down and ran to the wall near the castle. Here are the signs you should have examined: 
We are looking for a blue location on the wall. Here are the signs that the crosses pointed out to us. In exactly the same sequence as we inserted the glass into the crosses and press the signs. If everything is correct, the wall descends.
Blimey! There is a whole sheep farm here. We go all over the lawn. We reach the barn and see on the left, hanging "breath of the wind". (In Ireland?). Well then! It's definitely fortunate. We take the gear from there. Let's go around further. We go along the fence (blue location). We enter. We look at the swamp and take the leaf. This guy Kitt is not easy, he already planned everything in the castle! We leave. We go to the middle of the clearing (blue location).
4 huge stone steles. Ndaaa ... The riddle is not an easy one. But we can't do anything yet. We leave and go to the castle.
Bouquet.
We go straight to Keiler and ask her about the drawing, if she asked Kitt to make a sketch. No, not her. Okay, we'll figure it out later. Our newlywed, like, immediately gives us one more task (the Irish are completely lazy).
Collecting flowers for a wedding bouquet is not easy! But with meaning. What a superstitious these Irish! Well, we are always happy to help! We take a basket and a list and start looking for flowers on the list.
Where you go first doesn't matter. So the order is not required.
We just need to remember where we saw flowers. The first thing that comes to mind is where the leprechauns are standing. We go into the garden, turn around, here are the roses for you! There is a beginning.
I'm going to the swamp. Near the board (without crossing) we tear off the second flower. We're leaving. The third location is a flowerbed fenced with stones. We. leaving the location of the swamp, we go up and see a blue circle. We go in, pick a yellow flower, go out.
Now we are crossing the swamp (don't be afraid, it will happen in Irish quickly). We go into the hut, we approach the table with herbs. We look at the bunches of grass hanging from above, we take one of them. We go to the stones where the sheep are grazing. We go inside, put the arrow down. we are at the foot of the rocks. Now the arrow in any direction. Here's your lavender!
We leave and go to the arch. We leave it and immediately turn around, look at it in the very left side of the arrow on the columnar - a flower! We leave the location. We go further, almost to our car. We turn so that our car is behind us and go to the very end of the road (blue location) We pick the last flower.
So. The bouquet is ready, let's go give it to a friend. We go to the castle. Oh pa! What a luck! Kitt is not there. You can also look at his things. We look under the bed (since we will not be allowed to inquire anymore) and see ... .. Matt's things! It's all so weird. We go up to Keiler. But don't rush to open the door, let's hear what Keiler and Kitt have to say. After the voices subside, we quickly dive into the nursery. We leave and go to Keiler. We give her flowers and say that we found Matt's things under Kitt's bed. Keiler denies that Kitt was involved in the disappearance of the groom. (what secretive these Englishmen are!) We go downstairs, look at the fireplace, there is a photo of Keiler and Kitt. We approach Kitt, talk to him and ask him all the questions. Yes, he loves Keiler, so what?. We leave the castle and go to the pub.
A pub.
We need to find out from the old grumbler what he knows about the stones and about Matt's things. Well, what do you think? He laid it out for us so easily? Ha… No matter how. We'll have to play that old man on drums! The task is to combine the impact on the drum with the fall of the ball, which moves at the top, into the hole.
Let's go play. I can’t really help here, since you will have to score points yourself. The first time, having scored 55 points, they told me that I should train, the second time, having scored 47, they praised me and gave me a tip. So, having practiced, you will play the right rhythm. We approach Donal, he, having become emotional from our game, gives us the book.
We ask Donal a question about Matt's things. Yes, he hid them, but for the fact that we are so curious, he gives us the key so that we can find and drive into the shearing shed, 10 sheep.
Sheep.
We're going to catch sheep. We walk across the lawn and as soon as the lamb gets into the circle of light, but not too close, “we blow into the pipe”. The task is simple - enjoy.
As soon as we have collected all the sheep, we go into the barn, check the sheep, turn around and leave.
We go to the castle, because we now have 2 gears, we can try to solve the riddle with gears. Who is in difficulty, see the picture.
Hmm...another piece of paper for the dollhouse. Now she has a sheep. Soooo .. Run to the hut in the swamp. Let's look at the sheep. We look at wool - not enough! I run to the pub. We ask Donal for permission to shear the sheep. Of course! But only three bags. So be it, we go to the barn to do the wonders of hairdressing ... from sheep!
We go in, go to the left, look at the bag, then go to the electronics to the right. In the upper left corner we have a pipe in a square. She obliquely divides the square. Click on the top section of the square. The melody that we need plays and the sheep gets under the infernal machine. We read the instructions. So...example:
Our first Daly with green snowflakes is -2, she is under - No. 19, bouncing - it means she is happy, this is -12. Punks are easy! If you correctly guessed everything in the behavior of the sheep, and correctly set the number, then you need to shear 6 sheep in total. After every second sheep we change the bag. Having finished with the last bag, we take some wool from it. Let's go again to the swamp - we'll fill the sheep!
We go to the castle to the dollhouse. It's time to arrange the puppets. There are a lot of options. And any option can surprise. But for now I will focus on the arrangement of seven and eight dolls.
Page 5 of 6
You have the schematic. And who did not understand, we expose the dolls like this:
7
dolls
From left to right:
Bottom row - doll with white hair, empty, pig, knight, blue rabbit, knight.
The middle row is empty, empty, empty, cow, doll in a blue vest, empty.
The top row is a doll in green clothes, a cat.
Here are those times! They gave one coin hmm ... but I think it's not casual.
So, it's time to deal with the stones that are behind the fence, where the sheep graze. We go to the blue location. There is a terrible scream. But that doesn't scare us. We open a book on astrology, which we found in the library at the very beginning, look at the constellations. Now carefully read the book "Ancient Celtic Holidays". So, we find out that there are only 4 of them.
Here's what we need to place the stones. Taurus - Beltane. May 1 is celebrated on the day between the spring and summer equinoxes. Lion - Lughnasad - the feast of the first harvest on August 1. Scorpio - Samhain. The symbol of the outgoing year is November 1. Aquarius - Imbolc. House Holiday. It marked the birth of lambs and awakening nature. Celebrated February 1-2.
We put the constellations on the upper stones. From left to right: Taurus, Leo, Scorpio and Aquarius. The middle stone is trees. 1) A blossomed tree; 2) A tree with fallen fruits on the ground; 3) A tree without leaves; 4) A tree with barely noticeable leaves. The bottom one is holidays. The task is not simple. So who is completely confused, see the picture.
Taurus Leo Scorpio Aquarius

If you set everything correctly, below, near one of the steles, a cache will open and you will be given a third metal plate.
We return to the castle to the dollhouse. Let's try to arrange the dolls in a different way by adding one more.
8 dolls
From left to right:
The bottom row is a doll in green clothes, empty, knight, cat, cow, knight.
The middle row is empty, a doll with white hair, a sheep, a doll in a blue vest, empty, a pig.
The top row is a blue rabbit, empty.
You have received the fourth plate with instructions! Finally, it will be possible to understand what these plates are and why they are needed.
Definition of a binary code.
What is a binary code and what it is eaten with, the library will help you find out. We pass into the library to the far table. We study the document on the left. It will help determine the binary code. For those who still could not figure it out, it is done like this:
01000011 xerox plate 0+64+0+0+0+0+2+1 = 67, which corresponds to C.
01001101 arch plate 0+64+0+0+8+4+0+1 = 77, corresponds to K.
01011001 plate from a niche in stones 0+64+0+16+8+0+0+1 = 89, corresponds to Zh.
01001011 dollhouse plate 0+64+0+0+1+0+1+1 = 75, corresponds to Ch.
As you may have guessed, these letters are the initials in paint colors:
C - blue, K - red, W - yellow, H - black. Now you can safely go to the printing press.
We go down to the hall, to the copier.
Before you, everything is also a copier, on which you have already worked. First of all, you need to throw away the sheet of paper that was printed last time (if you did not throw it away). On the right side there is a “paper shredder”, a yellow basket. You just have to put your hand on it. If you messed up something, feel free to send it there. This basket eats everything. Moreover, without destroying the damaged sheet, you will not be able to continue working.
So, in front of us is a copier, which is also a printing press. On the left, below, paint, a stack of sheets of clean paper and on the right side of the retract - a dryer for a printed sheet.
All four plates must be placed in one row. When you send a damaged sheet to the shredder, you must take a clean one. And the plate that remains lying in the machine on the left must be returned to the row again.
The instructions are printed in this order:
1. Take the first plate 01011001, pour yellow paint on it.
2. We roll the sheet and put it in the dryer, but DO NOT dry it!
3. We put plate number 2 - 01000011, pour blue paint.
4. We take a sheet from the dryer and put it on blue paint.
5. We roll the sheet. Again put in the dryer (do not dry!).
6. We put plate No. 3 - 01001101, pour red paint.
7. We take a sheet from the dryer and put it on the red paint.
8. We roll the sheet and put it in the dryer (Do not dry)
9. We put plate No. 4 - 01001011, pour black paint.
10. We take a sheet from the dryer and put black paint on it,
11. We roll the sheet and put it in the dryer. Now turn on the dryer.
Instructions for using the rocket pack are ready.
Check out the drawing. 
We leave the castle, move away (to the car or to the bridge), take the rocket pack in the inventory and carefully, slowly, do everything according to the instructions. If everything is set correctly, then you ... will fly! Special attention look at the blue lever. In the instructions, it is printed down, but it says that it must be raised up.
For those who continue to explode, try another sequence of plates and paints: or this one:
1. 01000011 - blue 1. 01001011 - black
2. 01001101 - red 2. 01011001 - yellow
3. 01011001 - yellow 3. 01001011 - blue
4. 01001011 - black 4. 01001101 - red
Holding the left mouse button, we direct the flying Nancy to the tower. The window (location) will be highlighted in blue. We fly into the window. Blimey! Yes, there is a whole and unharmed perfectly preserved room! But Matt is not here. Let's explore the room. We approach the coffee table and get out of it only a note with a hint. And a huge chest of drawers, but it's coded. We look at the genealogical extracts on the wall. Everybody. We fly back to the castle.
We read the note. We need 4 books. The first one is on the shelf near Keiler, where the horse is.
The second and third are on the shelves near the table - one is on the left, the other is higher, on the right, the fourth is on the table with weights.
We read them carefully. The riddle is not easy. You will receive the code by unraveling the secrets of these books. But there is also a note. It says something about a "convenient place". Let's hit the road. Rising up, we fly into the sea, preferably along the coast towards a strange round flowerbed, on which we were picking a yellow flower. From the flower bed you need to fly to the right, along the coast, the rocks are not far from the coast, almost opposite the flower bed. We land on the rocks and on one of the walls we see L 5. There is one letter. We fly back to the tower.
We return to books. I offer you my thoughts. The letter K (in one of the books there is a mention of the sea) - on the map on the right is the Caribbean Sea. The letter X, we take from the rhyme (it talks about the middle, the book Zoopsychology. We take the middle letter). The letter G turned out to be the only one that does not have a repetition. Well, with the phrase about "ancient wisdom" you will have to suffer pretty much. It is necessary to do all the described actions, and we get the letter C.
We leave the castle and ... again we see the "ghost" flying out of our tower. What was it doing there? We fly there. We look around - everything is in place. Well, it's time to try our code. Enter -K, C, G, X, L. So we opened it. We take the key (well, finally we found how to open the box), and the doll! Ba! Yes, it's Nancy! We pay attention that she has the same key on her neck, we pick up the doll. We read the diary, look at the photo of the cute girl Fiona. We're flying away.
Since we found the key to the box, then we go to the swamp to the hut. We go into the hut, go to the table where the box is. We open it, we read a postcard - congratulations to Fiona on her sixth birthday. We turn around from a terrible howl ... God! Yes, this is our “ghost.” It hardly speaks. We try to explain to her why we are here. We understand that “the ghost is Fiona, but she doesn’t even want to listen to us and pushes us into some kind of hole. Horror!
Having fallen into the dungeon, looking around, we go through the tunnel. We leave into the round room and light the switch. At the same second, a man’s cry is heard that we did it in vain. He is isolated from us by a door. Yes, it's Matt! We talk about everything with him, and go to inspect the room.
Laboratory.
As soon as you approach it, the task "how to assemble the stairs" will automatically pop up. Well, you won't have any problems with this task. Having collected it, we rise and take out the nose of the rocket! We pass to the console, next to a dark room with a staircase visible there. We approach there, the light automatically turns on.
We examine the rocket. Below, there is an active zone, open it. Wires, and even how many, and even tangled! We continue the round. We approach the table. We take a journal with notes and read it very carefully, there are a lot of clues. Near the table, a little higher hangs a note. This is the instructions for launching the rocket. She will be very useful to us. Under the instructions was a red button! Maybe this is the way out? We turn it on and .... oops! We just didn't have enough! Here are the chemical elements. It's time to show off your chemistry knowledge.
We approach the table, look at the periodic table. There is another one at the bottom of the table. The table of "incompatible reagents" - that's what we need. We write out the reagents in this order:
We return to the chemical elements. Before you is a field with scattered chemical elements, 3 storages (categories) and a "hand". We press the red button and start arranging them into storage categories. Control panel on the right. At the top there are 4 arrows with which you will move the automatic hand forward - backward - right - left. Below it, a scale that opens the "claw". With this “hand”, you have to work. The challenge is to categorize the items in the storage soybeans without exploding.
HAND MOVEMENT TIP: When bringing the claw to the flask, look at the grip, it should be at the level of the element. It is necessary to open the claw wider than the flask, and not completely close it (except for small cones). Get the element in the repository (category), clearly in the center. Having brought a large element to the end, fully open the claws (“click” back), narrow (2 clicks). Leaving the storage, do 2 two "clicks" - back.
Here, in this sequence, we start the chemical elements. The number of the category (repository) where it is necessary, to place, the element is indicated in brackets.
NH3(1), P (1), H (1), H (1), H (1), I (2), NH3(1), H (1), F (3), I (2), Hg (3), P (1), H2O (2),
F (3), Rn (3), H2O (2), Br (3), P (1), K (1), LOX (2), Hg (3), I (2), K (1), CI (2), K (1), Rn (3),
F (3), Br (3), CI (2), H2O (2), H (1), key (1).
You are given a key to start. Now you can go unravel the wires.
Rocket.
Unravel the wires. We connect them as follows: gray to yellow, black to blue, purple to red, brown to green, pink to orange. In numbers (from top to bottom) it will be like this: 4 2 3 1 5. The picture is attached. 
Now we go to the stairs that lead to the rocket, put the nose of the rocket. We approach the board at the remote control. We pay attention to the note, remember the code 90.1. We go to the laboratory, pick up the stand - the holder for the rocket. It is in the middle, red with a circle inside. We approach the rocket, to the active zone, where the wires were unraveled. We take from the inventory a red plate with a circle, put it on, clicking it on the rocket just above the wiring.
Launch.
1. Insert the key.
2. Open the first two red levers.
3. Set the angle - 90.1.
4. Open the last red lever.
Game Nancy Drew Ghost of Malloy Castle
The seventeenth part of the cult quest - Game Nancy Drew Ghost of Malloy Castle- about amateur detective Nancy Drew was released in 2008. The release of this part was also handled by Her Interactive. The game came to Russia in 2008, thanks to the company New disc. What can not but rejoice is that the game was released in the same year as abroad. Fans of this game series were definitely pleased.
The essence of this part of the game is that one of her friends invites us (that is, Nancy Drew) to visit. A friend's name is Kyler, and she lives in Ireland. We have always wanted to visit this country. Beautiful and picturesque landscapes. Amazing places and wonderful animals. But we are not up to it. Our girlfriend is about to get married and we will be as bridesmaids. And, as usual, things don't go the way they should. The groom is gone. It just disappears and no one knows what happened. But nothing, here we will figure it out and find the groom. We have to learn a lot about old Irish traditions, learn how to shear sheep and fall in love with Irish folk music. All this cannot but rejoice. We have always wanted to visit Ireland, I think you would not refuse too.
On the way to unraveling, many secrets await us, including in a Celtic language that is incomprehensible to us. But nothing, other main characters will help us. All this is incomprehensible and mysterious, and insanely interesting. We hope that you will be able to cope with all the riddles yourself, but, nevertheless, we will help you a little by laying out full walkthrough games.
The appearance of the game remained exactly the same as in other parts of the game. Here the developers do not change themselves. But maybe it's for the best, because we are already used to this kind of game. An accessible 360-degree camera allows you to see everything we need around us. And the “second chance” will allow you to go back if we did something wrong somewhere.
Generally speaking, the game is still as exciting as all other parts of this quest with a million audience. I think now you can enjoy this game. Good luck. And here is Walkthrough of Nancy Drew The Haunting of Malloy Castle.
Passage of game Nancy Drew Ghost of Malloy Castle
Passage of game Nancy Drew Ghost of Malloy Castle. Part 1
Passage of game Nancy Drew Ghost of Malloy Castle. Part 2
Passage of game Nancy Drew Ghost of Malloy Castle. Part 3
Passage of game Nancy Drew Ghost of Malloy Castle. Part 4
Passage of game Nancy Drew Ghost of Malloy Castle. Part 5
Passage of game Nancy Drew Ghost of Malloy Castle. Part 6
Passage of game Nancy Drew Ghost of Malloy Castle. Part 7
Passage of game Nancy Drew Ghost of Malloy Castle. Part 8
Passage of game Nancy Drew Ghost of Malloy Castle. Part 9
Passage of game Nancy Drew Ghost of Malloy Castle. Part 10
Passage of game Nancy Drew Ghost of Malloy Castle. Part 11
A series of games dedicated to the young girl detective Nancy Drew is quite popular all over the world. Detective quests with an interesting plot and sometimes very difficult puzzles have resonated with players of all ages. This article will focus on one of the most famous parts of the game - "The Ghost of Malloy Castle" ("Nancy Drew"). Passing the most challenging puzzles, which will meet during the game and some important tips are provided for your attention.
For those who are not familiar with the quests in this series, the game provides a tutorial that can be started by reading a book in Nancy's room. The passage of the game "Nancy Drew: The Haunting of Malloy Castle" can develop in different ways, depending on which difficulty level you choose. There are two options: "Junior Investigator" and "Senior Investigator". The "junior detective" will receive easier puzzles and, in addition, he will have the opportunity to take clues from a special machine that predicts the future. For hints you need to pay with tokens.
The game is controlled with the mouse. Click in front of Nancy with the left mouse button and indicate the direction of movement to the character. Active locations that you can go to are highlighted.
You also need to know that in the game "The Ghost of Malloy Castle" ("Nancy Drew"), the passage is free, while the plot is linear.
Machines in the Banshee Cry pub
Already at the very beginning of the game, something starts to go wrong: first, Nancy gets into a small accident, and then she is not allowed into the castle and sent to spend the night in a pub. Judging by the ad, there are no seats in the pub, but it's worth going there for the slot machines.
To be able to play Banshee's Scream Pub slots, check the small cashback slots on each slot and you'll be rewarded with some coins. Now you can play. The first puzzle that will throw you the passage of "Nancy Drew: The Haunting of Malloy Castle" - "Answers" ("Sharp Detective"). This is a fairly simple mini-game, the only problem is that it has a time limit. Do not forget to save before you start playing it, otherwise, in case of defeat, you will forever miss the opportunity to get a prize - a pipe. Pictures with differences change every time. See the photo below for an example of one of them.

Now drop the coins into the nearby machine. The game of darts will begin. In Nancy Drew: The Haunting of Malloy's Castle, passing Darts is one of the easiest moments in the game. Here you need to use all the darts to score exactly 201 points. The dart will shake and move. Release the mouse button when the dart is slightly above the center circle - this way you will score 50 points. As a reward, you will receive a blue dog doll.
Puzzles in the library
Depending on your playthrough of Nancy Drew: The Haunting of Mulloy Castle, the next puzzle to come across after the automata could be the Scales. You will come across it when you get to the castle library. In it, you need to balance three bowls with the help of weights. In sum, the weight of all three weights should be equal to one hundred grams.
So, "Nancy Drew: The Ghost of Malloy Castle", the passage of "Scales". The solution to the puzzle is the following:
- The first bowl is brass (45), copper (47), (8).
- The second cup is silver (55), iron (40), (5).
- The third bowl is zinc (37), lead (60), oak (3).
As a reward, you will receive the missing piece of the mosaic. This mosaic is located on one of the columns near the bridge. It is assembled using the “fifteen” game method, so there should not be any difficulties with it.
In the same place on the bookshelf will lie If you click on its base, then a secret box with gears will move forward. To move on to the next part of the game "Nancy Drew: The Haunting of Malloy Castle", the passage of "Gear" is required. You will have to put the mechanism into action, which will require two missing parts. You get the first gear by completing the otter mosaic (see below), and the second one is near the entrance to the sheep barn.
Puzzles in the children's room
In the children's room, in the bookcase, you will find a strange mosaic box. Otters will be depicted on the box, as well as explanatory inscriptions from which it can be concluded that the left mouse button moves the tiles, and the right one rotates them. Actually, your task is to assemble the mosaic.
Let's say we numbered the tiles in the following order:
- First row: 1,2,3.
- Second row: 4,5,6.
- Third row: 7,8,9.
The assembly algorithm will be as follows:
- turn tile 4;
- swap tiles 3 and 2;
- turn tile 2;
- turn tile 6;
- swap tiles 9 and 8;
- turn 8;
- swap 9 and 1;
- turn 1;
- turn tile 9, then tile 7, then 3.
The box will open and you will receive the first gear. Another puzzle in this room is related to the dollhouse. You will return to it several times in the course of finding new dolls (one of the dolls will have to be made independently, as described below). There should not be any difficulties with the decision: just follow the instructions that are shown on the screen with the dolls on the left.
"Nancy Drew: The Haunting of Malloy Castle". Passage: "Gnomes"
This puzzle is waiting for you in the garden of the gnomes. Solving it will not be difficult if you get a book with ancient Irish poems, and Madame Isabella will give you a hint. Here is a quick solution:
- The first figurine of the gnome must be rotated three times.
- The second one needs to be rotated once.
- Rotate the third one twice.
- Don't touch the fourth.
- Fifth turn three times.
- Sixth - twice.
- We do not touch the seventh.

"Nancy Drew: The Haunting of Malloy Castle". Walkthrough: "Swamp"
The instructions that can be found in the secret room behind the fireplace will help you go through the swamp. There will be indicated secret meaning stones that will be placed on the way through the swamp. Everything is quite simple: additional pebbles near the two main ones suggest the direction in which you need to move and the number of steps you need to take.
You will come out to a hut, where you will find a lot of interesting things, including a mannequin for a sheep doll.
Bridal bouquet
You will be asked to help in the preparation of the wedding bouquet. They will provide a list of the flowers you need, but it will not be easy to manage without a book on medicinal herbs. Fortunately, this book lies in a hut near the swamp.
So, start looking for flowers:
- Pick three roses in the garden of the gnomes. They bloom next to the figurines on the left.
- At the exit from the garden, on the way to the flowerbed, you will find a yellow flower - a yarrow symbolizing courage.
- The symbol of well-being, verbena, grows near the mosaic column.
- If you follow the path to the left from the arch to the very end, then you will run into a forest edge. There grows a spur, a symbol of health.
- In the swamp, without crossing the stream, pick the symbol of protection - a pink foxglove flower.
- Cross the swamp and head to the hut. There, on the table with dried herbs, you can take a bunch of sage.
- Lavender is the hardest to find. Exit the hut and move towards the passage in the wall. You will come to a pasture with sheep. Go down and then right: you will find an active point. The dot will lead you to the stones forming a circle. Look at the bottom of the base of any of the stones and turn left. Before you will be a symbol of happiness - lavender.
Making a sheep doll
One of the most difficult tasks in the game "The Haunting of Malloy Castle" ("Nancy Drew") is the passage of the quest "Sheep Pen". After it, you can start creating a doll from a mannequin.
You will find a mannequin for the doll in a hut behind the swamp. To complete the doll you will need sheep's wool. And in order to collect wool, you will first have to complete Donnal's quest: drive ten sheep into the sheepfold.
When you see a sheep, use the pipe that will be shown at the top of the screen. You need to act quickly: the sheep scatter easily. Having received 10 sheep on the counter, hurry to the sheepfold. To prevent the sheep from running away, go to the sheepfold.
Now you can return to the hut in the swamp. Examine the mannequin again: it turns out that there is not enough wool in the box. So, more needs to be cut.
Wool you need a little, but you have to collect as many as three bags - only with this condition Donnal will allow you to shear the sheep yourself.
Go to the sheepfold and call the sheep with the pipe. Watch the behavior of the sheep. You will determine their emotional state yourself, the rest of the information (the family of the sheep and the color of its group) is indicated on the control panel. There is a manual on the left, read it carefully. Look in the table for the numbers corresponding to the family and color and add them to the number, which indicates the behavior of the sheep.
When there are three bags, take some wool for the doll. Go back to the hut and just click on the mannequin. The doll is ready.
Celtic stones in the pasture
In solving the riddle of Celtic stones, two books will help you a lot - "Signs of the Zodiac" and "Celtic Holidays". Carefully study them and proceed to the next task from the game "Nancy Drew: The Ghost of Malloy Castle" - the passage of "Stones". The solution to the puzzle is:
- From a book about Celtic holidays, you will learn that the stone under which the board lies symbolizes the beginning of the year, that is, Beltane. Memorize the first letters of all four holidays using the Ogham alphabet.
- It turns out that according to the astrological calendar, Beltane is celebrated during the period of Taurus, the season is summer (a tree with an abundance of foliage), and at the bottom there will be rune B.
- Go right to the next stone. Do this: Lugnasad - Lion - autumn (tree with falling leaves) - rune L.
- Samhain - Scorpio - zama (tree without foliage) - rune S.
- Imbolc - Aquarius - spring (a few leaves on the tree) - rune I.
Obtaining Instructions for the Flying Pack
This task is very difficult. For many who played "The Ghost of Malloy Castle" ("Nancy Drew"), the passage came to a standstill at this very place.
You will find a flying pack in a hut near the swamp. It's just not clear how to use it. You need instructions that you will have to print yourself. To do this, you need four special plates with a binary code. You will get them from the dollhouse, the pillar by the arch, and by solving the riddle of the Celtic stones.
For fun, you can try to figure it out yourself with the help of the reference that is stored in the desk drawer with the scales. It should turn out like this:
- 01000011 - blue color (C);
- 01001101 - red color (M);
- 01011001 - yellow color (Y);
- 01001011 - black (K).
Having solved the code, go to print the instruction in the stone hall. Go to and click on the paper tray so that all four plates appear on the screen. Place the blue plate to the left of the wheel, then fill it with blue paint. Now you need to put a blank sheet of paper on top of the paint. Press the wheel lever, after which the finished sheet can be sent to dryer (do not press the red button yet). The same manipulations must be performed with the rest of the plates in the following order: red, yellow, black. When the fully printed sheet goes to the dryer, you can safely press the red button. You now have instructions for launching the backpack.
Code for the secretary
Toward the end of the game, you will find yourself in a small tower, in which there will be a locked secretary. The code for the secretary, of course, needs to be unraveled. Books from the library will serve as the key to unraveling.
In one of the cabinets, next to the statuette in the form of a horse, there is a book with the strange name "Hydroponics and Aeroponics". Having written out all the consonants from the title of the book and, as said, excluding all repetitions, you will get a single letter - "G".
On the table next to the scales is the book "Zoopsychology". By solving the riddle from this book, you will get the letter "X".
In the right cabinet you will find the Ancient Wisdom book. The riddle in it is not that difficult, but it will take a lot of time to solve it. It should be the letter "C".
In the same cabinet is the book "Marine Cartography". Everything is simple there: you need the first letter from the word "Caribbean", that is, "K".
But there are five unknowns in the code for the secretary, so one more letter is needed. Fly from the tower west to the island. You will see a rock with an engraved inscription: "L5".
As a result, you will have a code: "KSGHL".
Laboratory in the mine
The next puzzle will surely scare off those who are not good with chemistry. This is a stand with chemical elements, which you will find in the laboratory at the end of the journey through the game "Nancy Drew: The Haunting of Malloy Castle". Walkthrough "Chemicals" (puzzle solution) is as follows:
- Your task is to put all the flasks into containers. And for this you have to use a mechanical hand.
- Remember that when you take a large flask, the bottom should be half a cage away, while the side grip is one wide. For medium flasks, both from below and from the side, the lower part of the grip should be at a distance of half a cage. And for the little ones, keep the bottom half a cage away and the top half a cage away.
- You can compress the upper part of the grip by clicking to the left of the slider on the scale. Move the gripper along with the flask to the desired container. When you move all the elements - get the key.

Rocket launch
You have reached the final puzzle, after which the walkthrough of the game "Nancy Drew: The Haunting of Malloy Castle" will be completed.
When you have collected all the parts of the rocket, the last thing left is to launch it. Open the door at the base of the rocket and untangle the wires. Connect the wires according to the following algorithm:
- Connect the gray wire to the yellow wire.
- Black wire to blue.
- Purple - to red.
- Brown to green.
- Pink wire to orange.
If everything is done correctly, then the indicator under the left switch on the control panel will be green. Set the switch to 90.1 degrees and insert the key. Click on the levers from left to right. Now the rocket should take off.
The junior and senior detective differ in the complexity of the puzzles.
For those who play the games for the first time in the series, training is provided.
Nancy has a wallet, in this game you will have to earn tokens.
The junior detective can get hints from the machine that predicts the future, but you have to pay for them.
Nancy doesn't have a cell phone; you can call from a booth near the Banshee's Cry pub.
Active locations are highlighted in blue.
Nancy flew to Ireland for her friend Kyler's wedding.
She is driving in a car on a night road and talking to Ned. Suddenly, a white ghost appears in front of the car, Nancy frightenedly turns the steering wheel and gets into an accident.
1. Meet Kyler. Playing darts and getting the first Easter egg
We walk along the path to the castle. We knock on the door, but instead of Kyler, an unfamiliar man opens. He does not want to let us inside and offers to spend the night in a pub. At the castle gate there is an arrow "Pub", click on it and you will be taken to this location.
Near the door of the pub hangs a sign: "No places." Let's go inside. Pictures of the Venice Festival hang on the walls, and in the corner are two slot machine. To play them, we need tokens - apparently, they need to be found or somehow earned.
Open the change boxes and take out two tokens. Pay attention to what prizes you can win.
Let's play darts.
Put the token in the coin acceptor and take the darts. You need to use all eight darts and score 201 points. The dart trembles and moves. To hit 50 points, you need to release the mouse button when the dart is above the central circle. The reward will be a dog doll.
First Easter Egg:
First you need to hit “50” four times in a row, then three times - aim past the circle, with the last throw you need to hit “1”. You will hear a characteristic cackle and get an egg with clovers.
There is nothing to do, you have to return to the castle. Nancy refuses to leave the path to where it is dark - you need to get a lamp somewhere.
We knock on the door, but no one is going to let us in to spend the night. Let's go to the windows and look up - there is someone there, and we need to attract his attention. We will act like hooligans and throw stones at the window that lie nearby.
In the picture - one of the solutions (you can hit the window with any large stone if you aim below the parapet).
Kyler looked out the window, recognized Nancy and invited her to the castle. She says that her fiancé Matt disappeared somewhere before the wedding and invites us to find him. The surly man's name is Donal Delaney. He lives in the castle all his life, is Irish and does not like the English very much. Also now in the castle is Keith Foley, a friend of the groom - he is located below, in a large hall. Kyler reveals that the castle used to belong to her grandfather's brother, Brendan, who was suspected of collaborating during the war. A huge library and various inventions in the castle are his work.
2. Pub "Cry of the Banshee". Making cocktails and win the whistle
As Kyler told us, Donal Delaney likes to sit in the pub in his spare time. Let's go to the pub. Donal won't say a word until we make him a Crow's Nest cocktail.
The book contains recipes for all cocktails. First you need to prepare orders that are closer to the bell. If you mess up something, throw the order in the trash.
Mix juices in a silver glass. If the recipe calls for a blender, put the solid ingredients into it first, then pour in the juice and press the button. Pour the finished cocktail into the right glass, add ice, cherry or lemon and place on a tray. Click on the call.
If you do everything quickly and correctly, you can earn tokens.
If you go to the pub a few times and make a lot of cocktails, at the end of the game you will get a star in the title.
Finally we can talk to Donal. Learn a lot about Irish folklore - elves and banshees. He is sure that Matt was stolen by the elves, speaks very negatively about him and says that Keith Fowley is also in love with Kyler. Apparently, Donal really wants her to marry not Matt, but Keith.
We already have tokens, let's play Vigilant Detective.
In a short time you need to find the differences between the two pictures. I recommend saving the game so you don't waste tokens if you lose. After the first victory, do not forget to pick up the prize - a whistle, after the next one - tokens. If you win all ten rounds, you will receive a star in the title.
3. We talk with Keith. Dollhouse and otter box
Let's go back to the castle. In the corner of the hall by the fireplace sits a handsome young man with a huge bruise under his eye. Let's get to know him - this is Keith. He is sure that Matt was afraid of responsibility and ran away from Kyler, because his things were gone with him. Keith says he works for a construction company and adds that the land the castle is on is a great investment. Why is he so interested in this? He doesn't give us the lamp we need so badly - we'll have to look for it.
Near the door is a machine that predicts the future. One token lies at the bottom right of the machine, it is hard to see. Let's ask Madame Isabella for advice and get a brown weight in return, and the advice will turn to dust when we bring the mouse to it.
If you ask for advice many times, at the end of the game you will receive an asterisk in the title.
There is a printing press in the corner of the hall. There is another weight on the big table, but it is not active yet. There is no one wall in the hall, and you can admire the moon on fresh air without going out - isn't it a fantastic landscape?
Near the fireplace on the right is a photo of Keith and Kyler.
Kyler asked us to start investigating with the nursery on the second floor where Matt lived. This is the next room to the library.
When we open the door, we will see a crow trying to pull an orange pebble out of a puzzle on the wall. It lacks a few more pebbles - it will be necessary to look. Broken glasses are lying around the fireplace - I wonder whose? We shake the toy horse, and a token will fall out of it. Let's go to the dressing table and look at the book, it says: "The LARIG family and others."
Nearby is a dollhouse. It is necessary to arrange five dolls, as shown in the instructions.
The pig should stand to the right of the horse.
Above the pig should be a cow.
The cat must be on the same floor as the horse and to the right of the knight.
The boy must stand under the cat.
There must be a knight between the girl and the boy, and there must be a knight to the right of the girl, which means we put her on the 1st floor between the knights.
When you do this, you will receive a token.
In the bookcase is a box with colorful otters. It is necessary to assemble the drawing, focusing on the fixed middle square. The right mouse button rotates the squares, the left one moves them. You will win a big gear.
We number the squares from left to right from top to bottom.
Junior Detective:
Rotate 4
Swap 3 for 2 and rotate 2
Rotate 6
Swap 9 for 8 and rotate 8
Swap 9 for 1 and rotate 1
Turn 9
Turn 7
Rotate 3
Senior Detective:
Swap 3 and 4 and rotate 4
Swap 1 and 6 and rotate 6
Swap 7 and 8 and rotate 8
Swap 1 and 2 and rotate 2
Swap 1 and 7 and rotate both
It should turn out like this:
4. Looking for a lamp
Let's go to the library and show Kyler's glasses. She says they are Matt's glasses and asks for help printing wedding programs.
Let's take a look at the library.
Take the book "Signs of the Zodiac" from the shelf of the left cabinet.
Nearby is an old helmet. If you open the box in its stand, then we will see a puzzle with gears. For the design to work, you need to connect 10 large and 10 small gears together. There is one small gear missing here, which must be found somewhere.
There is a door between the cabinets, try not to confuse it with the front door, otherwise you will fall down and break something.
The right cabinet contains a broken lamp and a Tower of Hanoi puzzle. The principle of its solution: you need to transfer the rings from the left pin to the right one so that the largest in diameter lies at the bottom, and the smallest at the top. You cannot put a large ring on top of a small ring.
Junior Detective:
We number the rings from top to bottom from 1 to 5, and the pins from left to right - A, B, C.
1-C, 2-B, 1-B, 3-C, 1-A, 2-C, 1-C, 4-B, 1-B, 2-A, 1-A, 3-B, 1- С, 2–В, 1–В, 5–С,
1-A, 2-C, 1-C, 3-A, 1-B, 2-A, 1-A, 4-C,
1-С, 2-В, 1-В, 3-С,
1-A, 2-C,
1-C.
Senior Detective:
We number the rings from top to bottom from 1 to 7, and the pins from left to right - A, B, C.
1-B, 2-A, 1-A, 3-B, 1-C, 2-B, 1-B, 5-C,
1-A, 2-C, 1-C, 3-A, 1-B, 2-A, 1-A, 4-C, 1-C, 2-B, 1-B, 3-C, 1- A, 2-C, 1-C, 6-B,
1-B, 2-A, 1-A, 3-B, 1-C, 2-B, 1-B, 4-A, 1-A, 2-C, 1-C, 3-A, 1- B, 2-A, 1-A, 5-B,
1-C, 2-B, 1-B, 3-C, 1-A, 2-C, 1-C, 4-B,
1-A, 2-B, 1-B, 3-A, 1-A, 2-C, 1-C, 3-B, 1-A, 2-B, 1-B, 7-C,
1-A, 2-C, 1-C, 3-A, 1-B, 2-A, 1-A, 4-C, 1-C, 2-B, 1-B, 3-C, 1- A, 2-C, 1-C,
5-A, 1-B, 2-A, 1-A, 3-B, 1-C, 2-B, 1-B, 4-A,
1-A, 2-C, 1-C, 3-A, 1-B, 2-A, 1-A, 6-C,
1-C, 2-B, 1-B, 3-C, 1-A, 2-C, 1-C, 4-B, 1-B, 2-A, 1-A, 3-B, 1- C, 2-B, 1-B, 5-C,
1-A, 2-C, 1-C, 3-A, 1-B, 2-A, 1-A, 4-C,
1-C, 2-B, 1-B, 3-C,
1-A, 2-C,
1-C.
When you transfer all the rings, then charge the lamp and you can explore the surroundings of the castle in search of Matt.
To the right of the cabinets there are scales, for which the last weight is missing. We go down and pick up the missing weight from the table.
5. We print programs
Let's take a golden plate from the paper tray - I wonder what it is for? Let's start printing programs (three pieces need to be done).
Take black ink and put it on the plate with the program.
Place a sheet of paper on top of the plate.
Spin the wheel.
Put the program in the dryer on the right and press the button.
Move the finished program to the basket.
The program says that Alan Payne will be the groom's best man, not Keith Foley. We return to Kyler and find out that Alan Payne came to Ireland along with everyone else, but when Matt disappeared, he thought it was a prank and returned to London. Alan is Matt's colleague, and Keith didn't mind if Matt was best man. Kyler gives Alan's phone number, and you can call from a phone booth near the pub.
We ask her about the destruction in the castle: it turns out that in 1944, the former owner of the castle, Brendan, experimented with new rocket fuel and exploded with his family.
If you talk a lot with Kyler, at the end of the game you will receive an asterisk in the title.
We leave the castle and see that the light is on in the tower. Let's go back inside and try to climb up, but the stairs are destroyed.
6. Explore the yard
To the left near the castle is a small garden with figurines of leprechauns - the heroes of Irish legends. These garden statues turn and each has a clover painted on their vest. We will again frighten away the crow - apparently, somewhere here there is another pebble from the nursery. Take from the bench a draft of Kyler's wedding speech, in which she writes: “What am I doing? It's all wrong." Maybe she changed her mind about marrying Matt?
If we go from the garden to the left and up, we will come to a Celtic circle on which yellow flowers grow. Be careful not to fall into the water from the cliff.
We go down from the circle and get to the swamp. What a terrible howl comes from the other side! We need to find some kind of board to get over there, and figure out who is trying to scare us.
If you go from the swamp to the right, then the path will lead to three Celtic crosses. In the center of each cross there is a hole for some object and a date. Another riddle...
Let's cross the central paved path and go further. The estate is divided into two parts by a high wall. And here is the passage, consisting of symbols, but in order to open it, you need to know the combination of pressing them.
Near the gate to the castle we will pick up a boy doll with glasses. Maybe she's impersonating Matt? I'll have to remember to put it in the doll's house. Let's pay attention to two mosaics on the gate. On the right of them, one fragment is still missing.
7. Help Keith seat the guests at the wedding table and solve the riddle of leprechauns
We go to the pub and call Alan. He says that Keith was most likely bruised by Matt. And in general, the three of them constantly swore.
Let's go back to the castle and ask Keith why he has a black eye. He replies that they were just fooling around. What about the picture of Keith and Kyler then? He promises to tell about it after we help him to properly seat the guests at the wedding.
In the Russian version, there is a mistake in the translation - instead of "Gloria" we have "Emily".
First, seat the bride and groom, with Nancy sitting to the right of Kyler.
Keith sits one seat to Matt's left, i.e. to the left of Alan.
Emily sits across from Keith.
Because a woman should sit next to Keith, and there should also be a woman next to her at the long table, and Taylor wants to sit at the extreme place of the long table, then he sits first from the top at the long table.
Rose sits next to him.
Linda sits between John and Heather, so John sits behind Rose, and then Linda.
Linda and Henry sit on opposite sides of the table, so Henry's seat is between Taylor and Emily.
Jane and Linda sit on opposite sides of the table, which means Jane's seat is on Keith's left.
A woman is sitting next to Jane - this is Heather.
Richard remained, he is to the left of Heather.
In exchange for a ready-made plan, Keith gives the book "Ancient Irish Poems". He found it in the nursery - apparently Matt was reading it. Let's open it - it is not necessary to read the text, but it is necessary to pay attention to the clover leaves and the highlighted red letters. There are seven of them, like the leprechauns in the garden. Most likely, this is the order of their rotation. Let's go there and check.
"B" - forward, "N" - back, "L" - left, "R" - right
Look at the vests of the statues and turn like this: 4th and 7th - do not touch, 1st and 5th - to the right, 3rd and 6th - back, 2nd - to the left.
You'll find a crow's nest with a girl doll that looks like Kyler, a token, and three pebbles from the puzzle in the nursery.
Let's talk to Keith again. He and Kyler used to have an affair, and then he introduced her to Matt. He really got the bruise from Matt.
We show the Matt Kyler doll and go to the nursery.
8. The Mystery of the Fireplace and the Riddle of the Scales
First, let's put all the multi-colored pebbles in the puzzle on the wall. This is a rainbow color puzzle, and the clue is drawn right above it if you look closely. Click on the pebbles according to the saying "Every hunter wants to know where the pheasant is sitting", i.e.
red - orange - yellow - green - blue - blue - violet.
A door will open in the fireplace, and behind it - a secret room. There is some kind of instruction on the floor, and a blackboard in the corner. Looks like we found a way to get across the swamp.
Let's watch a very scary video, put the found dolls in the house and go to the library to unravel the secret of the scales.
Let's open the drawer of the table and find out how much weight each weight has. We need to balance the three scales.
On the first bowl we put lead, zinc and oak
On the second bowl - silver, iron and mahogany
On the third bowl - copper, brass and iron wood
The secret box opens and we get a mosaic fragment at the gate.
Let's pay attention to the sheet near the scales, which says about binary codes. The plate we found in the printing press has a binary code (01000011). If we translate the numbers into letters, as written in the instructions, we get:
0*128 + 1*64 + 0*32 + 0*16 + 0*8 + 0*4 +1*2 +1*1 = 67. This is the letter "C".
9. We collect tags
We go to the gate to restore the mosaic.
General rules for collecting tags: first you need to collect one column or one row and do not touch it anymore. If, in extreme cases, you have to move it, move the entire assembled piece. Look at the original image and if you move the tiles clockwise put the tiles you want to set in front of the entire chain.
We insert the fragment found in the scales into the mosaic and get the second plate. It is gray and has the inscription 01001101 on it. We translate the code and get "M".
10. We explore the swamp and the closed territory of the estate
Let's throw the board over the swamp and go to the other side. Here lies a pile of stones - this is the beginning of the path. Let's look at the instructions in the inventory. Two stones are the basis, and the direction of movement is set by additional stones. Important: if your next move is "two to the right" and you take one step to the right and see other stones, then do not pay attention to them, but continue to go to the right.
Route: forward 1, right 1, forward 2, right 2, forward 2, left 4, backward 2, left 2, backward 3, left 2, forward 1, left 1, forward 2, right 1, forward 2, right 2, forward 2, right 1, forward 1
In the end, we go to the hut.
Standing inside, from the entrance we look to the right diagonally and take the rocket pack from the wicker basket.
We will take the instructions for the dollhouse for seven dolls from the table, look at the locked box. A small mannequin for a doll, threads, pins, a box of wool are not yet active.
Nearby is a cage in which there are a lot of midges. You need to get rid of them to see what is inside.
To the left is a table with a book on medicinal herbs. We find out that insects can be repelled with a mixture of tansy, fleaberry, wormwood, thyme and catnip. All these herbs are on the shelves. We put them in a mortar, crush them and bring them to the cage. The insects will fly away and you will take the lens. If you look at it more closely, you can see that its shape matches the shape of the hole on the Celtic crosses.
Let's go back to the courtyard and insert a lens into each cross in turn. Through the lens, you can see enlarged symbols on the wall that closes the passage to the other side of the courtyard. The order of pressing is the dates on the crosses from older to newer (first you need to click on the symbol 1801, then on 1845 and 1916).
Let's see how the wall goes down, and let's go forward. That's why this area is fenced - sheep graze here.
If we go to the right and up, we will see a sheepfold. Hanging next to the door are bells that ring when the wind blows, and a small gear - now we can assemble the puzzle under the helmet in the library.
If you go to the right to the border of the estate, near the trees there will be a location with a stone on which the map lies. It looks suspiciously like the development plan Keith was talking about.
In the center of the courtyard, there are four large stones in a circle that can be twisted. They consist of three parts, each of which has signs. We need to talk to Donal about it.
11. Playing with dolls and unraveling the secret of the helmet
Let's go back to the castle and arrange the seven dolls according to the instructions found in the hut.
The cat is on the 3rd floor on the right, because all the other dolls should be on her left.
We put Kyler on the same floor where the cat is, which means on the left on the 3rd floor.
We put the pig between the chandelier and the knight - the chandelier is on the 1st floor, which means we put the pig on the 1st floor.
The girl is under Kyler and on the 1st floor because she has to stand below the cow.
On the 2nd floor there should be dolls of a boy and a cow, but it is not yet clear how to put them.
The boy should stand to the right of the cow, and under him there should be a dog. In turn, the dog should be to the right of the knight and to the left of the cat. So, we put the dog on the 1st floor between the knights.
We put the boy above the dog, and the cow to his left.
We get another token.
Now let's check what is hidden in the helmet in the library.
You need to put all the gears so that they spin from the lever. If the gear gets into the hole, it "sticks".
One of the solutions:
We take away another scheme for arranging dolls - there are already eight of them, we do not have enough sheep dolls.
12. Making a wedding bouquet
Let's talk to Keith about the building plan. He, as usual, laughs it off. Let's go up to Kyler's - she didn't order this plan from Keith. I wonder what he's up to? How to get rid of him and see what he hides under the covers on the next bed?
Kyler asks her to help her arrange the wedding bouquet and gives her a list of flowers and a basket.
We need to find foxglove, yarrow, lavender, spur, rose, verbena and sage. All plants are drawn in a book of medicinal herbs in a hut by the swamp.
Rosa is in the garden with leprechauns. To take it, you need to approach the leprechauns and turn around.
Near the place where the board lies through the swamp, pink flowers grow. This is foxglove.
The sage hanging in the hut above the table with herbs is a bunch of grass.
Yarrow is a yellow flower, we saw it in the Celtic circle on the northwestern outskirts of the yard.
Verbena grows near the left mosaic at the gate, it is lilac in color.
If you go out onto the road and go left past Nancy's car, then we will reach the location where the spur grows.
Lavender is around four mysterious stones on the right side of the yard. There is a board near one of the stones below. You need to lean towards it, and an arrow will appear on the right side of the screen. Turn around twice and take the lavender.
We carry a ready-made bouquet of Kyler. Keith finally left somewhere. Let's get closer and lift the edge of the blanket on the bed - well, well, here are Matt's things! We go up to Kyler and hear that she is quarreling with Keith. Nancy refuses to go there, so we go to talk with Donal.
13. Great drummer Nancy Drew
When we ask Donal what the inscriptions on the stones mean, he will explain that these are Celtic runes. He has a rune-translation book, but it must be won.
This mini-game is best played with the keys and the spacebar rather than the mouse. Multi-colored notes quickly run from left to right. When the notes approach the circle on the right, press the key corresponding to the color of the note. If the note is greyed out, press the space bar.
When you make a mistake, you are deducted one point for each wrong note, so if you see a difficult combination, it is better not to risk it and skip it. It is difficult to win, but if you play several times in a row, then in the end you will be credited with a victory. If you want to take a break and play later, just hit the drum when you get back.
Also in this game you can earn tokens.
Finally, Donal is satisfied with our music and gives the book back. It tells about the four main Celtic holidays and gives the Celtic alphabet.
14. Making a sheep doll and getting the third plate
Let's go back to the castle and talk to Keith and Kyler about Matt's found things - they didn't know anything about them. It remains to ask Donal.
He admits that he hid the things, and gives us the task of driving ten sheep into the sheepfold for tomorrow's shearing.
If you see a sheep, blow the whistle (you must click on the whistle at the top of the screen), and she will run into the sheepfold. You can only catch the sheep that is illuminated by your lamp. You need to drive the sheep quickly, otherwise they will start to scatter. When there are 10 sheep on the counter, quickly go to the sheepfold, go inside and go outside - now the sheep will not run away.
Let's go back to the swamp and take another look at the little mannequin. To make a doll, we need wool. There is very little of it in the wool box. What if you try to shear some sheep? We need to ask Donal's permission.
He says that it is not difficult to shear sheep, but we must fill three sacks with wool! We go to the sheepfold to read the instructions.
First call the sheep by blowing the whistle. Look at the control panel and sheep behavior. The sheep family is written on the screen and the color of the group is indicated by asterisks. Find in the table the numbers corresponding to the family and color, and add them to the number that indicates the behavior of the sheep.
One bag is filled with wool from two sheep, so don't forget to take it out of the box.
When you have cut three bags, take some wool for the doll, but do not rush to leave. If you make the sheep four different hairstyles, then at the end of the game you will receive an asterisk in the title (I liked the sheep in bows the most).
Let's go back to the hut in the swamp, press the ball of wool on the mannequin and pick up the finished doll.
Let's go back to the nursery and arrange eight dolls.
We put Kyler to the left of the chandelier on the 1st floor.
The dog should be on the 3rd floor to the left of the cow, so its place is in the upper left corner above Kyler.
On the 2nd floor there should be dolls of a girl, a sheep, a boy and a pig, and a knight should stand to the left of this chain. There must be a knight under the pig, which means that it must be placed on the 2nd floor in the rightmost slot.
The cat and the cow should stand side by side on the 1st floor, and the cat should be between the two knights, which means that we put the cow under the horse, and the cat to the left of it.
A boy is standing over a cat.
To the left of him we put a girl and a sheep.
Open the secret drawer of the dollhouse and take the third plate. Its code is 01001011. We translate and get the letter "K".
15. We twist the Celtic stones. Second Easter egg
To help us unravel the mystery of the Celtic stones, two books will help us - "Signs of the Zodiac" and Donal's book. If you look at the stone, at the top is the constellation, in the middle is the season, and at the bottom is the name.
There is a board under the first stone. After reading a book about Celtic holidays, it is logical to assume that this stone symbolizes the beginning of the year - Beltane.
Draw the first letters of all four holidays and do not forget that the names must be read from bottom to top.
We get that Beltane (May 1) is celebrated during Taurus according to the astrological calendar (April 21 - May 21), the beginning of the daylight season is summer (there are many leaves on the tree), the rune “B” is below.
Lughnasad (August 1) - Leo (July 23 - August 21), harvesting - autumn (leaves fall), rune “L” below.
Samhain (November 1) - Scorpio (October 24 - November 22), the beginning of the dark season - winter (no leaves), below the rune "S".
Imbolc (February 1) - Aquarius (January 21 - February 19), the rainy season - spring (small leaves), below the rune "I".
Lughnasad:
Imbolc:
We take the last plate. It has the code 01011001. We translate and get "Y".
We extract second easter egg.
On a stone above the board, put the constellation Taurus on top, in the middle - autumn (leaves fall), below - Imbolc.
Turn the top stone to the right once, the middle stone once, and the bottom stone four times. Repeat this until the board opens and pick up the instructions.
These are the turns of leprechauns in the garden. After counting, we get that the 2nd and 6th leprechauns should be turned to the left (by 9), do not touch the 1st, 3rd and 6th (they stand at 6), the 4th - to the right (by 3) , 5th and 7th - back (by 12).
16. Nancy learns to fly
We have four code plates and four letters. There are four bottles of ink near the printing press.
Plates:
01011001 - "Y"
01001101 - "M"
01000011 - "C"
01001011 - "K"
Click on the sheet of paper in the tray and the first plate will automatically appear on the machine. Fill in the ink required for this plate, put a blank sheet on it and press the lever. Put the finished sheet to dry. Take the next plate, fill in the ink, take the sheet from the dryer and press the lever. Put the sheet in the dryer, etc. Once you have applied all four colors to the sheet, let it dry. It should turn out like this:

If you experiment with different colors, get an asterisk in the title.
We go outside and try to take off. Place plays a big role. I took off to the right of the entrance under the tower, and from the bridge - try it. From now on, your movements on the street will take place exclusively by air. If you fly over the estate several times, you will receive an asterisk in the title.
17. The tower and the third Easter egg
Let's go to the secretary. It is closed, but if you type "LARIG" on the lock, like on a book in a nursery, then you will get an arrangement for ten dolls. You don't have one doll yet - Nancy's doll.
In the drawer of the nightstand next to the bed, take another instruction. To solve the code for the secretary, you need to find four books and an island next to the estate. Let's go to the library first.
In the left cabinet, next to the statuette of a horse, there is "Hydroponics and Aeroponics". It contains the first riddle - "To find a real consonant, you need to eliminate all repetitions." Write down all the consonants from the title of the book, cross out the same letters and you will have "G".
In the right cabinet on the shelf above the Tower of Hanoi is "Ancient Wisdom". Solve the puzzle and you will receive the phrase: "The letter C will help."
ancient wisdom
Jealouswisdom
Evnyayarudmost
Ruevnyayadbridge
Ruevnyadmost
Buevnyadmost
Buevyadmonst
Buevaomonst
Buevapomonspt
Buevapomonskt
letterpomonset
Letterpomonet
The letter will help
In the right cabinet on the shelf on the right is "Marine Cartography". You need to take the first letter from the word "Caribbean".
On the table near the scales lies the fourth book "Zoopsychology". You need to guess the riddle: "Whoever goes to the middle calls his name to everyone." This refers to the central letter in the word "Zoopsychology" - this is "X".
Let's go outside and fly west from the tower to the island, as indicated in the instructions. The inscription "L5" is engraved on the rock.
Let's go back to the tower and put the code "KSGHL" in the central slots of the castle. The secretary will open. Let's read Fiona's mother's diary, in which she writes about rocket packs, take the Nancy doll and the key.
Let's go back to the nursery to solve the last riddle of the dollhouse.
Third Easter egg.
The cow should be on the 3rd floor and to the left of all the dolls, which means that her place is in the upper left corner.
On the 2nd floor there should be a cat, Matt, a sheep and a dog.
On the 1st floor are Kyler, Nancy and a girl.
We put the girl in the far right slot, and above her - the dog.
To the left of the girl we put Nancy, and to the left of her - the boy.
We put a sheep above the boy, and Matt to the left of it.
The cat should be above Kyler, but to the right of the pig.
We put the pig in the leftmost slot on the 1st floor.
We pick up the third and last Easter egg.
For a quick arrangement of dolls, you can get an asterisk in the title.
Now it remains to check whether the key from the secretary fits the box in the hut.
18. Laboratory
Opening the box, we take out a greeting card. We get acquainted with the villain who opens the hatch in the floor and dumps us into the mine. We go to the light, press the lever and, finally, we find Matt. He tells how he got here - he was attacked by a crow when he found secret room in the nursery. It turns out that Keith was not bruised by him, but by a broken branch when they wanted to play a trick on Donal. Because Matt knew that Keith was in love with Kyler, he did not want to see him as the best man, and came up with an excuse about a career and Alan Payne.
Let's take a look at the lab. Let's turn to the right and take the instructions for launching the rocket from the wall.
Press the button on the wall and open the stand with chemical elements.
It is necessary to decompose all the elements into four containers. The description of the groups hangs nearby on the wall. When you move the mechanical arm towards the element, expand it one space more than the element's size. Then move your hand and squeeze it to grab the element. Transfer the element to the container, open your hand inside. It is impossible to touch elements that are still on the stand, and not in containers.
When all the elements are in place, with the help of a mechanical hand we will get the key.
Let's turn around and go to the niche opposite.
You need to assemble the stairs from the pieces. The left mouse button moves the fragments, the right one rotates them.
One of the solutions:
Let's go upstairs and pick up the first stage of the rocket.
To the right of the stairs is a rocket (it will light up when you approach it). Climb up the stairs and install the first step. To the left of the stairs are containers with wings, take the wings from the middle bucket and install them on the rocket.
Open the control panel under the rocket and connect the power.
You need to connect the wires correctly. First take the wire, then click on the colored circle. We connect wire 1 with a red circle, 2 with blue, 3 with orange, 4 with yellow, 5 with green.
We launch a rocket. To do this, let's go to the control panel to the right of it. Attached to the board is a note: "Launch angle 90.1 degrees." If the power is connected correctly, the button under the left switch should turn green.
Set the switch to 90.1 degrees and insert the key. From left to right, click on all the toggle switches. If done correctly, the rocket will take off.
Copying of material is allowed only with the indication of the author of the walkthrough, known on the Internet as Julia-10
Thanks a lot, Madlenka, for help in uploading screenshots!


