Fallout 4 journey to the stars quest. Find the hidden images of Mister Cap in Dry Gorge
To start this side mission in the expansion Nuka World released for fallout games 4, you should find a peasant, whose name is Purified. You will find it next to the Yader-Mir station. Teleport there and head to the Hubologist camp. The desired NPC can be found near the fence, located near the tower. Talk to him about this and that, and then follow this man to the camp. He will introduce you to Dara Hubbell and after that the quest will start.
Note: if you wish, you can not communicate with this person and immediately go to the camp of hubologists and find Dara on your own.
Talk to Dara
We are heading to a point on the mini-map called the camp of hubologists - it is located west of Yader Town. There we find the parking lot of a mysterious group of people who call themselves hubologists. Their camp is inside the cafe. Having reached the desired location, we are looking for Daru Hubbell (a woman with gray hair and an oxygen system on her back). We speak with her on various topics in order to eventually get the mission.
Get 5 suits

Dara asks you to find 5 working suits for all members of the group's sect. Below we will show the location of all special suits:
We teleport to the point "Volt-Tek: among the stars." We go into the building using the main entrance (it will be located directly in front of the hero). We turn into the right tunnel. After two turns, we find a huge model of the planet Earth, next to which are a rocket and an astronaut. We remove the spacesuit from the mannequin and move on.

We pass into the center of the attraction and reach the large hall. Ahead we find a closed room, but through the window it is clearly visible that there is another astronaut dummy in it. Open the door and take the suit.

We move on and reach the end of the complex. Then we go down the stairs, standing nearby. To the right and to the left we find two doors. We pass into the one on the right and again go down the stairs. We cross the room, turn right and continue along the road. On the way we come across two more doors. We select the left one and get into the laboratory. We open another door and find ourselves in the control room with another animatronic. We pick up the suit and continue on our way.

We get out of the room and turn left. We go into the passage and find models of rockets and astronauts. We remove from them two suits. Now you can return to Dara.

Deliver the suits to Dara Hubbel
We move to the camp and talk with Dara. Now you should listen to the speech of the woman, and then go to the local dump along with the entire group of hubologists. We arrive at the desired location, go into a dilapidated building and talk to the character.
Clear the landfill (optional)
You will have to complete this task if you report that you can deal with everyone on your own. You can also ask hubologists for help or send them to fight robots without support. It will be necessary to destroy all the aggressive cans, and then talk to Dara again. The girl will again "push" the inspirational speech and ask you to do her one more favor. We agree.
Use three cores to power the starship
We approach the spaceship and find the switchboard, located to the left of the entrance. Open it and find 4 empty holes. It is necessary to try to interact with everyone to install 3 cores.

However, this is only the beginning. We then go to a huge building, which is located at the beginning of the trash can, go through the left door and go up to the top floor. In the far part of the corridor we are looking for a power distributor. We return to the starship and install it near the shield for the nuclei. As soon as the hubologists go inside, we pull the lever and send everyone flying.
Note: this side quest Nuka World has two endings. If you manage to install 3 cores (Dara asks for this), then the hubologists will simply disappear, and if you decide to mount 4 cores, then after launching the starship, the entire group will die.
In addition to the main, plot Fallout lines 4 Nuka-World you can also go through and quite interesting side missions, which will give you a lot of emotions, bonuses and other other goodies. You can complete these tasks after completing the main storyline Fallout 4 Nuka-World or during the passage of it. In this case, there is no fundamental difference when you decide to complete these tasks, as well as their sequence. After all, they were created simply to diversify the whole game process Nuka World.
Additional quests Fallout 4 Nuka-World
Quest "Cover in a haystack"
The mission "A Cap in a Haystack" can be obtained during the journey to Mount Fizztop during the mission "Ambitious Plan". On the way to the mountain, you will meet Sierra Petrovita, who is an ardent fan of Yader-Cola and everything connected with it. She collects all this in the real museum of Yader-Cola. If you have an average or above average level of charisma, then you can easily get this mission. But if you can't, then you have two options.
The first thing you can do is to play along with Sierra, pretending to be the same crazy fan of Yader-Cola and go on a tour of Yader Town with her. The next way is simply to bribe her with whatever coin suits her. The fact is that the girl really wants to taste the taste of Yader-Cola quartz, which she drank for a very long time and has already forgotten this taste. This drink is so called because of the light glow. You can find this Yader-Cola on the buza of Adepts and Operators, and they are also in the Galaxy Zone when you complete the Star Dispatcher sub-mission from the Big Tour mission.
In the end, when you get the "Cap in a Haystack" mission, you will need to find a number of images of Mr. Cap, which are scattered throughout the territory of Nuka-World. In order to see these images, Sierra will give you Mr. Cap glasses, which will allow you to see invisible images of Mr. Cap. When you find ten pictures of caps, you will be given the opportunity to meet the creator of Yader-Cola, John-Caleb Bradburton. Sierra just longs for this meeting to find out the recipe for the drink.
Locations of all 10 images of Mr. Cap in the Yader-Mir park
The first picture is located in Yader Town near Mount Fizztop, if on the left side of the lake, the picture will be located in the wall of the building near the toilets (Restroom).
In the Galaxy Zone, two images are hidden in a meshed courtyard behind the Star Control building and not far from the RobCo arena next to the Space Walk tunnel.
Also, two pictures are in the zoo "Safari". The first image is hidden near the primate house on the back of the gorilla plinth, and the second image is hidden in the Village House maze on the one single wall that is not covered with vegetation.
In the "Children's Kingdom" zone, you can also find two pictures with Mr. Cover. The first image is located on the upper tier of a dilapidated clock tower. The second image is hidden in the House of Laughter, behind the left red door in the round room.

In the Dry Gorge zone, the first picture is on the tombstone in the cemetery, which is to the left of the saloon. The second image is in the Mad Mulligan's mine on the wall of the digger's house.
And the last picture is in the "World of freshness" zone. It can be found on the wall of the bright house, which stands on the left near the river.
When you find all 10 pictures, where each of them contains a letter, you will need to return to Sierra. After meeting her, head to the secret elevator that will take you to Bradburton's office. The inventor of the Yader-Cola recipe will be waiting for you there. During communication with the inventor, you will be given a choice, Sierra or Bradburton. If you choose Sierra, you will get a unique jumpsuit, and if you choose Bradburton, you will get the Nuka-Cola recipe, the drink itself, and the weapon. You can also take possession of everything at once. To do this, you will need to select Sierra, and then turn off the lights and sneak into the vault. After that, most likely you will have to eliminate Sierra.
Quest "Journey to the Stars"
You can get this mission in the Hubologist camp with the help of the Purified One, or from Dara Hubbell. The Hubologist camp can be found on the west side of Yader Town. In this mission, Dara will ask you to find 5 suits.

Locations of all 5 suits for Dara Hubbell
All of these suits can be found at the Vault-Tec Among the Stars display. These suits are worn on mannequins. The first mannequin is next to the main entrance in the right tunnel. The second is in the room behind the closed door. You can get into this room from the central hall of the exposition. Then move to the end of the complex and go down the stairs. After passing through the right door, you will need to go down even lower. After going through the entire room, you will need to turn right and head towards the two doors that are directly ahead. Enter the left door. There is a laboratory and a control room in which there is a third mannequin with a spacesuit. You will find the last two mannequins at the exit from the room near the rocket model.
Apart from complete passage story missions Fallout 4 Nuka-World in the latest addition to Fallout 4 presents a sufficient number of side quests, as well as secrets for obtaining additional bonuses and unique items. You can complete these tasks after completing the story in the mission "" or as passing DLC. In this case, the sequence of actions is not very important, but side quests definitely diversify the gameplay and make it more fun.
Additional quests Fallout 4 Nuka-World
Quest "Lid in a haystack"
This quest can be activated in the task "" on the way to Mount Fizztop, just talk with a fan of "Yader-Cola" Sierra Petrovita. This strange girl collects everything related to Yader-Cola and stores the trophies in a real museum of this drink. If you have an average level of persuasion, you can quite easily get from her additional task. However, if this does not work, then there are two options for the development of events.
Firstly, you can play along with Sierra by identifying yourself as a Yader-Cola fan and go on a tour of Yader-Town with her. Secondly, a kind of bribery can work as a persuasion: the girl wants to taste the special quartz "Yader-Cola", which she has not drunk for a long time. A variety of drink is called so because of the soft glow. Such bottles can be found at the base of Adepts and Operators, as well as in the "Galaxy" zone when completing the "Star Dispatcher" quest, which is part of the "" mission.
Ultimately, after receiving the side quest "A Cap in a Haystack", you will be asked to find images of Mr. Cap scattered in different places throughout the Yader-World park. To do this, Sierra will give you a holotape with clues and Mr. Cap's glasses, in which you will see hidden images on the walls. The reward for finding ten pictures should be a meeting with the creator of Yader-Cola, John-Caleb Bradburton. Sierra's interest lies in finding the recipe for the drink.
Location of all 10 images of Mr. Cap in the Yader-Mir park
The first image can be found in Yader Town near Mount Fizztop, if you walk along the left side of the lake on the wall of the building next to the restrooms.
Two images are hidden in the Galaxy zone at once: in the courtyard closed with a grid, behind the Star Control building and not far from the RobCo arena next to the Space Walk tunnel.
Two more images are hidden in Safari Park: near the primate house on the back of the plinth with a statue of a gorilla and in the Maze of the Village House attraction on the only stone wall not covered with plants.
The "Children's Kingdom" zone also contains two images of Mister Cap: on the top floor of a dilapidated clock tower and behind the left red door in the round room of the "House of Laughter".

In "Dry Gorge" one of the images of the cover is located on the tombstone in the cemetery to the left of the saloon, and the second in the Mad Mulligan's mine on the wall of the digger's house.
Finally, the tenth image is located in the "World of Freshness" zone on the wall of a bright house on the left, standing near the river.
After collecting all 10 images in this way, each of which is marked with a letter, return to Sierra, and then head to Bradburton's office using the secret elevator. In the office you will meet the inventor of the Yader-Cola recipe himself. In the course of communication with him, you will need to make a choice between Sierra and the scientist. In the first case, you will receive a unique jumpsuit, in the second - a drink recipe, Yader-Cola itself, and a weapon. You can try to take over everything at once. To do this, choose the side of the Sierra, take your reward, and then turn off the light and enter the vault. In this case, after such a raid, Siera will most likely have to be dealt with.
Quest "Journey to the Stars"
it side mission Fallout 4 Nuka-World can be obtained from the Hubologist Camp with the Purified One or from Dara Hubbell. The hubology camp is located west of Yader Town. Dara will ask you to find five suits.

Locations of all 5 suits for Dara Hubbell
All of the suits are on display at Vault-Tech Among the Stars and are worn on mannequins that you have to find. The first one is located near the main entrance to the building in the right tunnel. The next one is located in a closed room, which can be accessed from the central hall of the exposition. Then move to the end of the complex and go down, go through the right door and go down even lower. Go through the room, turn right and go straight to the two doors. Behind the left is a laboratory and control room, where you can find the third suit. The last two suits at the exit from this room are on the left near the rocket model.
After collecting all five suits, return to Dara Hubbell and go with her and the hubologists to the dump. There you can complete another additional task to clear the area from robots. After that, you will be asked to assist the hubologists by supplying electricity to the starship. To do this, you need to install three cores in the ship's switchboard, and then find the power distributor. The plan to send the cultists to the stars will work if you use three cores for the shield, but if you set four, the whole group will die.
Complete Walkthrough Fallout 4
-
- Mad Mulligan Mine
- Ferris wheel
- Nuka Racers
- Tree house
- World of Freshness
To make your stay in the Yader-Mir amusement park more exciting, be sure to visit LIA. If you were attentive and inquisitive, then you probably already heard or read about LIA somewhere in the terminal, for example, in the terminal of the Yader-Mobilchikov arena. LIA is not only the park's mascot, but also a valuable source of information about Yader-Mir. This is a robot in the form of a bottle of Yader-Cola. You can stumble upon LIA at the entrance to Yader-Mir, from which you enter the park for the first time after completing the quest “That's how they rolled”. To get the current quest you need to chat with her until she tells you about finding the medallions. Tolerate insults in your address, as one of the raiders changed her character programs.

When visiting the attractions of the park, you can collect medallions, and if you get a complete set, you will receive a prize! To better understand what to look for and where, ask LIA about the medallions again. She will tell you that there are several machines with special medallions in the park. The vending machines are installed near the most popular attractions and pavilions of the Yader-Mir park.
Obtain the Vault-Tec Medallion: Among the Stars

Medallion "Vault-Tech": among the stars you will find in the exhibition complex of the same name in the zone of the park "Galaktika". You will visit this location during the passage of the Star Dispatcher quest. The machine with medallions stands at the exit from the exhibition, in the corner. To take the medallion, go to the machine and press the key to activate it. If you don't want to go through the entire exhibition just for the medallion, then enter from the second door "Volt-Tech": among the stars, which is located in the alley, to the left of the entrance to the first floor of the Yader-Cosmoport, with the inscription "Starmarket".

Locations to explore:
- Galaxy
- Yader-Spaceport
- Cinema "Starlight"
- Vault-Tec: Among the Stars
- Nucleus Galaxy
- Arena "RobCo"
The current quest is activated automatically as soon as you approach any of the entrances to the "Yader-Mir" zone "Galaktika", for example, when capturing this territory in the "Big Tour" quest. At the entrance there was a battle between merchants and robots. I wonder what happened here?
Check out the battlefield
Examine the battlefield. At one of the merchants named Tiana Alston you will find a holotape with her diary. Perhaps, after reading it, you will understand what happened here.

Read Tiana's diary
Find Tiana's diary in your items, in the "Miscellaneous" section, and read it. It's not entirely clear what happened, but it has something to do with the Star Dispatcher's central computer. They were going to launch it normally, but Tiana's father hurried and did not wait for a sufficient number of cores. In general, something went wrong and they were attacked by robots.
Find the Star Dispatcher
Now I need to find this central computer to figure everything out, but for now you have to fight the robots of the Galaxy Park zone and numerous turrets. But before these robots served visitors to the park. You can find new modifications on defeated robots, which can later be used to improve robots at the robot workbench, which was added in the Automatron add-on.
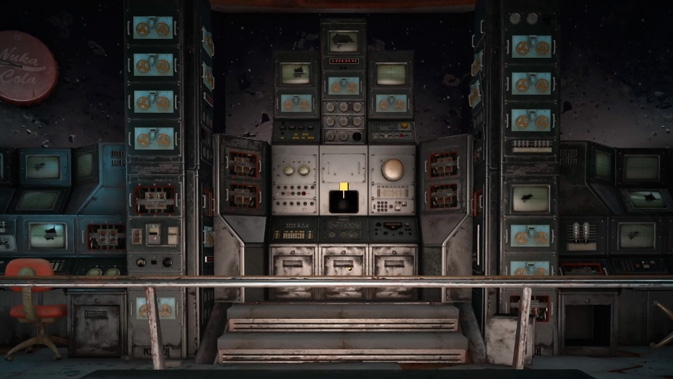
The Star Dispatcher central computer is located in the Yader-Spaceport building, located directly in front of you if you entered from the entrance shown in the screenshot above.

On the way to this building, after the planet statue and before going up, look into the small cafe on the right. Under the counter you will find a stash with lids, and behind the counter you will find a Nuclear Blending Machine. In it you can mix different kinds Nuka-Cola, also, as you explore the park, you'll find new recipes that add different flavors to the Nuka-Mix Machine. Based on the Beverage Designer achievement, you will be able to mix at least 20 different versions Yader-Cola. You can read about all the achievements of the Nuka-World and Fallout 4 add-ons.

Approaching the building with the sign "Star Dispatcher" (Star Control) open the glass door. The computer is behind the exposition with power armor.
Inspect the central computer
The central computer "Star Dispatcher" cannot work without stellar cores. At least one stellar core is required to enable emergency mode.
Install stellar core
Lucky for you, you will find the stellar core without leaving your computer. Nearby you will find the corpse of Tiana's father, Kendell Alston, and next to him is the stellar core. Take it and install it in the characteristic slots that dot the entire surface of the Star Dispatcher central computer.
Reboot the central computer
Reboot the central computer of the Galaxy. First of all, you will see a warning on the screen that there are not enough Star Cores to control robotic systems, that is, robots. And now you have only limited functionality available in emergency mode. For the central computer to perform basic operations, 20 Star Cores are required, and for full functionality - 35.
After reading Kendell's diary in the system logs, you will find out what happened in the "Galaxy" with robots and merchants. Star cores serve to ensure that the computer communicates with the robots and gives them commands. But Kendell and the merchants took them out in order to sell them. When the raiders came to Yader Town, the merchants panicked and decided to turn on the park's defensive mode in order to use the robots against the raiders. Not listening to Tiana, Kendell launched a defense without inserting the Star Cores in place, for which he paid with his own life and the lives of all the merchants in the "Galaxy" zone.
Be sure to open the "View network of Star Cores" command, it contains all the information about how many Star Cores can be found in one or another location of the Galaxy Park zone.
Repair the central computer (1/20)
To repair the central computer "Star Dispatcher" you need to find at least 20 Star Cores, or destroy all robots and all defenses. Let's start searching. You can find stellar cores in the following locations: 6 pieces in the territory of the Galaxy, 4 pieces in the Starlight cinema, 7 pieces in the Nucleus Galaxy, 6 pieces in the Vault-Tech: Among the Stars exposition, 6 pieces at the RobCo Arena and 5 pieces in other sectors of the Yader-Mir park.
As you find Starcores, you will be alerted that you have enough Starcores to activate the new emergency protocol. In this case, at a convenient moment, return to the central computer and activate it. There are 3 intermediate emergency protocols in total, each of which will be available every five Stellar Cores found. Each intermediate emergency protocol allows you to disable the firmware of one of the types of robots, reducing the number of your opponents. I advise you to turn off the most dangerous robots.
Find Star Cores in the territory of the "Galaxy" (1/7)
Star Core (1)
On the territory of the "Galaxy", that is, the territory outside the attractions of this zone, there are 7 stellar nuclei. You found one core in the room with the central computer.

Star Core (2)
To find the next stellar core, go around the Yader-Cosmoport building on the right, which houses the Star Dispatcher central computer. At the place where the dead merchants spent the night, you will find ammunition, weapons, a cache with lids on the boxes near the chemical laboratory, and at the very end, near the garbage cans and old office equipment, the corpse of a merchant with a star core.
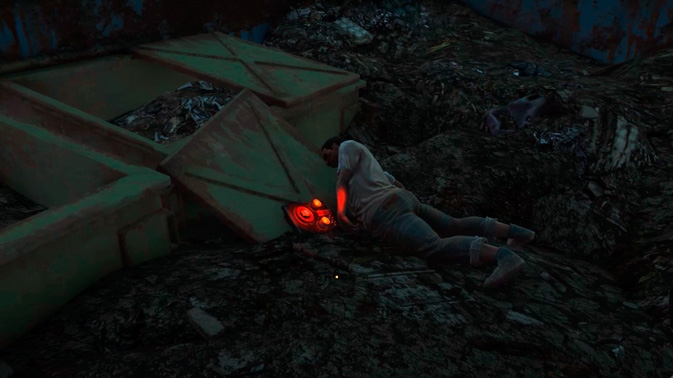
Clue
Watch out on one of the wooden crates located near the mattress and the yellow explosive box magazine "Scavenger!", an exclusive magazine from the Nuka-World add-on for Fallout 4. This magazine, like the others, gives you a magazine perk that will increase your chances of passing credibility checks. You can check out other magazine perks, and see the location of the rest of Nuka-World magazines and not only -.

If you go around the Yader-Spaceport building on the left, you will find a hidden image of Mister Cap, provided. that you have the special Mr. Cap points that Sierra Petrovita should have given you when you received the quest "A Cap in a Haystack" from her.
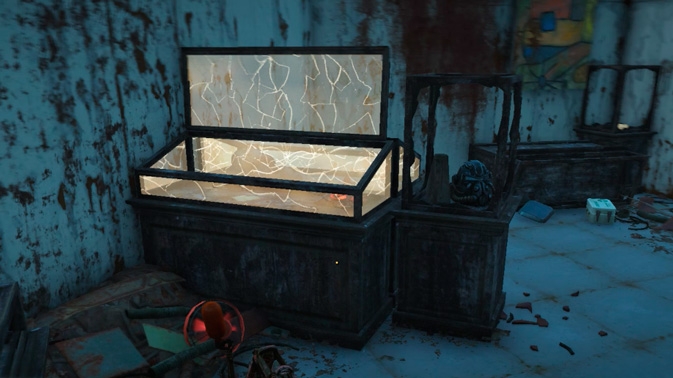
Star Core (3)
There is also a stellar core in the room located above the central computer. It lies in a display case (the level of the castle is medium) along with a nuclear mini-charge. In the closed service room (the castle level is easy) you will find a roll of 750 Yader-Arcade tickets, which will be useful to you for obtaining the Nuka-World achievement, and the Galaxy admin key, which opens the gates on the territory for staff (with a sign “ Employees Only").
Star Core (4)
The stellar core is in the booth at the main entrance to the Yader-Galaktika attraction, which you can get to by going to the right of the Yader-Spaceport (if you are facing it), where the central computer is located, and climbing a small ladder. The booth is located to the right of the entrance. You need to go through the gate.

Star Core (5)
Opposite the attraction "Yader-Galaktika" there is a building with a signboard "Arc Jet G-Force". Climb the stairs to the very top and find the Star Core.

Star Core (6)
You will find another stellar core at the end of the descent with the inscription "Spacewalk". The easiest way to collect it is after exiting the RobCo arena, the core will be immediately to the right at the beginning of the ascent.
Who issues: Sierra Petrovita
Locations to explore:
- Yader Town, USA
- Fizztop Grill (surroundings)
- Galaxy
- Yader-Spaceport
- space walk
- dry gorge
- Cemetery near Dock Phosphate Saloon
- Mad Mulligan Mine
To get the current quest, you had to complete a small task from the "Miscellaneous" section with the code name "Secret of Sierra Petrovita", which appeared when you first met Sierra.
Follow Sierra
To gain the trust of Sierra Petrovita, you had to agree to her offer: she will give you a tour of Yader Town, USA. Just follow her and listen to what she tells about Mount Fizztop, about Yader-Arcade, about the restaurant-theater Salon, about Mr. Cover's cafe and about LIA. At the end of the tour, talk to Sierra about her secret search.
If you used persuasion in the first conversation with her, then you will not have this task, go straight to the search for hidden images.
Talk to Sierra
Those strange glasses that Sierra wears - Mr. Cap's glasses - are not just sunglasses. They were needed for one competition, which was announced in Yader-Mir shortly before the war. The winner was waiting for a meeting with the creator of "Yader-Cola" - John-Caleb Bradburton. To win the competition, it was necessary to find ten pictures in the park with Mr. Lid, the mascot of Yader-Cola. Each picture has a part of the code message and it can only be seen through glasses. Sierra thinks that somewhere in his office is the formula for Yader-Cola, which she wants to get her hands on for her collection. If you help her, she promises to reward you. And the reward will be Bradburton's inventions, everything that can be found in his office.
Sierra gives you her Mr. Cap glasses and an old holotape "Hidden Mr. Cap" with clues to where to find the pictures.
Put on Mr. Cap's glasses
Find Mr. Cap's goggles in your Items in the Clothing tab and put them on. Now you look like a real fan of Yader-Cola and are ready to search for the hidden images of Mr. Cap. Just remember that goggles only work if you don't have any helmets on, for example, from power armor. The cipher on the image of Mr. Cap can be read only while wearing glasses on his head.
Find the hidden pictures of Mr. Cap in Yader Town
There is one image of Mister Cap hidden in Yader Town, and it is located near Mount Fizztop. To find it without problems, go from the mountain on the left side of the lake. On the wall near the toilet you will find an image (there is a sign "Restrooms" on the toilets). The letter "G" is hidden in the image.

Find the hidden images of Mister Cap in Galaxy
Hidden in the Galaxy are two images of Mister Cap. The first image is located at the entrance to the merchants' camp, located behind the Yader-Cosmoport (the central computer "Star Dispatcher" is located there). Stand facing the building and start walking around it on the left. Near the gate, look at the wall on the left. The letter "S" is hidden in the image.

The second image is hidden near the descent with the inscription "Spacewalk". Follow the instructions to find it. From the RobCo Arena, which you probably visited during the Star Dispatcher quest, go to the area with the pavilions for games until the very end. There you will see a rise - this is the "Spacewalk" only from the other side. Climb all the way up and turn your head to the right. Hidden on the wall is an image of Mr. Cap with the letter "R".

Find the hidden images of Mister Cap in Dry Gorge
Hidden in the sector of the Dry Gorge Park are two images of Mister Cap. The first image is located near Scout Protectron's paddock with Buttercups robopony and Doc Phosphate's Saloon (read the walkthrough). It is painted on one of the gravestones of the cemetery, and the letter "E" is hidden on it.

The second image is located in the Mad Mulligan Mine, where you will go during the quest Showdown in the Dry Gorge. It is painted on a small iron booth that you will pass by. Let the small waterfall next to it serve as a guide for you. There is an "H" hidden in Mr. Cap's image.

Find hidden pictures of Mister Cap in Safari
Locations to explore:
- Dry Gorge:
- Doka Phosphate Saloon
- Theater "Dry Gorge"
- Mad Mulligan Mine
The Dry Gorge sector in the Yader-Mir park is located northwest of the Yader-Town. The Big Tour quest will lead you there, in which you need to capture the entire park and distribute it among the gangs. This zone has two entrances, and as soon as you enter one of them, you will automatically activate the current quest.
Explore the "Dry Gorge"
From the very first steps in the "Dry Gorge" you will be attacked by bloodworms, this place is directly teeming with them. They are not very dangerous, but appear from the ground quite unexpectedly, which is sometimes slightly annoying.
Look around the park sector, you may be able to find a way to get rid of them. And here is the first source of information - the protectron Sheriff-hawk or Sheriff-eagle. One of them, depending on the entrance from which you entered, will greet you at the Dry Gorge. Talk to him and ask about pests. The sheriff only knows about the gang that made their lair in the Mad Mulligan mine, most likely they are bloodworms. Therefore, he invites you to become his assistant and help him deal with the gang.

Charisma
You can ask the Hawk Sheriff or the Eagle Sheriff what's going on in Dry Gulch (Easy Persuasion). But even if the persuasion works, you won't get any valuable information. Alas.
Agree to help the sheriff. The door to the Mad Mulligan's mine is locked, but in a safe near the theater, the Sheriff keeps a spare key. But that's not the problem - he forgot the cipher! Therefore, you need to talk to three of his cowboy Protectron friends: Doc Phosphate, One-Eyed Ike, and Scout to recover the cipher. Each of them will tell you their part of the cipher, but you will first have to prove to them that you can handle the bandits.
Collect pieces of the cipher from the safe
Charisma
Invite Doc Phosphate, One-Eyed Ike and Scout to skip the task (the level of persuasion is difficult).
You will meet the one-eyed Hayk first, if you meet the Eagle Sheriff at the entrance, just go straight down the street and stumble upon him. He is a real cowboy and offers to test your skills in a duel.

Win a Gunfight (Optional)
The rules of a cowboy duel are simple: go outside and on the count of "Three" shoot first at One-Eyed Ike. To do this, he will give you a Cowboy Revolver. Select it in the "Weapons" tab, and then shoot at the count of "Three" at the slow cowboy Protectron. For the victory, you will receive some cartridges for a new revolver and the first part of the cipher from the safe.

Next you will meet Doc Phosphate in Doc Phosphate's Saloon behind the counter. This Saloon is at the end of the street, not far from One-Eyed Ike. Doc Phosphate will give you "Wild Yader-Cola" and instruct you to serve customers, since "Dry Gorge" is famous for its hospitality. You need to deliver three orders of drinks.

Serve drinks (Optional)
Prospector Owen is waiting on the second floor of the Saloon, and two other customers are in town: Miss Trixie is in the first building on the right, and Assistant Hank is in one of the buildings on the left if you go down the street from the Saloon. To serve them drinks, simply walk up to the table and press the appropriate key (E). By the way, the drink can be immediately taken back.
Talk to Doc Phosphate (Optional)
Return to the Saloon to Doc and inform him that the task is completed, you can also mention that all customers have long turned into skeletons. In gratitude, you will receive 6 more bottles of Wild Yader-Cola and the second part of the cipher from the safe. Don't leave the Dock Phosphate Saloon until you've thoroughly inspected it. On the counter you will find an ammo box, behind the counter on the wall is a first aid kit, and under the counter is a roll of 850 Yader-Arcade tickets, which you will need to get the Nuka-World achievement "Useful Prizes". Full list Nuka-World and Fallout 4 add-on achievements you can find.
Scout can be found near an empty paddock, not far from Phosphate Dock Saloon and stalls with Nuka-Mixing machines. His Buttercups ran away somewhere. You need to hunt them down and bring them back to the paddock. The scout claims that they are very fond of Yader-Cola, so he suggests looking at the stalls with it.

Take Buttercup to the corral (Optional)
Buttercups are robot ponies. You will actually find one of them near the kiosks with Yader-Cola. Go to the tables next to the Nuka-Mixing machines and look in the trash can. His yellow robobutt sticks out from there. Pick it up and then go back to the paddock and throw it out of your inventory. To do this, go to your Pip-Boy in the "Pre" section, then select the "Junk" tab, find the line - Buttercup Robopony and press R to throw it away. Then return to the Scout and get the third part of the cipher from him.

Near the paddock, you probably noticed an old cemetery, there, on one of the tombstones, is hidden the image of Mr. Cap, which is necessary for the quest "Cap in a Haystack".
Find the key to Mad Mulligan's Mine
You have successfully obtained all three pieces of the cipher from the safe in the Dry Gorge. Now you need to take the key to the "Mad Mulligan Mine" from it. The safe is located in the Dry Gorge Theater, it is located near the collapsed cabins of the attraction, not far from the Nuclear-Mixing Machines on one side and from one of the entrances to the sector on the other. An anthill has formed inside, so beware of ants attacking.

The safe is in a large barn near the windmill. Open it with the cipher and take the key to the Mad Mulligan Mine from it. On the territory of the theater, near the audience seats, there is a small building for employees. Pick the lock on the door (the level of the lock is hard). Inside you will find the Recipe "Nuclear Dawn". This new type of Nuka-Cola can then be made in the Nuka-Mixer, bringing you one step closer to completing the Nuka-World Beverage Designer achievement. You can see the entire list of Nuka-World and Fallout 4 add-on achievements. In addition to the recipe, this service room contains a chest with various useful supplies and a roll with 850 Yader-Arcade tickets, which are required for another achievement - Useful Prizes.

Enter Mad Mulligan Mine
On your way from the Dry Gorge Theater to Mad Mulligan's Mine, take a peek at the rows of enclosed pavilions located near the Scout paddock and cemetery. There you will find a Star Core near the corpses of merchants, which is necessary for the Star Dispatcher quest in the Galaxy zone.

Mad Mulligan's Mine is located on the opposite side of the park from the theatre. A high tower, which stands just near the entrance to the Mine, can serve as a guide for you.
Locations to explore:
- Safari
- "Safari" - House of primates
- Visitor Center
- "Evil Anaconda"
- Bear Den
- "Safari" - House of reptiles
- Mr. Cap's treehouse
The Safari Park area is located north of Yader Town, USA. You need to capture this sector on the instructions of the Big Tour quest and then assign a gang of raiders who will be responsible for it. The current quest is activated automatically when you approach the Safari and see a fight between a man named Cyto and a strange creature - a crocodile claw (1). In the bus standing near the entrance you will find two boxes with explosives.
Note: On the instructions of the current quest, you will need to destroy all the crocodile claws in the Safari territory, of which there are only 21 individuals. Therefore, next to the killed crocodile claws, their serial number is written in brackets.
Find out where crocodile claws came from
We should find out what kind of strange creatures are in this zoo and where they came from. They will have to be destroyed in order to capture the territory of the sector. Talk to Cyto, the post-apocalyptic Mowgli, to see if he knows.

Cyto speaks like a caveman, but you can understand him. Safari is infested with crocodile claws, according to Zito, and no matter how much he kills them, they always come back. He doesn't know where they came from, but he has something that can help you kill monsters. And Zito asks to do this so that nothing threatens his family.
Follow Cyto

Follow Zito through the Safari. He will lead you to the "House of Primates" and part-time his house. Near the Primate House, beware of the crocodile claw (2).

Zito was raised by gorillas who saved him as a child after the death of his real parents. He will tell you that a wounded old man came to their house, whom Zito tried to help. The wrinkled man said that he created the monsters and gave Cyto a holotape that could help deal with the crocodile claws.
Listen to Dr. McDermott's holotape
The diary of Dr. McDermot turned out to be on the holotape, listen to it. To do this, go to Pip-Boy in the "Prev" section, and then in the "Miscellaneous" tab, and find the line "Dr. McDermot's Diary, Entry 47B".
Dr. McDermot worked in the replication department, simply in the cloning department, and with the help of a replicator he created crocodile claws - creatures that are ferocious and uncontrollable. The replicator has failed and is producing them at a high rate. The Doctor implores whoever is listening to this tape to turn off the replicator and destroy the crocodile claws. To do this, you need to find his password or Dr. Hein's password.
Talk to Cyto
Ask Cyto if he knows where the cloning department is located. But he didn't even hear those words, but Zito saw Dr. McDermott come out of the triangular house. Most likely the department is located there - you should check. Cyto offers his help, so he will become your temporary companion. Fear not, your constant companion is here to stay. And if you want to assemble a Dream team, then try your luck and use your charisma. If the persuasion works, then a hefty gorilla named Chris will also join your team.
Charisma
Ask Cyto if the gorillas will help you in destroying the crocodile claws (the level of persuasion is difficult).
At the exit from the Primate House, go through the vegetable fence on the left to be behind the gorilla statue. There you will find a hidden image of Mr. Lid, which must be found for the quest "Lid in a Haystack". True, you can read the cipher on it only in the special glasses of Mr. Cap.


Enter the large triangular house
The large triangular house is the Visitor Center, which is located directly opposite the entrance to the Safari Park area. Just go back to where you came from.

Examine the triangular building and find the entrance to the cloning department
Inside the Visitor Center, you will have a fight with another crocodile claw (3). Kill him, and then take a good look around in the reception room. On the desk near the reception center terminal you will find the recipe for Yader-Onslaught, which will add to your collection of new types of Yader-Cola. You will be one step closer to earning the Nuka-World Beverage Designer achievement. About all Fallout achievements 4 and Nuka-World additions you can find in a separate article.

At the end of the room you will see a door with a service terminal hanging nearby - this is the entrance to the cloning department.
Examine the terminal at the door
After examining the terminal, you will understand that to open the door on this moment is impossible, and you will also find a ransom demand from the ODHA (Society of Friends and Defenders of Animals) who kidnapped Dr. Hayne. Of course, this happened before the war, but Dr. Hein's password is needed to open the door, so it's worth finding it. They kept him in the place where the Evil Anaconda was being built.
Find out if Zito knows anything about the Evil Anaconda
Talk to Cyto about a place called "Evil Anaconda". According to him, this is a big attraction, which they began to build on a hill, behind the zoo. Most likely what's left of Dr. Hayne is there, which means his password too.

Reach the Giant Metallic Snake
To get to the giant metal snake, as Cito called the Evil Anaconda attraction, you need to go deeper into the Safari Park area, cross one of the bridges over the stream. Not far from the "House of Reptiles" in the gap between the high walls you will see the construction site of the "Angry Anaconda" attraction. To get there, go down into the stream and walk to its end, then go up the hill.

Search the giant metal snake for Dr. Hein's password.
Three crocodile claws (4-6) live on the territory of the Evil Anaconda, which you will have to deal with before you go in search of Dr. Hayne. There are metal booths on the construction site, in one of them you will find the password. At night, the desired booth will be illuminated by spotlights. Also, a working generator with a nuclear block for power armor, located a few meters from the desired booth, can serve as a guide for you.

The sliding doors of the booth are locked (the level of the lock is difficult). You can pick the lock or go up to the roof and take the key in the green ODZZH bag lying near the skeleton. Inside, you'll find Dr. Hayne's skeleton and his password, which is in a red toolbox.

Sneak into the cloning department
Return to the Visitor Center to the service terminal near the entrance to the cloning department. Select the line "Open the door to the Yader-Gen replication department" in the terminal and welcome to the secret cloning department.
Disable the failed cloning machine
Going down the stairs to the Replication Department, beware of being attacked by one Crocodile Claw (7) in the Department Office and two more (8-9), including the Albino Crocodile Claw Boss, on the lower level of the Cloning Department, where the Nuka-Gen replicator terminal is located.

After you kill the creatures, use the terminal to turn off the replicator. To do this, select the line "Disable the current replication procedure".
You can learn about the "Camp of Hubologists" from the terminal of the Adepts or accidentally come across while walking around the "Yader-Mir". First we talk with Dara, she is the main one among the Hubologists. During the conversation with her, we learn that during the years of the great war, the talented writer Dick Hubbell discovered a method that allows expanding the boundaries of consciousness. With the help of the alignment procedure, he was able to unleash extraordinary mental abilities in his followers. Our interlocutor is a direct descendant and keeper of all his secrets, collectively referred to as hubology. Dara offers to join their ranks, according to her assurances, with them we will find inner peace and happiness, they will help us discover the stunning power of the mind.
An easy way to part with lids...
To go through the Alignment procedure, you need to contact Phil. The survivor is tied to a chair and pumped up nervous system zeta radiation to destroy some of the neurons. Only with the help of high charisma can one be persuaded to go through the first and second leveling for free. After the first leveling, they give the Hubologists' attire and get the name Nick-1, which means - Tuned Wheel Finder. The first stage of a long journey. Each time there will be more radiation during the procedure (as well as the price), so we put our health in order in advance. We learn from Phil that the founder of the Great Hub - long ago came into contact with the Star Father, who lives on the planet Quetzal in the distant constellation Zif. It was he who taught the Great Hub how to align. To find out the plan of the Great Hub, you need to get Nick-6. The Great Hub persuaded the Star Father to allow the righteous to move to the planet Quetzal. Hubologists must prove their allegiance by constantly battling the influence of neurons and suppressors. On a spaceship, they are going to go to the planet Quetzal. The star father informed the Great Hub of the coordinates of the planet. To get Nick-7, we give a total of 8400 caps, and Dara shares with us a plan for the future - having gained knowledge on the planet Quetzal, the Hubologists must return to earth and rule people like the ancient gods. To get NIK-8 Dara requires 10000 caps - n this gift will not reveal anything supernatural to us and we will not know the truth.

Dara offers us a job, we need to find spacesuits, in the amount of five pieces. As a reward, she promises 200 caps, but with the help of high charisma, you can get as many as 350.
According to rumors, there are spacesuits in Yader-Mir, in the Galaxy zone. That's where we're going.
Note
Inside the former diner, and now the home of the Khabolgs, on the table is the recipe for Yader-Frutti.

Arriving in the Galaxy zone, the Star Dispatcher quest is activated in parallel. We search the territory in search of spacesuits. Many strong enemies await us in the location: Robo-eyes, Protectrons, Nukatrons-Guardians and a new kind of robots Novatron and Mr. Penka - the latter attacks with radiation.


Note
In the location "Starlight Cinema" on the stand for books there is a recipe for "Nuclear Breeze".
We remove space suits from animatronic models of astronauts in the location "Volt-Tec: Among the Stars". You will have to search the entire huge building, along the way collecting the stellar cores necessary for the Star Dispatcher quest.


We return to the "Camp of Hubologists" and give the suits to the quest giver.

Dara accepts the costumes and reveals that they need them to capture spaceship standing nearby in a landfill. Now you can move on to the next phase of the plan - the girl is counting on our help to capture the starship. If successful, Dara promises one of the Hubology's greatest treasures as a reward and believes that they will be able to ascend on this ship.

We are leading the Hubologists to storm the Yader-Mir dump, to recapture the ship.
Note
You can choose several options: go with everyone together, give a signal or figure it out alone.

At the junkyard, the Survivor and the Hubologists are attacked by: Mr. Penka, Mole Rats, Nukatron Guardian, Cave Crickets, the most powerful of the enemies is the Security Robot.

Note
In the cave, in the bear's mouth, there is a nuclear block.

We get to the spaceship and listen to the laudatory feedback from Dara to us, that the victory would have been impossible without our participation.

As a reward, we get a weapon that once belonged to the Great Hub itself - the Alien Blaster.

But the mission has not yet been completed, it is not enough to capture the ship, you need to launch a starship that will take them to a new home. For work, we are promised ammunition for the weapons of the Hub. The starship must be turned on with the help of three nuclear blocks and an energy distributor installed - it is located near the dump in a two-story building.
Note
If you install not three, but four nuclear units in a spaceship, then the Khabalogs will perish!

Thanks to us, the plan of the Great Father comes true, and Dara hands over the promised ammunition as a token of gratitude. On your next visit, the Hubologist camp will be empty. The scam with Align worked, and the gang-watering can "flew" to another place with our covers, in search of new potential victims :) Or maybe they did fly away?


